Dynamic Splitting Techniques: Switching Your Axe to the Horizontal
Dynamic splitting techniques might seem a bit esoteric. And if you always split on a block in your yard, you will never need the techniques featured in this piece. But on a remote backcountry trip, or wilderness expedition, like a summer canoe journey or a winter snow walk, you won’t have a chopping block unless you camp where someone has left one. Yet if you are using fire for boiling water, cooking, or warmth, you may well have to split wood.
It’s never a good idea to split directly onto soil, as it contains small stones and smaller particles of grit. Solid rock in camping spots, such as in the Canadian Shield country, is even more potentially damaging to axe bits.
Snow presents almost the opposite problem, in that you have no solid surface onto which to work. Once you make a trampled snow platform, even if it has a good crust, placing a round of wood on it and hitting it with an axe will cause the wood to break through the platform quickly.
In this article, I will explain and demonstrate a set of dynamic splitting techniques that allow you to process wood even when you don’t have a chopping block. Further down the page, you’ll also find an embedded video where I walk through the methods in detail, showing both the “between-the-legs” and “side-swing” approaches, along with the key safety considerations to keep in mind.


Switching to Horizontal Axe Strokes
If you can’t work vertically because the surface upon which you are operating is too hard or too soft, then working horizontally can provide the solution. You’ll need a couple of extra techniques. You should bear in mind, right from the outset, that these techniques are dynamic; indeed, they only work if the axe is moving at speed. Your safety, as well as the safety of others around you, requires you to adhere strictly to the safety points outlined here.
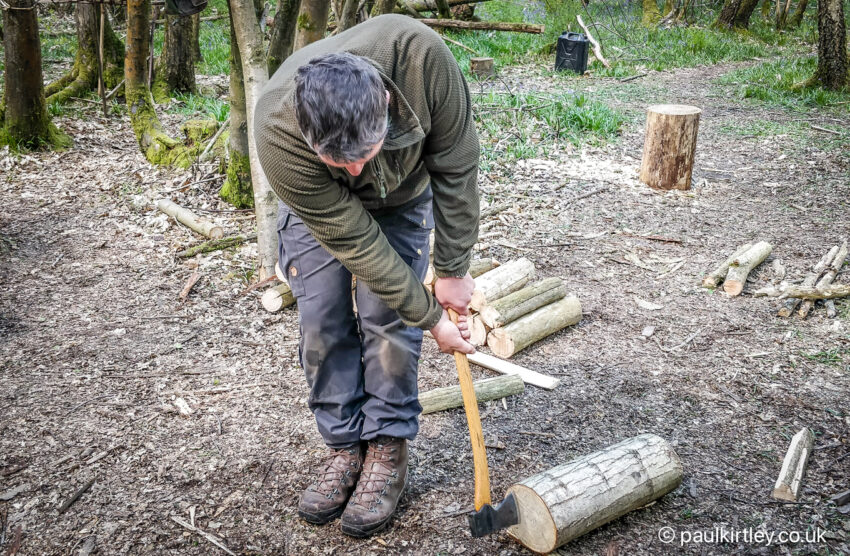
Between-the-Legs Axe Technique
The between-the-legs technique is a dynamic splitting technique for the half-axe. Longer axes are too long and hatchets are too short. The idea is that the round of wood you want to split is placed on the snow, rock or ground, close to horizontal; then the front surface of the round is struck with the axe, sharply and with speed. While the idea is straightforward, there are a couple of essential details to consider.
The front surface (the surface you will strike with the axe) should be raised very slightly, using a small piece of wood. Raising the log’s front face has several benefits. First, it raises your target off the ground, which means you are less likely to clip the ground or rock with the toe of the axe bit. Second, the lower edge of the rear surface of the log gains some purchase on the snow, rock or ground, reducing its ability to move easily. On snow, you can achieve a slight angle to the horizontal by placing the rear face of the round of wood into a depression in the snow.

Key safety points:
- Find a safe area, away from where other people in your camp are operating. Make sure your companions are aware of what you are doing and tell them to stay away from you, especially to avoid moving around in the vicinity directly in front of or behind you. Once you have your head down to swing the axe, it’s unlikely you will see anyone approaching. Tell people not to try to collect the firewood you are splitting until you have stopped swinging the axe and said it is OK to approach.
- Foot positioning is crucial: Place the round of wood where you plan to strike it with the axe. Then, position your feet so your heels are no further back than the front edge of the round. Positioning your feet this way ensures the axe is already past your legs if you miss the wood or if the axe deflects from, or through, the wood at an unexpected angle. That is, ensure the follow-through is not your foot, ankle, or shin.
- Think about what you want to hit, not what you want to avoid. You want to hit the wood, not your feet. As you ride a bicycle down an otherwise flat street, if you focus on the one pothole, you’ll tend towards it, rather than away from it. Focus on where you want to go, not what you want to avoid. Likewise, here, with the axe, think about what you want to hit.
- Do not let go of the axe. This point may seem obvious, but it sometimes happens nonetheless. Contrary to what many think, letting go of the axe will not send it flying a long distance behind you. Instead, your grip tends to weaken towards the end of the stroke, when the axe is on an upwards arc. If you let go of the axe, it will tend to go upwards and be spinning above you or closely behind. You should be mindful of the reduction in sensitivity and dexterity that even thin leather gloves can bring. Don’t attempt this technique with gloves that do not provide a good grip on the axe handle, such as wool or synthetic material gloves with a non-grippy palm.
- Do not partially let go of the axe. In a way, partially letting go of the axe is actually worse than fully letting go. While you might injure yourself if you let go, you will definitely injure yourself if you partially let go in the way I describe below. I have never done this, but I have seen a photograph of an example of the result. The individual, with just a few fingers on the axe handle, suffered a deep cut on their lower back, near the spine. The axe swung upwards, using their fingers as the pivot point.
- Remove any lanyard that may be attached to the axe. A lanyard attaching the axe to your arm is a liability. You absolutely do not want a sharp three-dimensional pendulum attached to the end of your arm, flailing unpredictably between your legs.
So, given the above safety concerns, why bother with this technique at all? Well, necessity. As described, there are some situations where you have no block. Plus, it’s a beautifully efficient technique when used in the right circumstances and executed correctly.

Your grip should be two-handed. As to which hand is top and which is bottom, this is a matter of personal choice. Most people initially opt for their non-dominant hand to be nearest the swell of the handle (the guide hand) and their dominant hand above it, which is how you naturally hold an axe with two hands. Yet, for some people, this technique is preferred with the opposite arrangement, where their dominant hand guides. Either way, go through the motions gently at first and see which one feels most comfortable for you. That’s the one to choose.

The Side Swing Technique
Like the hand of a clock on the wall, as the axe moves further away from the 6 o’clock position of the between-the-legs technique, it gets higher off the ground. Hence, you can achieve the ground clearance you need for longer axes by swinging the axe to the side of your legs, rather than between.

The question then becomes which side? Most people will naturally hold their non-dominant hand closest to the swell and their dominant hand above this, nearer the head. This hand positioning means swinging the axe to the side of the non-dominant hand is the correct approach. As with other two-handed techniques, though, some find it more natural to swing the axe to the other side with their hands switched. Either way, swing the axe to the side of the hand that is closest to the end of the handle.
Place the round of wood on the surface you are working on, whether it is soil, snow, or rock. Raise the front edge as before. You will then need to size up how far away from the log to stand, so the axe is the correct distance off the ground to hit the wood where you want to strike it and start the split. Make sure your heels are no further back than the front face of the log. Once you have measured up and are in position, raise the axe and swing swiftly and crisply.
Key safety points:
The safety points for the side swing technique largely echo those of the between-the-legs technique. In particular, ensure you have a safe area and your companions are aware to stay clear. If you accidentally let go of the axe during this technique, it will tend to go further away from you than it would in the between-the-legs technique. So make sure the area behind you is clear.
It’s easier to keep hold of the axe here because your legs don’t impede your arms towards the end of the swing like they can with the earlier technique. Here, your arms can follow through with the axe. Don’t turn this into a golf swing, though. You don’t want to be swinging your axe around behind your head and back.
Before you swing, remember to position yourself ahead of the front face of the log, so that it is physically impossible for any follow-through of the axe swing to be towards your legs.
Watch: Dynamic Splitting Techniques Demonstration Video
Dynamic Axe Splitting Techniques – Some Key Pointers
Here are some tips to help you succeed with the above dynamic techniques…
As with much of bushcraft, selecting the right materials makes all the difference. These techniques are most effective on wood that is relatively straight-grained and has a low knot count. If there are predictable knots in the wood you are processing, such as the regularly spaced rings of knots found in pines, then saw the wood so that the ring of knots is at one end of the round of wood, rather than in the middle. Then, initially attack the round from the opposite end to where the knots are.
These dynamic splitting techniques depend on the inertia of the wood. This passive physical property, an object’s tendency to resist its state of rest, is why the axe needs to move swiftly. The axe will have penetrated the round, initiating the split, before the wood has had a chance to accelerate away from the blow. These techniques work more effectively on heavier pieces of wood. If the wood is light, it will accelerate quickly.
The longer the piece of wood, the more difficult it becomes to get the split to run all the way along the piece. If you want a simple rule, I suggest keeping wood lengths under 60cm (24″). Longer pieces make your work harder. It’s easier to saw shorter and split more.
These techniques become trickier the smaller the target area at the end of the round of wood. Lower inertia is part of the story, as the thinner the piece of wood, the lower its inertia. A smaller target also means greater accuracy with your axe strike.
But, with practice, you can build up a high degree of accuracy with an axe for these techniques. And with some species of wood, you can almost merely flick the axe and the wood will split.
Equally, though, time and energy are critical resources, particularly while making a wilderness journey. If you can pick the rounds up in one hand, then I would move to the hand-splitting technique.
Aim to hit the piece of wood in the upper half, rather than across the middle. You want the split to move down through the piece as well as back through it. Better to start the split on the outside than in the middle. With smaller pieces of wood, this may mean clipping the wood with part of the axe’s cutting edge, rather than its full extent.
If the wood does not split the first time, remove the axe if necessary, reset the piece of wood in position, and then try again, hitting in line with the axe mark you have already made. If the piece doesn’t split all the way through, turn the wood around. Then, attack it from the other end. Aim to hit the face in line with the partial split, so the two meet.
A Useful Addition to Your Backcountry Axe Repertoire
Mastering these dynamic splitting techniques adds real versatility to your axe work. No matter if you’re on rock, snow, or lack a chopping block, knowing how to switch to horizontal strikes helps you process wood safely and efficiently. These techniques also protect the edge of your axe. As always, accuracy and awareness matter as much as power, so take the time to practise in controlled conditions before relying on these methods in the backcountry.
Want to Learn More?
My Wilderness Axe Skills & Campcraft Book
Buy a signed copy of Wilderness Axe Skills and Campcraft at wildernessaxeskills.com
Edge Essentials Online Training
A sharp edge makes every task with a knife or axe safer, easier, and more effective. Yet many people struggle to maintain their tools properly, often putting off sharpening until the edge is already dull. In my Edge Essentials training, I take you step by step through the fundamentals of sharpening and edge care, from bushcraft knives to axes and even specialist tools like spoon knives.
The lessons are clear, practical, and designed to give you confidence. With these skills, you’ll know not just how to restore a keen edge, but also how to keep it sharp in the field with minimal kit. If you rely on edged tools outdoors, this inexpensive, accessible training will quickly pay for itself in greater efficiency, higher quality bushcraft, and confidence in your most important tools.
Click here for full details of Edge Essentials and start honing your sharpening skills today.
Related Axe Material on this Website
Axe Safety In Camp: Care, Attention And Good Habits
Essential Axe Techniques for Backcountry Firewood Splitting
Tree Felling For Winter Firewood: Axe and Saw
Ambidextrous Axe Use for Bucking Logs: How Switching Hands Improves Efficiency
2 thoughts on “Dynamic Splitting Techniques: Switching Your Axe to the Horizontal”
Hi Paul
Just a short anecdote about me employing this technique:
I tried showing this technique during a demo of sawing wood which is under different sorts of compression, as the generated pieces of wood where the perfect size to feed in a stove. Some people, one of which the instructor, where splitting wood by trying to balance the piece on a round piece of stem.
Now, the instructor, someone really experienced in the field of logging, got really upset when he saw what I was about to do, saying that I was freaking crazy by swinging the axe between my legs. After a few succesful splits he still didn’t see the valur of this beautiful technique, which is a shame really.
It even made me kind of secondgues his expertise in his field, as he is perhaps also dogmatic about other techniques…
😉
Greetings!
Ruud
Hi Paul.
Very thorough and safe description if anyone really needs to use this method. I have used it in winter after seeing you do it on our course. However, as one from Northern Ontario, where Pre-Cambrian Rock is predominant, my parents, and all the elders I grew up around, used wood to fuel their stoves in winter, back in the 1960’s and 70’s. The wood was cut with saws to length, and we always, always made a chopping block out of the largest diameter log section. No one chopped without a chopping block. We are scolded if we split on the ground alone, and told to use the block. In fact, everyone had a favourite chopping block set aside for a few years exactly for that purpose, and it was never chopped up unless it was worn and cupped on both rides, and unstable from wear. It’s never too cumbersome to not have a chopping block, and if your fuel wood is a small diameter, it can be set against a perpendicular log on the ground to be split with an axe.
I don’t mean to burst anyone’s bubble, but, we’ve had no need to chop without a chopping block. The chopping block was devised from experience by the elders who consistently did this stuff year-round out of necessity to fuel their homes.