How To Make An Improvised Candle Holder

During the shorter days of the year, evenings in camp are longer and darker.
Illumination becomes more important.
Candles give off a soft, natural light and are relatively inexpensive.
To get the best out of candles, however, it’s good to have them raised up off the ground.
Making a candle-holder from natural materials is relatively simple.
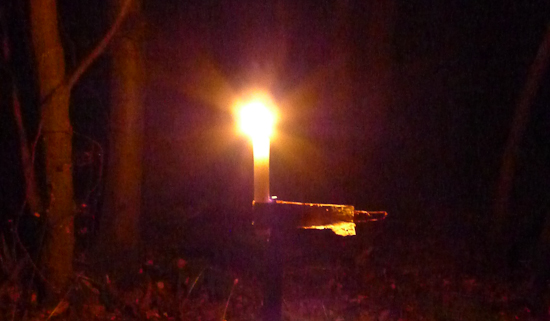
This style of candle-holder both holds the candle steady and raises it up off the ground.
Also, if you are looking for bushcraft projects for young people, this is a good one.
Making an improvised candle holder provides the opportunity to learn about the properties of some common natural materials as well as exercising some basic knife skills.
What You Will Need to Make a Candle Holder
- a household candle
- a strip of birch bark
- a straight stick about 2.5cm/1 inch in diameter

Please note: strips of birch bark such as needed for this project should not be removed from live trees. It damages the tree (potentially killing it), leaves it open to infection and is unsightly.
Birch bark is well preserved by the oils it contains and will be in good condition on dead, fallen trees long after they have hit the ground. Take your bark from dead tree trunks lying on the ground. It’s easier to collect anyway.
The choice of wood for the stick is not critical. It is better if it is green as opposed to dead as the split (see below) is easier to create. In the example in the photos I used hazel. Sweet chestnut also works well.
Carving The Stick
The length of the stick determines how high the candle will be off the ground. So, first of all it should be sawed to the required length. I typically make them around 60-70cm (24-28 inches) long. This height gives a good ambient light and a good light for reading if you are sitting on the ground.
The candle holder will be inserted into the ground, so it must have a sharp point. This is the next job. Use a knife to point the stick. The basic forehand grip and cutting strokes away from the body are all that are required.


The candle will be held at the opposite end of the stick to the point. You must shape this opposite end so that it can be split easily and accept the birch bark.
Gradually slim down the last 7-8cm (3 inches) of the stick creating a broad face. Stop short of the centre of the stick though.

Then do the same on the opposite face, leaving about 5mm (0.25 inch) thickness remaining at the end.

Splitting The Stick
There is a right way and a wrong way to split a stick. I’m not even going to show the wrong way lest it put ideas into your head! Below is the right (i.e. safe) way to do it. Particularly for inexperienced knife users, this is the only method which should be permitted.
Work onto a surface. Place the thinned-down end of the stick over a log. Place the tip of the knife in the centre of one of the flattened faces about 1-2cm (0.5-1.0 inches) from the end of the stick. Keep hold of the stick and make sure that pressure on the flattened end will not cause the stick (and knife) to skip towards you. Press the tip into the wood with firmness but control. This should create a controlled split in the stick. Give it a bit of a wiggle if necessary to prise the fibres in the wood apart.

Now the split needs to be opened out a little. Again using the tip of the knife, and working away from yourself, shave away the inner surfaces of the split along the last 2.5cm (1 inch) of the split; create an opening a little bigger than twice the thickness of the birch bark you have collected.

Attaching The Candle
The strip of birch bark you have collected is what fastens the candle to the stick. It’s a versatile yet secure way of making this attachment. It can easily be adjusted to securely hold different sizes of candle.
The first thing to do is double the bark over into a loop.

Then feed the birch bark loop down into the widened split at the end of the stick.

Keep working the birch bark down into the narrower part of the split until the bark is completely within the split and the bark is held securely. Then insert the candle into the loop. All you need to do now is adjust the loop size so it holds the candle securely against the flat face at the end of the stick. Using your thumb to push against the opposite face helps pull the bark through the split.


That’s it. All you need to do now is push the stick into the ground and light the candle when you need it.

Related Articles on Paul Kirtley’s Blog:
Bushcraft Knife Safety For Children
21 thoughts on “How To Make An Improvised Candle Holder”
Thanks for this Paul. It will help illuminate St. Andrews night for my we sojourn in the woods tonight.
If the BBC did a show called Top Of The Blogs this would surely be in this weeks top 10.
Windy.
Hi Windy,
Thanks for your praise. Have a braw evening in the woods and wee dram for me 🙂
Cheers,
Paul
Simple but effective! I will have a go at this when I go for my winter camp in a couple of weeks!
Nice to see a new article on here! Always look forward to reading them.
All the best.
Lee
Hi Lee,
Nice to hear from you – you’re right, it’s been a while 🙂
Let me know how you get on with making use of this idea.
All the best,
Paul
Paul first of all have a merry Christmas and a happy new year. This article is simple and brilliant. Want to go out again and just try it out. Where are the candles …….(annoying my wife now..;-) ).
Hi Rody,
Wishing you a very merry Christmas and happy New Year to you too my friend.
Thanks for your feedback on the article. I hope you found your candles! 🙂
All the best,
Paul
Very good Paul, its true, the simple way is very often the best way!
Thanks for the tip.
I would like to take this chance to wish you and yours a very happy Yule!
All the best for the new year.
Chris.
Hi Chris,
Thank you – and the same to you and yours. I hope you have a wonderful festive season 🙂
Warm regards,
Paul
First off, many thanks for agreeing to write some stuff for Scouting magazine, it really helps to put the out in scout. I’ve got the Feb/ Mar issue off so thanks for stepping up to the plate with that one too!
Good point about the flammability of Birch bark, I’ve used tea lights to make these and found that the radius helps keep the flame away from the bark. They are also small enough to double up the bark in a figure-of-eight shape to hold two but I’ve never tried it with candles.
My pleasure Austin. Good idea with the tea-lights. I’ve not tried the figure-8 configuration but I can imaging it will work very well.
I have a couple of other candle tricks up my sleeve so will likely share them too. One of them will be in the Feb/Mar issue of Get Active.
Enjoy your time off!
Cheers,
Paul
Another good one Paul, i saw this in the Scouting Magazine. thank you for agreeing to publish articles there.
This is a great thing to do with my scouts and I guess we will be making a few on our next camp. I guess we will also try to find a way to add a windshield, or these will suffer in a breeze.
My pleasure. I’m very happy to be able to contribute to the Scout Association’s publications. I’m glad you agree it’s a good project for your Scouts.
Yes, they do suffer if exposed directly to a breeze – it causes the candles to burn down more quickly if nothing else – but I generally try to find sheltered camping spots, where I don’t have to be exposed to the breeze either 🙂
If you do find it breezy in camp, then you can position the candle holders in the lee of larger trees to shield them.
Also, you can use plastic drinks bottles to make a transparent cover for them. This is a neat solution if you find discarded bottles (i.e. litter) or have used bottles in camp and would otherwise dispose of them. I don’t advocate taking the bottles specifically for this purpose.
Have fun experimenting with this idea.
All the best,
Paul
A nice simple method.
I will try it out the next time I’m in the woods.
Hi again Adam,
Glad you like this one. Please let me know how you get on with it.
Warm regards,
Paul
It’s a very simple and functional design. I think it’s very practical^^
Hi Paul very informative and very simple.
Do you use parrafin lamps on your trips. If so do you have a recommended type/make and what makes it so.
Enjoying the articles
Steve M
That’s a nice idea for longer camps or if you use the camp several times.
I normally just hit a stick in the ground and glue the candle with hot wax on top of the stick. You need a flat surface on top – normally you just saw it flat – than you let the wax dripping on the top of the stick. Before you glue the candle on top you heat the lower part of the candle untill it starts to melt, than you press the candle on the stick.
Next day you can use the stick as a fire starter. If you plan to leave the place next morning without a fire you burn the candle holder before you sleep. So you do not leave the wax in the nature, where it doesn’t belong to.
With that technique you don’t have to cut in living wood. On a dead and dry stick the wax glues better.
I normally do not like to use green wood, if it isn’t neccessary, especially if i set up my camp every evening somewhere else.
But for a long staying camp Paul’s construction seems to be better, because the candle is better fixed. Glued candles can fall down, if you hit against the candle holder.
As a windshield i sometimes cut away the bottom of a plastic bottle and put it upside down over the stick or candle, that’s a question of the diameters.
You also can cut away the top of the bottle and glue the candle directly inside on the bottom of the plastic bottle. Some water inside makes it stabile and windproof and secures against setting the bottle and every thing else in fire. But that is more a camping trick for a light on a table than a propper bushcraft stile. With my girlfriend on a camping ground i use this. With a scout patrol i would not use plastic rubbish. Young people should be trained and educated in a stile next to the “knife only” way, i think. Part of this education should be to use candles behind hedges , bushes or lean to constructions.
German scouts normally use their torches only in cases of emergency or to look on the map at night hikes. Part of the education should be to set up the camp and to light a fire before it becomes dark. Even the candle isn’t the pure stile, but for cooking or looking in songbooks that can be allowed, as an exception. Of course it is sensible to learn to live in the woods without candles and torches.
Marcus
Hi Paul,
Many thanks once again for supplying another great article, not an “if you don’t do this you’ll die” article, but a useful tips article, reducing the packing list to a handful of candles, from, lamp, batteries, gas bottle, hanging frame, a simple idea that is quick to put into action.
Once again many thanks Paul.
Nige.
Such incredible advice from so many awesome sources! I love it!
Alway a pleasure reading any advice, tricks or tip for on your wisdom, and hilts many of your posts relate to the Northern Hemisphere, they are as relevant in principle down under here in Aus,
Beautifully written and easy to grasp! Catch you up hen your next in Oz
Rick j Petersen
Hi Rick,
It’s good to hear from you. I’m glad much of this material is proving useful to you down under too. As you rightly point out, the principles of much of bushcraft can be transferred to different materials in different locales.
I’m look forward to the next time I can make it to Aus. It’ll be good to meet you and some others from the bushcraft community down there.
Warm regards,
Paul