Lighting A Fire With Feathersticks
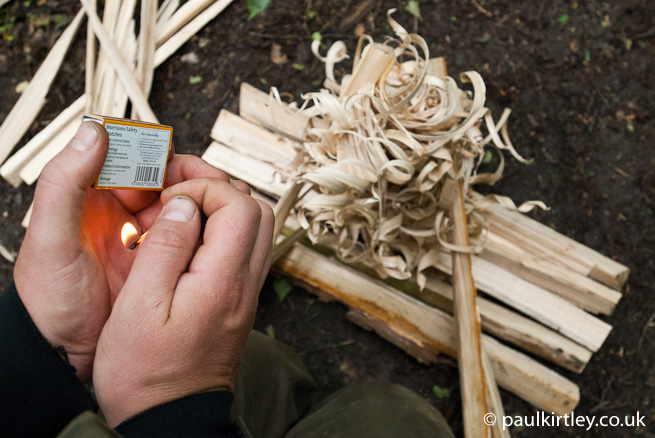
As with any fire lighting exercise, starting a fire with feathersticks can go one of two ways – it either works or it doesn’t. You end up with an established fire or you don’t.
Nature doesn’t offer any middle grades for fire lighting. You get an A-grade or you fail. If you’re fortunate, you get the chance to re-sit the exam.
As with exams, fire-lighting success is down to preparation.
More than just about any fire-lighting technique, success with feathersticks is entirely down to the quality of your preparation. From material selection to having a sharp knife to possessing good technique, it’s all down to you.
Even with friction fire-lighting, if your bow-drill set preparation is not A-grade, for example, you might still just pass by putting in more effort with your drilling.
With feathersticks, success is entirely down to preparation. Make rubbish feathersticks and they won’t work. Make good ones and they will.
The place to put the effort in with feathersticks is before you even try to light them. Then the rest is easy.
So, if you haven’t read my article about making feathersticks, then you should. There is, however, a little more to it than just making a good feathersticks.
It’s also about what you do with them…
How Many Feathersticks To Light A Fire?
Good feathersticks will form both the initial kindling and the next size of fuel up, both in one deftly made fire-lighting unit. The intention is for the whole thing to eventually catch light in one package, starting with just a small flame.
Not so well-made feathersticks will see the feathers light but the stick not taken by the flames. In this situation, unless luck is on your side, you’ll end up with some charred sticks and no fire.
The key – as anyone who has been taught by my colleague James or I will be under no illusion about – is thin necks.
In dry conditions you may only need two very good feathersticks to establish a fire. N.B. very good.
In cold, somewhat damp conditions you will likely need four very good feathersticks; in very wet, rainy cold conditions or when your life depends upon it, I would recommend six very good feathersticks.
Featherstick Fire Lay
As with any fire lighting, you should choose a suitable spot, clear the ground if necessary and – particularly important in most cold/damp conditions in which you’re going to need feathersticks – put down a platform on which you will create your fire lay.
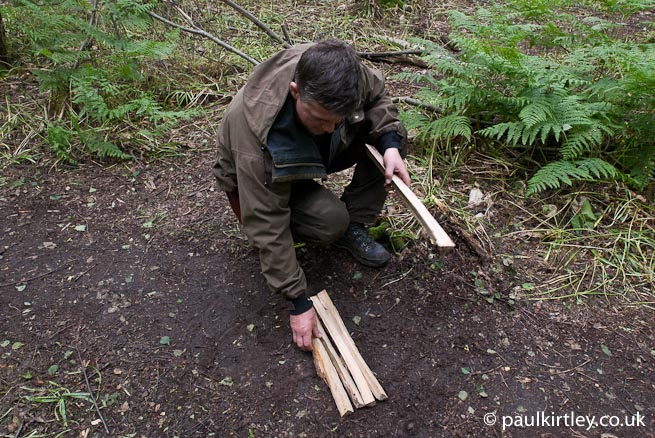
Also, remember that the circumstances under which you will need – rather than choose – to create feathersticks will often be when there is no small fuel, or at least no dry small fuel, available.
You will, therefore, likely need to make your platform from split wood. This should be no difficulty, though, once you have found materials from which you can make feathersticks and have batoned the material into the correct sizes.
Furthermore, as well as the fire platform and feathersticks, by applying the batoning technique with your knife, you can produce a range of fuel sizes, from small splints to finger-thickness and thumb-thickness fuel, right up to larger fuel – all from the same dead-standing timber.
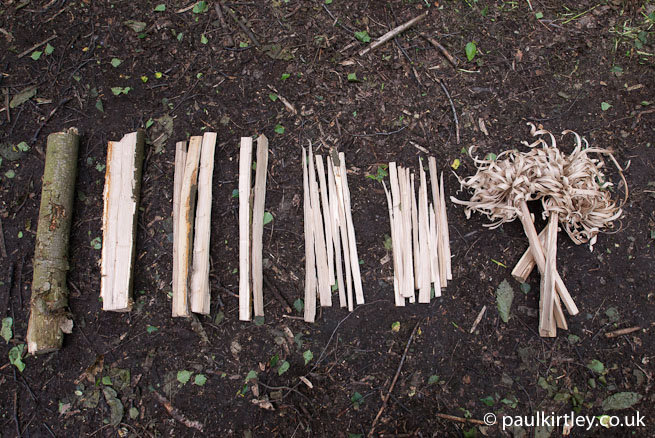
So, to light your fire, place your feathersticks on top of your platform. This should be done in a similar way to a small-stick fire lay.
First, make sure you are kneeling with your back to the wind and your knees closed. Then organise the feather sticks in a V-shaped lay with the open side of the V facing you (and therefore facing the direction the wind is coming from).
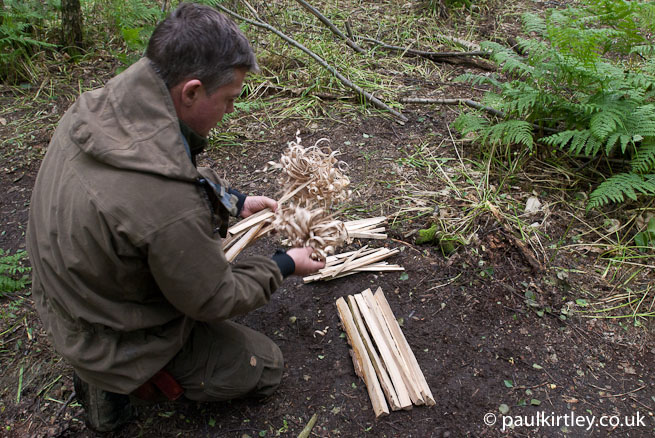
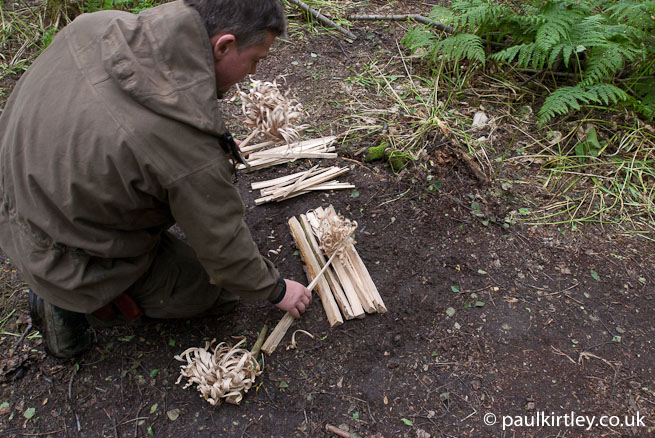
Alternating the feathersticks to the left and right of the V, with the feathers facing inwards, stack up the feathersticks to create the initial fire lay.
When you made your feathersticks, you made them with the shavings all concentrated at one end with a maximum arc of 180 degrees (not all the way around in a 360 degree).
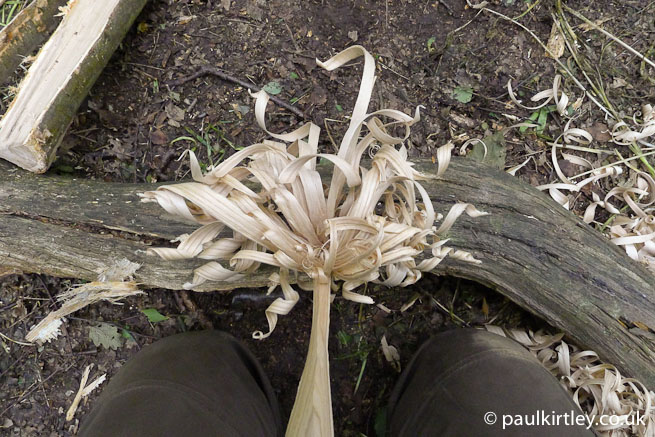
In limiting the curled shavings to one side of the stick, you can lay it on its side and have all the curls concentrated in the centre of the V, where they are needed.
You should also have your other larger fuel prepared. Before you light the feathersticks, have small splints up to medium-size fuel ready to go and close to hand.
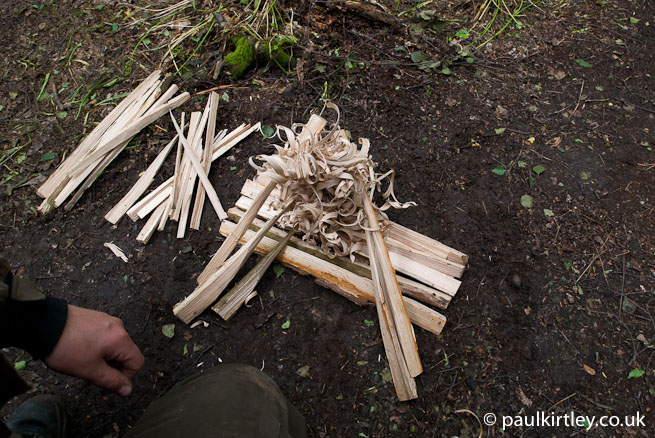
Ready To Go: Lighting Your Feathersticks
In arranging your feathersticks in the way described above they should be easily ignited with a single match. Also, any cigarette lighter or splint or other source of a small flame will easily light your feathersticks.
Introduce the flame to multiple points of the base of the tight mass of curls in the centre of the V-shaped fire. The curls should accept the flame readily, and the flames will soon be shooting up through curls.
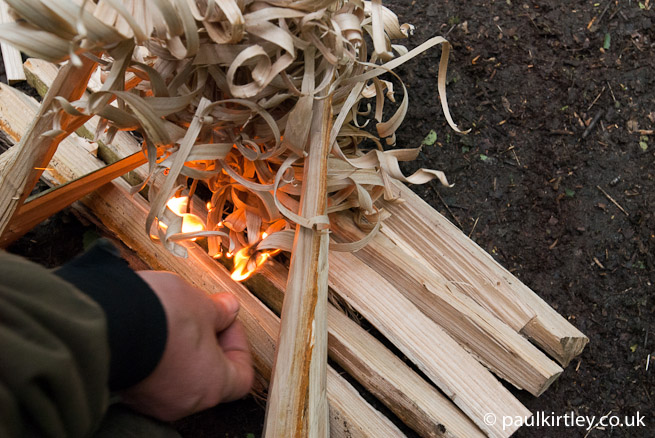
As mentioned, the flaming curls should ignite the neck of the stick but remember, because of the length of the sticks you can always manipulate them to get the flames hitting exactly where you want them.
Resist the urge to fiddle around with the fire too much. Many failures with fire are down to people messing around with them too much.
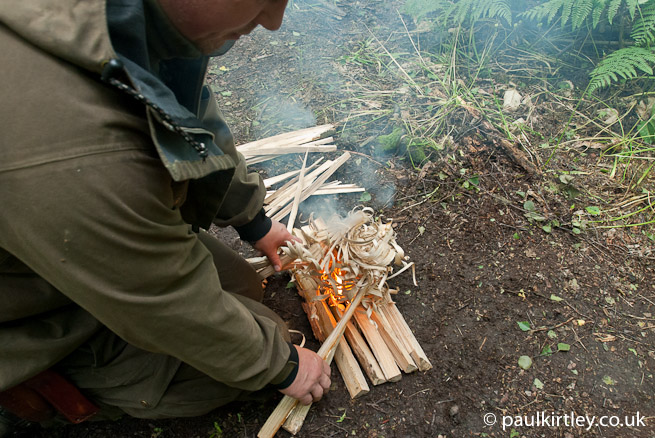
Once the flames are coming through the top of the curls, add some small splints in the same V-shape lay as the feathersticks were placed initially, again alternating the them left and right. This creates a column of fuel above the flame where they cross and the good amount of stability to the overall fire lay.
As the fire becomes established add your next size of fuel and so on.
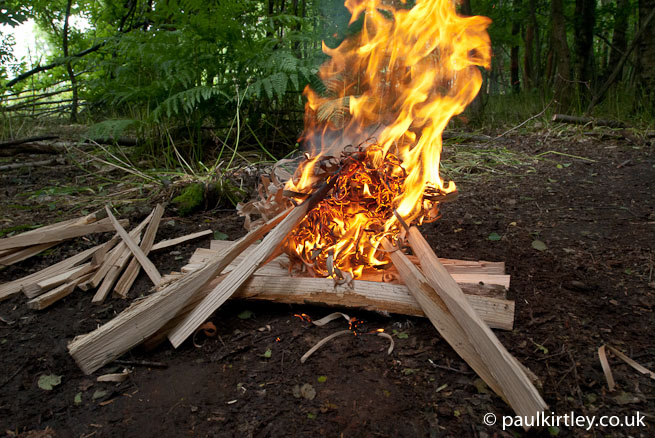
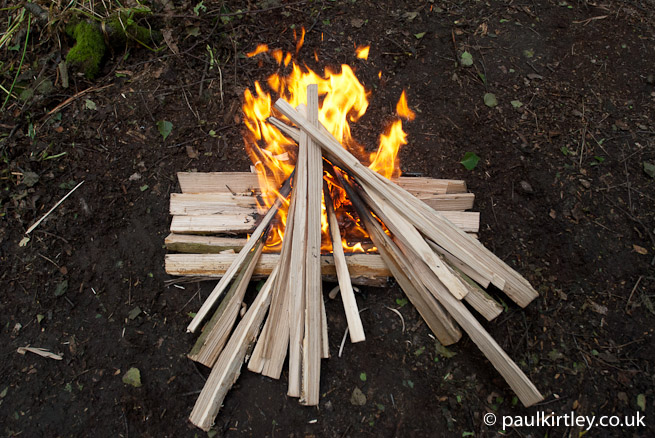
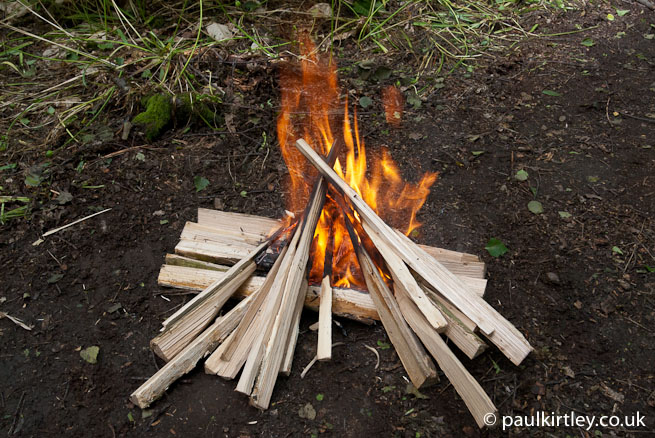
When done properly, the above process is a very reliable way of establishing a fire in what would otherwise be difficult fire lighting conditions.
**Leave a comment below to let me and other readers know about the times you’ve used feathersticks to light your fire or wished you had…
Related Material On Paul Kirtley’s Blog:
How To Make Fantastic Feathersticks
How To Light A Campfire With One Match
44 thoughts on “Lighting A Fire With Feathersticks”
Hi Paul,
Thanks for these feather stick vids. The first time I tried this years ago I was using sticks 2 inchs long… Then wondering why I couldn’t get decent curls…. Lol. We all start somewhere I suppose ;o)
Cheers
B
p.s bit off topic but really looking forward to the id masterclass :o)
Hi Ben,
Thanks for your comment. Well I hope these featherstick articles help you get longer, more flammable curls! 🙂
All the best,
Paul
Hi Paul,
Yeah if I’m honest it was a skill, once tried and failed, that I have never tried again. However I will now. I mostly use birch bark and dead twigs from the lower part of scots pine to get my fires going. Mostly because that is what I have in abundance :o) However, as Shiver pointed out, basic skills are so vital and I have spent time mastering so many others I will knuckle down and have another go at this.
Cheers mate,
Ben
Great article, sometimes it’s really nice to retrace your basic techniques, and pick up a few things you missed before, making your fire lighting skills better and easier than before.
Thanks for sharing.
Shiver
Hi Cyril,
The “basics” always bear revisiting. Indeed, they are often glossed over in search of more “sophisticated” techniques.
I’m always keen to point out – as I am doing here – that these are foundational techniques and foundations need to be strong.
As you say, it’s always worth going back to make sure your foundations are as strong as they can be.
Thanks for your comment.
Warm regards,
Paul
Paul,
great article! Question about the base platform. Why is this flat on the ground instead of elevated slightly to allow the fire to “draft” from underneath?
Hey Chuck,
Thanks for your comment on the article. As for your question, the simple answer is that it doesn’t need to be elevated slightly; the slightly more technical answer is that the uneven surface of the platorm created by the split sticks is sufficient to allow the necessary airflow under and up through the fire.
I hope this helps.
Warm regards,
Paul
I don’t think even in hot weather i’d risk using only 2 feathersticks.
After putting the time and effort into the preparation it would be a waste to fail to get a fire going because I was too lazy or maybe over confident in my skills to make a couple more.
like most fire starting techniques, Birch bark, feathersticks, small stick lay etc. I still use the method you taught me… ”When you think you’ve done enough… Do some more”
Good article! I have got some nice pieces of wood in the garden that I think will make good featherstick practice, and this has just reminded me it’s there! 🙂
Thank again!
Hi Liam,
I like your prudent approach – four is definitely a much safer bet.
And it’s reassuring to know that you listened to what I said…. 😉
It’s good to read that you are already being thorough in applying a range for firelighting techniques. I hope this article helps you consolidate your skills further.
All the best,
Paul
Great article as always Paul,
I have used feathersticks since I was in cubs many many moons ago and still use then today. They work for me, some though over the years have definitely get better but I find that the more you rush them the worse they turn out; the technique of angling your knife forward and rearward to change the direction of the curl helps out a lot. The other thing I find important is different fire lays for different conditions as well.
Many Thanks again
Hi TinkyPete,
It’s good to hear from you – it’s been a while…
It’s definitely true that if you rush feathersticks then the quality deteriorates. That said, the more you make them, the quicker you get for a given quality level… 😉
Take care,
Paul
Great article Paul…very informative and useful for the great outdoors. I never tire of hearing of useful info that could save yopur life…thanks
Hi Steve, thanks for your comment. I’m glad you liked this one. It’s one of the skills that never fails to be useful.
Cheers,
Paul
Thanks Paul, I loved your previous featherstick article too. I definitely have a ways to go to get my sticks that good!
One thing that might be useful to mention is the use of fatwood to make feather sticks. I cut some from a downed pine recently (where a dead branch meets the trunk – it had that strong pine disinfectant smell), and made a featherstick with it. My stick wasn’t even that good, and it was pretty damp, but it lit up really well.
Just one extra thing that might give us an edge when we need it 🙂
Hi JD,
It’s good to hear from you and I’m glad you liked this pair of articles. Good feathersticks are just about practice (and a sharp knife)… 😉
You make a good point about “fatwood” – resinous pine wood. The best is typically from a stump of a tree that has been felled while alive, where the tree has continued to pump sap into the stump. The wood contains a lot of turpentine, which is what you can smell (and see in the orange/pink colouration of the wood).
I’ve used resinous wood broken from stumps (sometimes need to use an axe) to good effect particularly in the damp conditions of the boreal forest. Also very good in the deep cold of mid winter – as you say, they very readily accept a flame (or even a spark).
Maybe I’ll do a separate article/video on this when I get the opportunity…
Cheers,
Paul
Another outstanding, well chosen, easy-to-understand article Paul. I will definitely be incorporating some pointers from this article and the how-to-make feather sticks article you wrote recently. Great job. Sean.
Thanks Sean. Did your FireSteel arrive OK?
Hi Paul First I would like to echo the comments of Sean Fagan and second I would like to say it is a real thrill every time I see you have produced a new article. Your articles are always well written informative and encourages me to get out there and practice my skills. Thank You.
Hi there, that’s kind of you. I appreciate the feedback and this is why I share what I know – if I can help or inspire even a few people, then my work has been worthwhile.
Thanks for taking the time to let me know you enjoy my material.
Warm regards,
Paul
Awesome write up Paul!!! These news letters are the best, thank you!!!
Regards ,
Chris Regan
Heavy Cover Inc.
Cheers Chris, that’s very kind. Glad you are enjoying them.
All the best,
Paul
Paul,
Once again, great information and presentation. I forward all your stuff to my nephews. I always use this method to start the fire in my shop stove and my coal forge. Newspaper in the Pacific NW is always damp and does not work very well. Good feather sticks and kindling always works.
Hi William,
Thanks for your message. Thanks for sending my material to your nephews. I hope they enjoy it and are able to get out and practice a few skills. You are certainly in a great part of the world to have to make feather sticks work for you in those damp conditions.
Warm regards,
Paul
Hi Paul
I’ve never tried feather sticks but clearly see the methods effective kindling. The rain forests are very
hard to find dry kindling unless you cut a dead standing tree snag. Feather sticks would do the trick.
Where I live in the mountains we carry slivers of readily available pitchwood from fir. Birch is a rare
species but alder might do the job-will try it!
Kind Regards
Jim Pacific NW
Hi Jim,
Any relatively straight-grained and knot-free wood will do the trick for feathersticks.
Even many small conifers between the branches produce eminently suitable wood.
Pine, spruce, cedar all work very well.
Amongst the widely distributed broadleaves, apart from birch and alder, try willow if there are any sizeable examples in your area.
Warm regards,
Paul
Hi Paul
Thanks for the input as always! There’s plenty of woods to use here. I’m in Idahos River Of No
Return Wilderness/ Snake River Region. Your many friends could get bush mountain lost in a vast
experience here. This is the largest remaining wild area left below Canada-wake up to a moose in-
camp with trout and huckle berry breakfast. A summer spent bushcrafting. I would love to visit you all in Europe sometime.
Kind Regards
Jim-Pacific Northwest
Hi Jim!
It sounds like paradise. I’d love to visit one day… 🙂
Warm regards,
Paul
I am there too! I have mostly practiced out on the Lava flats-though due to transportation methods (and my not being willing to ride a bike thirty miles on a dirt road.) I can’t get out to a particular spot-about a kilo and a half into the flats. (or as us locals call it “the cedars”) I am saving my pennies for a small pit bike though so I can run a trap line in the area(coyote pelts are worth money you know) And as soon as I have one of those lawn-mowers welded to a bicycle I am gonna try this whole feather stick thing.
Great very informative write up
I hope we get the bookings at our centre to be able to show people all these methods
Thanks
DB
Thanks Dave. Where is your centre?
Thanks Paul,
Excellent article and great pointers, especially the sharp knife, and the pictures help so much.
Will definitely give this a go next time out.
Regards.
Tim Collins
Hi Paul !
As always excellent and instructive.
I tried several times but each time I broke the wood.
I’ll be diligent and one will succeed.
Thank you!
Bozidar
Croatia
Hope it goes well for you next time Bozidar! 🙂
Paul
Yet another great informative article and I’m looking forward to trying this and hopefully more successful and wiser for it. Great stuff and thanks for your blogs and clips, I’ll be sharing them with my friends and my son Robert ( 12 ) is a keen follower as well. Keep up the good work. Paul
Hi Paul,
Thanks for your comments. I’m glad my articles and videos are serving you and Robert well.
Warm regards,
Paul
I consider feather sticks a carving project. I have found that a lot of individuals would find spoon carving or utensil carving easier. It took me a while to get good at this with loads of practice. It is a great skill to have. Really reliable way to make fire. Great article. Thank you.
Hi Victor,
Yes, it is a skill as opposed to a quickly assimilated technique. Good feathersticks, made consistently well and in reasonable time, do take some practise. It’s definitely worthwhile though, as I’m sure you agree.
Warm regards,
Paul
Hi Paul,
Making feather sticks is some of the best fun you can have, we laughed all the way through the elementary in September, it’s not as easy as it looks when you do it.
Many of us found holding the knife still and drawing the wood through easier and got better (not perfect) results.
Many thanks for the effort you put in to your articles.
Nige.
Hi Nige,
Good to hear from you and I’m glad you have fond memories of the Elementary course.
Yes, the draw-through technique is a good one too. My colleague James prefers it.
Warm regards,
Paul
Hi Paul, great article and very informative. I’ve tried firesticks a few times but clearly I’ve got to increase the length of them and work on making “thin” ones. Mine usually end up as charred bits of wood – to which I’ve applied a gas turbo-flame lighter – which usually gets them going.
Thanks for all the articles. Phil
Cheers Phil. Gas turbo lighers are a great bit of kit 🙂
Hi Paul,
This is a great presentation here. I originally received it off you as part of your Online Course that I subscribed to. I have shown the techniques to my Scouts with good success. I love logical way you convey information and it certainly helps when presenting to young people who are always asking, “why do you do it like that?” To be able to give a logical reply instead of saying, “because that’s the way it’s always been done”
Regarding the pulling across the knee technique. I wasn’t able to get down to Sussex to do a course with you, so I did one here in Cumbria with Ben and Lisa and he demonstrated the knee technique and boy! was he fast at it. It’s pretty obvious you have both had the same initial training. Keep up the good work and I’ll try and get down in 2021 if things open up okay.
Hi Paul
I regularly use feather sticks to light my wood stoves at home, I find it a good way to practice making them. Especially while in lockdown and unable to go camping etc.
Thanks for the information.
Kind regards
Tim
Did this step-by-step and it worked perfectly first try. Thanks Paul.