How To Carve A Beaked Notch For Pot Hangers
The simplest methods of suspending a billy can over your campfire are typically fixed in height. Simple pot hangers are little more than a straight stick with a few modifications. They are quick to set up and well suited to boiling water or cooking very simple meals.

Moving Beyond Simple Pot Hangers
The downside of simple pot hangers is that they typically only afford one fixed position over the fire.
If you want to have some degree of variability in the heat you can apply to your cooking and your kettle, then you’ll need some form of adjustability in any cooking rig or crane that you are using.
Also, if you are creating a more elaborate cooking set-up, then you may want to suspend multiple pots over the fire, each at a different height.

The Beaked Notch – The Key To Many Adjustable Cranes and Rigs
A useful bit of woodcraft to learn in order to construct an adjustable pot hanger that suits various camping situations is creating a beaked notch.
Creating multiple beaked notches allows the hanger to be suspended at various heights.
Thus learning the beaked notch technique enables you to create a pot hanger which is easily raised or lowered, even with the pot attached.
If a beaked notch is created and set up correctly, it can hold relatively heavy loads, remaining remarkably stable.
Material Selection For An Adjustable Pot Hanger
For suspending pots you’ll need to create a tick-shaped hanger, typically from a straight growth of woody shrub or tree that has a side branch.

The main shoot will be kept long and the side branch truncated near to the junction with the main shoot.


Also trim off any excess material from the main stem below the join, otherwise it may catch on lids of pots and kettles.


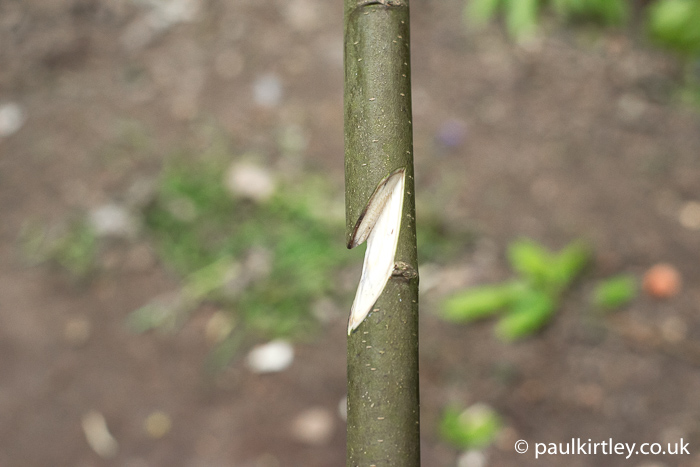
Carving The Beaked Notches
The beaked notches are carved into the main, straight stem of the “tick”.
Now this is where I often see a common mistake, usually by relatively inexperienced people posting photos on Facebook, Instagram and the like.
The mistake is to carve the notches on the opposite side of the stick to the hook at the base of the tick. They should, in fact, be carved on the same side. This provides much better balance and stability to the pot hanger, whatever the method of suspension.
So, now that we know which side of the stick to carve our beaked notches this is how we do it…


The Beaked Notch – Super Useful
The usefulness of this simple notching technique is not to be underestimated. It’s definitely something which should be in your woodcraft arsenal. Please do me the favour of respecting the woodcraft tradition and carve these with a sharp knife and an eye to tidiness. Your campcraft should be neat.
If you enjoyed this article, then you will probably like the following…
How To Make An Improvised Candle Holder
21 thoughts on “How To Carve A Beaked Notch For Pot Hangers”
Great article Paul, Iv known about this for some time but have never tried it before. I’ll be attempting it next time I’m in the bush. Thanks again!
Great Dave. Let me know how you get on with it.
Cheers,
Paul
A brilliant right up Paul, there were a couple of subtleties you mentioned that i’ll incorporate the next time I do this. Many thanks for sharing
Peace
Zed
Textbook as always Paul.
I would add though I find it a good idea when doing multiple notches to start with the top uppermost notch first and work your way down to the pot hook. That way it keeps strength in the shaft while carving so you don’t accidentally break the hanger as you go. Hope that makes sense?
All the best
Will
Thanks for the clear pictures – you’ve sorted out the mistake I’ve made a couple of times (cutting out under the beak) by showing how and why it’s not necessary to do that. Much appreciated.
Now I’ll pass the idea on to my Scouts 🙂
Thanks for this Paul. It’s always good to revisit basic campcraft skills. This article is very timely as I’m taking 4 late teens wildcamping in a few weeks, so can teach them this skill. I like the different ways to hang the stick, only ever seen the first option (wire “hook” a good idea). Thanks again.
Hi Paul. Good article and good photos, yes I do use this method on my camp fire and as you say it is very reliable method even in high winds as long as the to point is deep enough it’s very sturdy, thanks again for a good pod, would love to get you to come up to our centre sometime and help me with some plant identification and a bit of training Or if you up this way doing anything with Ray Goodwin maybe a stop over at ours to discuss the possibitys thanks again take care Trev
Thank you Paul. Yes, I has been using this method before. This method is really good and it serves very well. Specially if you staying in one place for longer. I agree with you Paul, the notches should be carved on the same side of the stick to a pot hanger hook. In this way the notches is closer to gravity center (forces working to the same direction). That is important if your suspension is the other stick (it can slide of). I enjoining every your episode. You doing GREAT job. Good summer.
Thanks for another great piece of information. I have seen this before, but as of yet not tried it. This is one of my goals for trying this summer while camping. Please keep the great articles, and other information coming. I really enjoy them all.
Great stuff and great photos! Although I already know how to make and do use the beaked knotch, it’s great to confirm that what I am doing is the best way possible and that I’m not missing anything. Thanks 🙂
Hi Paul,
many thanks for another useful article. I have used this method before, however never with as many settings as the one in your last picture. I am now inspired to teach this method to my son and his 3 cousins when we do a week long camp in the summer holidays.
I was officially woirking on my fire skills last night. But I had
some time so picked up a branch and had a play. I carved two
quite good notches on the branch, quite proud of them. Not quite
sure I’ve got sure I understand, ‘undercutting the stop cuts’.
But happy with my work. Going to do the full Waggon stick
at weekend. Last I did one I ended up with my Son’s and My lunch
on the floor when the support stick twisted over and dropped the pot.
Paul,
Thank you. Excellent tutorial as always. Thank you so much for sharing all this valuable information. I will be trying this technique soon.
Martin
Great info Paul, espec. the way the notches are made. As usual practical and useful advice. Thanks
Hi Paul – nice, clear tutorial, brother. I use this a lot; but mainly to make the hook for an atl-atl – almost exactly the same cut, but extend the flattish (or scooped) section a bit longer to rest the dart on.
Ede
Wow, thank you for this article!
I’ve seen photos from a distance of these type of hangers but not known their name or how to make them. Will have to test this out next weekend. 🙂
Thank you for all the effort you put into making all this available for everyone!
My pleasure Philip. Have fun next weekend. Hope this proves useful to you.
Warm regards,
Paul
Hi Paul,
very usefull article as usual.
I have seen that fashion of notch in some bushcraft videosbut I tried to make it myself only one time using hazelnut with bad results maybe because the dry wood or maybe because I’m a bad carver…..
Anyway learning woodcarving is on my top list so next time I’ll try it again thanks detailed pictures you shared .
Many thanks for all your efforts you put to teaching us, I know it should be a bushcraft course matter; I really appreciate that.
Thanks again and regards
Pierluigi Tucci
Hi Paul, Thanks for the great tips. Keep the good info up.
Regards Peter (Australia )
Paul, thanks for all your tips. What model is the mora knife you are using in this demo? Thanks.
Sorry, that is looking for me a bit like camp fire flea circus artistic!
And I think, that is a potential dangerous technique!
I got large eyes, when I have seen the photos of your simple pot hangers, but that here is really great!
In Germany, a sometimes very dry, really dangerous dry country, regarding dehydration, and forest fire, if we do not have 3 or 4 large stones to stand the pot simply on top, and to make the fire between, we hit to wooden forks in the ground, a third stick as a bridge between them carries the pot or several identic military pots. Of course the forks can be replaced with heavy logs too, or large stones.
That is my survival stile construction, without the risk, that the pot hanger breaks out of the earth.
The cook has simply to feed the fire in a way, that the heat stays constantly, if he can not use the amber of oak or beech.
I most times carried in the last 30 years my cooking water with the whole rucksack on my back to my camp side. I normaly can not risk, that the pot could come down, with a great desaster of dirt, even if the water just has been sucked in the pasta. I would loose water, well calculated food, and would have dirt in my food and a dirty pot, often without possibility to clean it in the night in the stealth camp.
(Or I have to clean it, loose my water for the morning, witch is my security extinction water. My water is exactly calculated, because i have to carry it on the back!) With your construction here it is possible, that the hook brakes, if you use larger pots, or it slips out or the cook gets smoke in the eyes, or it becomes to hot for him over the fire, and because he wants to be fast, he doesn’t find the right contact point. And all that risks, without any necessarity?
In the reality outside, you often dry damp wood around the fire, a cook who can’t see any more, because he got smoke in the eyes, needs a construction, that works even blind, that allowes him to put the pot with closed eyes as fast as possible back over the fire, if he is standing in the smoke in the heat with a pot in the hand, drying fire wood and other often younger people around him! Boy scouts, own children, or some how locked in adult people in that moment, with naked feet, because the shoes are drying, rucksacks on or behind them, carving or cooking knifes in the hands , I don’t know what! A pot in the hand of a blinded and barbequed cook comes so fast down, nobody will have time to jump up out of the circle of persons who are sitting around the fire! May be experienced bushcrafters or boy scout leaders would be prepared in that situation, but often enough, one adult is cooking, and the second is making firewood far away, only tired children and unexperienced people around the fire helping cooking or having a rest after a very long hike. If it is already dark, people need the light of the fire and most times it becomes relativly cold, when it becomes dark, most times you do not carry more clothing, than you need, if you know, that you will light a fire. And I think, everybody agrees, that experienced people make normally the smallest fire, which is needed, to reach, what is necessary. So people are sitting close around the fire! I took care whole my life, when I was outside, because I had little boy scouts with me, and my cook had been always the oldest, experienced, strongest, hardest and most intelligent of the group. — But I have seen several 6 or 8 liter cooking pots, full with boiling water flying directly between fire and feet of children! You have no chace to avoid that, you can take care so much, as you want, it is only a question of time, till that happens! — And with your technique, which I find really dangerous, that surely happens ten times oftener, than with a bridge between forks and twenty times oftener than with a cooking chaine between tripod and cooking pot!
I really ask you courteousely to thing about that, what i wrote here after 30 years buschcrafting and several thousands of cooking fires in small groups and after hundreds of days in camps with up to 150 persons sitting around 20 or more fires.
I think, you should stop using that technique and change to tripods with cooking chaine or one long wooden hook , that is fix attached to the tripod. We want to cook pasta, not the feed of our children!
Nothing against that both techniques I found here in your photos, if you are out with two adult people or alone and sitting far away from the fire and next to a river full of drinking water and want to boil water for a pine tea. But in the most situations people are cooking over a fire the tripod with cooking chaine is together with a pot on four stones in my opinion the only secure way to do it, and should be used by everybody as technique No1 !
A strong chaine for larger pots needs to be only 50 cm, the upper end can be replaced with a nature fibre rope, potentially burning , but hanging to high, for cathing fire, but not melting like plastic ropes.
And because i do not want to cut in living wood, and do not want to make noise in the forest by hacking wooden forks in the ground, even in summer, when I have no problem with frosty earth, i use for my small 1 liter pot a fire with silent collected twigs and a small tripod, and a very small stainless steel cooking chaine: I bought in a shop for 5,-€ a Victorinox stainless steel knife chaine, did away the closing wire of the carabiner hook, so I got a relatively large open hook for my pot hanger, and added at the other side a larger stainless steel key ring, that allowes to pull the upper part of the chaine there trough, to do it over the little tripod from old dead wood. — no noise, no cut in living wood, no sawing, no breaking, no hacking, no traces, no sound, nothing! Only a bit light and heat and a warm coffee! Ultralight Stealth Camping with a few oliv green parts of military equipment and all comfort and without any problems with hunters, foresters and landowners since decades! That is my way to do it.
Marcus