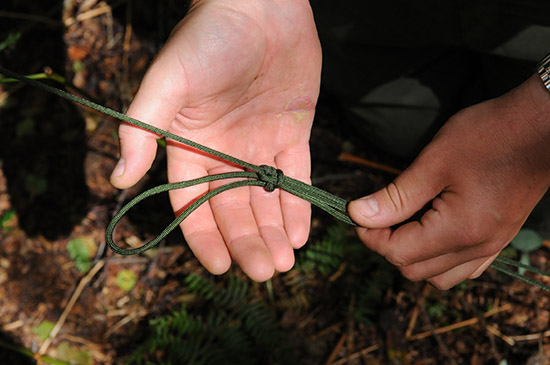
How to Tie an Adjustable Guy-line Knot

Sometimes called a slippery adjustable loop, an adjustable guy-line knot is very useful to know, particularly for those interested in bushcraft. Whether you are setting up a small or large tarp, or even a tent, this knot allows you to adjust the tension in a guy-line without the need for fancy clips or toggles.
The absence of of tensioning clips or toggles also means you can pack your guy-lines away more tidily. A slick and easy knot to tie, once you have mastered it you will be able to pitch camp even more quickly.
For the weight-conscious back-packer, using this knot instead of the tensioners fitted to tents and some tarps will allow you to shave a few more grams off your pack-weight.
What follows applies equally to tent guy-lines as well as tarps but for simplicity I will just refer to tarps. Typically we use a peg to fix guy-lines but we can also use conveniently placed tree-stumps, exposed roots, saplings and trees. For simplicity I will just refer to pegs.


That’s all there is to tying this very useful knot. I like its elegance and the way it helps you simplify your equipment. It reduces clutter attached to your tarp/tent. It also speeds up pitching and breaking camp. To release the knot, all you need to do is pull the live end, pulling the bight out of the knot.
I hope you found this article useful. Let me know in the comments – too many pictures? not enough pictures? would more descriptive text help? Also, if you have found uses of this knot for things other than guylines, let us know in the comments.
Finally, if you think this article would be useful to someone else, send it, share it or tweet it to your friends. Thanks!
58 thoughts on “How to Tie an Adjustable Guy-line Knot”
Really cool knot Paul! I have the tarp end of the guy in the same knot too, though it is quick release, just to be able to retention should it need it in the rain, and im feeling soft about getting wet 😀
Sorry I ment it isn’t quick release at the tarp end! 😮
Ah-ha, that makes a bit more sense. Although I’m assuming you mean re-tension rather than retention? If it’s the latter, then I’m not sure I want to know…. 😉
All the best
Paul
Hi Paul, I think type of post is really useful. The photos do a good job of showing how to. I know from personal experience how difficult it can be to teach knots to some people. I think the description you provide says all it needs to without making things too complicated. Good job!
Although not a different use, I have used this knot quite a few times as a makeshift repair to scouts’ tents and others on expedition. I have also created washing lines with it.
Hi Matt
Good to hear you thought the article was useful. I can see how you would use this knot or similar (e.g. tautline hitch) for tensioning washing lines too.
All the best
Paul
Hi Paul,
I have to again admit another one of my weaknesses…knots ! This particular one will really help me, I currently use my own ‘adapted ‘ version of a Prussik to ‘fix’ my parachute/tarp lines, this one looks far better.
I think knots require a logical – mathematician’s brain, to conquer and retain them all successfully. Keep them coming it would be great to add to my modest collection.
Thanks
Mark
Hi Mark
Interesting you pick up on the link with logical thought and mathematics. I’ve always found approaching knots from a logical point of view is the best way. There is a whole area of mathematics known as Knot theory but we probably don’t need to get into that here 😮
I’ll keep popping them out in a logical fashion and I hope this will help…
Best
PAul
It is a great little knot I learned it a while ago now I find it the best knot to use. I was a cub and scout and venture and most the knots I learned then I find I still use but it is the simple knots which last forever in your skill set 🙂
I have also used the knot as a type of halyard for raising and lower antennas for work as it is easily to adjust and stays in place till you move it. Under tension it works best and the more weight the stronger it stays.
Hi TinkyPete
Good to hear from you again. Yep I agree, it’s the simple stuff that you use repeatedly that really sticks over time. Interesting to hear your other uses of this knot. Thanks.
All the best
Paul
Hi Paul, good article as ever – a simple knot to tie and therefore to teach.
(K)not sure what you plan as future ones to show, but may I be as bold as to suggest that for some knots, pictures using wider diameter cord/ropes might be useful? Sometimes its difficult to see what wraps round what when thin cords are used. Naturally you wouldn’t want to tie your hooch up with climbing rope, I just mean as a demo of the knot!
Off at a tangent, I now use red ropes for all my tarps, especially with groups, to minimize people tripping over them.
And another tangent(!) I use bungees and clips on my tarp – you can adjust the tension quickly and easily particularly in the wet and cold. (They are a bit more bulky though)
And finally are you aware of http://www.animatedknots.com ?
No, this is finally(!) – clove hitch best “knot” in the world? Discuss….
Hi Phil
Clove hitch? Super useful! And how many ways do you know how to tie it? Always fun around the campfire 😮
I think that demonstrating with clear (colourful and larger diameter) ropes is definitely worthwhile but I also want to show these knots being shown in situ in the correct context. Maybe both ways in one article is the way forward. Theory and application?
Personally I avoid bungees for tarps. I understand they have their advocates but personally I’ve found I’ve never needed them. As with anything – find what works for you. I’m definitely a pragmatist in that sense 😮
And yes I have seen Grog’s animated knots – it’s one of the links on my resources page….. 😉
All the best
Paul
Although I use a slightly different version, nice knot and nice article
Hey Rody
Good to see you over here. Which version do you use?
Best
Paul
I use the tentline hitch with first 3 wraps then just a tie off at the other side of the knot with a loop.
Great Tutorial Paul.
Great step by step photo’s, ive wabted to learn this knot for some time.
Ive seen it down my many Bushcraft experts, but they do it fast, hard to see what there doing.
Great post.
Cheers,
Dave.
Hey Dave
I tie it slow when I’m teaching but fast when I’m using it. I hope this article will help you nail this knot. 🙂
Cheers,
Paul
This and the evenk knot are the only ones I use. Is this basically a taut-line hitch?
Hi Steve
It’s very similar to the taut-line hitch. The first two turns are the same but after that it diverges. Have a look at the following link and this should be clear:
http://www.netknots.com/html/tautline_hitch.html
All the best
Paul
I saw this as a variation of my favorite knot, the taut-line hitch, right off the bat. I like the addition of the quick-release here, especially for if you have a long length of good line you don’t want to cut.
Thanks for the great pictures, always essential. I’d add my vote for taking the photos with line that’s easier to see, rather than the aesthetic purity of thin, green line. I understand your point about showing it “in situ”, so maybe you could show the final knot that way, while the step-by-step photos use a bigger, even multi-colored line?
Thanks for this.
Hi Stew
Thanks for your comment. Yep, the quick release works well. I use this method of creating a quick release – by passing a bight through – with quite a few ‘standard’ knots.
Thanks also for your feedback on the pictures. I’ll include some pictures with larger, more colourful line in future.
All the best
Paul
If I’m correct, this is a (slightly modified version of the) Taut-line hitch. A very useful knot indeed. One of my favourites.
For people struggling with tying this knot, they might find this Wikipedia entry useful.
http://en.wikipedia.org/wiki/Taut-line_hitch
By the way, in my experience you should really dress the knot well. Else it doesn’t have enough friction and may start slipping (depending on the rope).
Hi Jeroen
Nice to see you back again. It is very similar to the taut-line hitch but differs in how it is finished. The first two turns back down the line are the same but then rather than going around both static parts of the line which run down to the peg, the taut-line passes around a third time above the knot on the line that leads up to the tarp (I hope that makes some sense?) as in the diagram in the following link:
http://www.netknots.com/html/tautline_hitch.html
With all of these knots, tying them well definitely makes a difference, particularly with ‘slippery’ line. If in doubt, a good tip is that you can always make a further turn before finishing the knot so that there are three turns then the finishing turn around both lines.
All the best
Paul
By the way, would this knot also work for tying a hammock to a tree, or isn’t it secure enough?
Jeroen
Hi Jeroen
It’s not secure enough for suspending a hammock. I will include some other useful knots for this.
Best
Paul
Ah yes, I see. Well, another useful knot to add to my repertoire 😉
Have a good weekend!
All the best,
Jeroen
Hi Jeroen
That’s one of the things I like about knots – there are lots of variations and subtleties within families of knots.
Have a great weekend too! 🙂
All the best
Paul
Hi Paul,
Knots are notoriously difficult to describe in words. It’s supposed to be the toughest thing for a writer. I already know how to tie this knot (I learned it from Bob on the Fundamental Bushcraft course) and as soon as I saw your first photo I was wondering … which side of the knot do I have to be on to tie this? When I watched Bob demonstrate I had to orientate my whole body so that it was at the same orientation to the knot as his was. Then his left was my left, his up was my up, etc.. I even had to move all my limbs and fingers just as he was doing while he was doing it only I didn’t have any cord! (Imagine someone doing Tai Chi behind someone who’s doing something really useful!). This was the only way I could learn. I think it’s muscle memory? I must have looked pretty stupid but it worked! PS my favourite knot is the constrictor knot tied in the bight (do I really have a favourite knot? I should get out more!!)
Eric
Hi Eric
I think the difficulty of writing about knots explains why I very quickly decided to let the pictures do the talking in this article 🙂
It’s interesting watching how people learn. I used to also teach Ju Jitsu and my experience in this area has certainly helped my understanding of how to teach the physical skills of bushcraft. Different people learn in different ways. Your description of having to mimic Bob’s movements to reproduce the process of tying the knot is not so uncommon in learning to undertake a set of movements.
I agree the constrictor knot is a great one. Having a favourite knot? I think that’s fine. There’s an aesthetic to knots and ropework that can be appreciated like any other aesthetic. If you like knots, how can you not have a favourite? 🙂
All the best
Paul
Thanks Paul another interesting article, very clearly shown, I do know that knott and it is very usefull simple and effective, though I don’t usually use it as a quick release I must try that.
Have you tried the Dolly or Truckers knott? maybe not particularly usefull out in the feild, but with a little modification to the way you tie it and secure it can be great for for really taught ridge lines, but it is exceptional for secureing kit to a roofrack or roofbars, you can get ropes as tight as ratchet straps and it is unbelievably easy to undo afterwards.
Cheers
Duane
Great stuff, I love knots! I guess that makes me another man who needs to get out more – or should that be get in more? I think that there are really very few knots one needs to learn in order to manage most of the tasks encountered in ‘bushcraft’ and camping. Actually it was many years ago when I was looking for a book from which to learn an adjustable friction knot like this one that I first encountered Ray Mears in print. Coincidentally there has recently been a related thread over on the BushcraftUK forum called Tarpology Knots, see: http://www.bushcraftuk.com/forum/showthread.php?t=78600 (it’s a ‘sticky’ so this ought to be a permalink). There’s a further link in one of the posts there to the Wikipedia page for the ‘Farrimond friction hitch’ which can be used in the same way as this knot, but has the advantage of being ‘slippery’ so it falls away without a tangle when the working end is pulled. I tried the ‘Farrimond’ out at the weekend and it does seem pretty secure. More useful knots please Paul.
Paul, Loving your blog, hopefully one day I will have a blog as good.
Have you ever come across or used the Farrimond Hitch before, which works the same as the adjustable hitch. I just find that the Farrimond comes away cleaner when you pull on the release end of the hitch.
Hi Mick,
Thanks for your comment. I’m glad you like my blog. Yours is looking pretty good too 🙂
I am familiar with the Farrimond hitch. I do believe its inventor wrote to Ray Mears with an explanation of it when I was Course Director at Woodlore.
It’s a clever hitch.
All the best,
Paul
Just picked this knot up a week or two ago, great to see it explained here too!
Good stuff. I hope it’s proving useful!
Hi Paul, Great Blog, I like the way that by finishing the way you do ,you don’t need to cut the rope, I
Have learned through mucking about that if you reverse either of these knots, that you can create an
adjustable loop which you can slip over in item like a bedroll or a carrymat and tighten by pushing
the knot toward the object, and it will not allow the noose to slacken while under tension,but is easily
slackened when you want to remove it, just by sliding the knot away from the object, rather than trying to pull the standing part to loosen the loop. I hope this makes sense to you. I use this for a variety of
uses and it works for me. As has been said before, it is easier to demonstrate, than to explain in words,
I have not seen these knots used in reverse in any of the knot books. GREAT SITE, KEEP IT UP.
Paul, good post and good pics. Have been meaning to try this one for a while and can see its use in securing guy lines. For securing a tarp ridgeline I’m a big fan of lightweight luggage straps. I tie the rope off on 1st tree then make a loop eight inches short of second tree. Run the strap through this and round the tree and you can easily tension/ loosen with one hand. They have a ton of uses including lashing up wood while you gather it, securing items to pack frame and securing rolled up tarps.
Hi there,
Yes, I can see that would work quite well as long as the buckle held. Does the strap come undone easily enough?
Also, did you see the videos on all of the tarp knots I use as part of the 20 free videos here on my blog? I think you might find some of that knot content useful too.
Warm regards,
Paul
Hi Paul,
I’ve been stuck on this knot for too long and saturday just gone I did it! Out of the many videos and guides I’ve seen, it was yours (long ago printed off) that cracked it. As typical, it was the day my bungees had arrived to avoid having to use this knot – ah well!
This really is such a good blog man, the same day I worked out my hammock was anchored to a sycamore – my Collins pocket guide was too shady on a few bits, got on the smartphone and within the minute your tree guide got it bang on.
Cheers
Brady
Hey Brady,
That’s great feedback thank you. It’s good to know that I’ve helped you nail more than one thing by the info I’ve posted on this blog.
You might also find this article over on the Frontier Bushcraft blog useful for your tarpology too:
http://frontierbushcraft.com/2014/04/05/tips-tricks-tarp-guyline-attachment-options/
All the best,
Paul
I use the non-slipped version of that knot aka the adjustable grip hitch to tie up brush and finish it off with two half hitches after drawing the pile tight. It works great. I also use that and the taut line
hitch to make a rope belt. It works perfectly. And, there is no need to untie it. I prefer it over a standard
belt.
Hi Paul,
Plain and simple, this is a great hitch. I have really been enjoying learning and using knots and particularly hitches in the last couple years now. Thank you for sharing.
-Rich
Hi Rich,
Thanks for your comment. I’m glad you agree this is a great hitch.
Keep in touch!
Warm regards,
Paul
This has to be one of the easiest knot tutorial s ive ever tried.
Thanks for this, will remember this knot for a long time.
Thanks for posting this. I was aware of this knot many years ago, but I just wanted to remind myself how to tie it. It is Christmas Day down here in New Zealand and I’m setting up a gazebo outdoors to provide some shade…. and because we often get wind in the summer, I am taking the precaution of anchoring it to the ground…. thus my desire to use this knot. Thanks and best wishes… Stephen Coote, Nelson, New Zealand. Happy Christmas.
Thanks for this! I’m useless with knots.
Nice, I might give this a try instead of the tautline hitch, which is what I’d normally tie for this purpose.
Let me know how you get on with it as an alternative Chris.
Was showing figure 8 hank to my scouts at last weekend survival camp they were putting away our DD’s, a great illustration of these knots.
Thanks for the positive feedback Derek and well done for passing skills on to the Scouts. I’m glad to have helped in a small way. Warm regards, Paul
Hi Paul,
No matter how old or new the content is or if repeated numerous times, the information you put out is always relevant and highly instructive. I have just now been practising this knot once more in my kitchen between chairs and a bench! Thanks for your continued hard work and professional dedication. I very much appreciate it. For me the style and balance of your blogs info is spot on! Cheers.
Hi Jason, it’s good to hear from you. Thanks for your positive feedback on my materials and methods. I appreciate you taking the time to let me know these blogs work for you. Thank you.
All the best,
Paul
Hi Paul,
I had some paracord handy and had to try this knot. As you tied it I had been reminded of what was called a Taut-Line Hitch. The knot profits from being set, as with the taut-line hitch: in the process you put a slight warp in the standing part that really locks the knot down—yet it can be adjusted readily.
Suggestion: show tying the knot first without the quick-release Feature. Show how to set the knot. Then introduce the QR finish. Thanks much! Very practical! Ken
Hi Paul,
Thanks for all the great advice. I’ve learnt a lot from you. Whats the best length of cord to keep for tarp guidelines, and also the ridge line?
Thanks again, Chris.
This is a good tutorial on a very important knot to know, this is slightly different than the way I was taught. I will defiantly trying this one.
Since you showed me this knot (Bight) many years ago, I have slept out in my hammock, constantly, now, for over 11 years. I still use this Bight for the Tarp’ and they very, very. rarely slip. They have withstood 50 mph winds. Many thanks
Hi David, it’s good to hear from you. I’m very glad this knot has been so very useful to you. Thanks for letting me know. Wishing you many more good nights under canvas…
Warm regards,
Paul
Thank you for sharing this and taking the time to include pictures. A knot that is very easy to remember and to execute is invaluable in many circumstances. I’m an avid outdoors guy, spend a lot of time on the water or in the woods, yet I’ve never taken the time to learn this knot, and now I’m glad I did. Too many good lengths of core have been wasted because I had to cut a knot rather than just pull and untie it. I need to be able to secure a portable antenna mast and a fall could be disasterous for my antenna or anyone who may happen to be in the area, I’ll feel much better knowing my knots will hold, but allow me to untie them and reuse my cords time and time again. It may not seem like much, but good Paracord or rope can get very expensive after a while and once it’s cut it cannot be made whole again and retain it’s original strength. Thank you, and great job explaining in a way that most can understand.
My main issue with tensioners is, they don’t fit very well for trees and roots. So while I keep som guy lines with tensioners around on a woodland trip for strength and ease of use, most lines are without. They may take some more time timo to tie and they may have a weaker grip on the line but they’re much more versatile.