Tree Felling With Axe And Saw
Proficient felling of a well chosen tree, using good technique, can seem effortlessly straightforward. On the other hand, ill thought-out felling can become complicated and dangerous. Either way it is one of the more hazardous endeavours in the woods.
In this article I want to highlight the main pointers I teach to people when learning to fell trees. I will assume you have basic axe handling skills and good general axe safety awareness.
Why Might You Need To Fell Sizeable Trees?
There are a number of good reasons why you may need to fell sizeable trees. The need for firewood is a common one, particularly in winter conditions. Dead, standing timber is the best source of dry firewood in the forest. If you are building a long-log fire, then you need logs of a good diameter. Even if you are using smaller fuel, it may be most efficient to source it from a dead-standing tree then split it down.
A second reason you may need to take down a tree is to make a camping spot safe. I’ve had to do this a few times on canoe trips, where the camp site has been compromised by an unsafe tree. You might think, why didn’t you just move? Well these situations arose either on islands in rivers or in areas of thick bush where there was an established, albeit small, camping spot.
Third, you may need materials for woodcraft projects. This could be the wood itself, the bark or both.


Tools For The Job
Your primary tool for felling is an axe. You can use a half-length axe and upwards for felling. Hatchets are too small and light. You can fell entirely with an axe but it is somewhat more controlled if you use a saw in combination with you axe to complete the felling. On trips I tend to carry a folding bucksaw, which breaks down and folds into a relatively compact shape. It is also possible to carry just a saw blade and make a saw with materials you find in the forest. In addition to your axe and saw, you should carry a sharpening stone with which you can maintain a keen edge on your axe. A sharp axe is an efficient axe. In remote settings, it’s also prudent to carry a metal file for reshaping the edge, should you chip it.


What To Fell?
I’ve already mentioned it’s sometimes necessary to take down a tree (or the remaining part of a tree) that is making a camping spot unsafe. Otherwise, you tend to have a choice of what you fell. My advice is to keep the felling job as simple as possible.


Principles Of Felling
First, it’s worth us stepping back for a moment to think about the structure of a tree trunk. It is a bundle of fibres, fixed to the ground at one end. Like any upright structure, the weight bears down through the structure. And like a stick, if you bend it, you put the fibres on the outside of the curve under tension and those on the inside of the curve under compression.


Once you have completed the front cut, you need to make a cut at the back. It is possible to make back cuts with an axe but it is less controlled than with a saw. A saw is a great tool for the job actually. Because the fibres at the back should now be under tension, there is little chance the saw blade is pinched. You can cut in gradually with the saw, in a very controlled manner.
At this stage I should say you must not pass in front of the tree once you have begun the front cut. You are in the process of destabilising the tree. Nor should you walk too close to the back of the tree behind the direction the tree wants to fall. Therefore you should have both your axe and saw with you before you begin.
The base of your front cut should be horizontal. Your back cut is also going to be horizontal. To achieve this you cut horizontally with your saw. Ensure the blade is running parallel to the back of the front cut so you are cutting symmetrically behind the front cut.
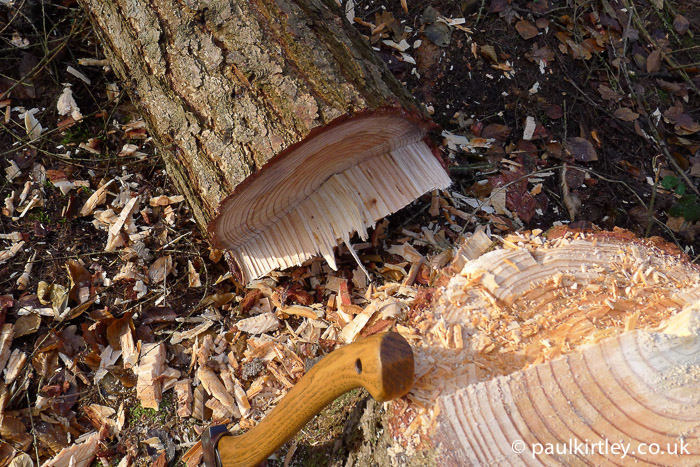
The critical point – sometimes displayed incorrectly in books – is that the back cut must be made above the bottom face of the front cut. 2.5cm (1 inch) is a good distance to start above the line of the bottom of the front cut. This gives some margin for error if the saw dips down while cutting.


Why is the relationship between the position of the front cut and back cut so important? Well, it creates two mechanical features which make the fall of the tree more controlled and predictable. Putting the back cut above the bottom of the front cut creates a step. The back of this step forms a backstop for the base of the tree as it falls. This stops the trunk slipping backwards off the stump and provides a stable pivot point.


During the process of making your back cut, the tree will begin to fall. Usually, the saw blade wont reach the front cut before the tree starts to move towards the ground. Once you have cut enough fibres at the back of the tree, it will be free to move away. So, you will usually end up with an area in between the front cut and the back cut where the fibres remain attached. These connected fibres we call a hinge. Only when the trunk pulls away from the stump will these fibres disconnect.


The accompanying images of felled live and dead trees all show good examples of hinges, having worked in a good fashion, some of them textbook.
Before You Start
First, after selecting your tree and assessing direction of fall, you should ensure you have a clear work space at the base of the tree. You don’t want to be tripping or rolling your ankle while using your axe or moving in the vicinity. Nor do you want the use of your axe or saw to be impeded by nearby vegetation or shoots from the base of the tree. Check there is nothing nearby that might catch your axe as you swing it.

Finally, if you have companions with you, be clear with them you are felling trees. Make sure you know where they are and if in the vicinity of where you are felling (e.g. watching) make sure they are at a safe distance away, off to the side or behind where there tree will fall.
Even dead, dry trees are heavy. Live trees, with the water they contain, multiply the weight involved a number of times. The mass coming down to the ground, even in a modest tree, can b surprising. The leverage which a tall trunk can apply at its base is colossal.
Always take great care to apply the safety considerations above. Remember to keep things simple and straighforward. Build experience gradually and don’t bite off more than you can chew.
If you liked this article, then you’ll probably like these…
Felling For Firewood In The Northern Forest
Get Your Signed Copy Of Wilderness Axe Skills and Campcraft
Buy a signed copy of Wilderness Axe Skills and Campcraft at wildernessaxeskills.com
17 thoughts on “Tree Felling With Axe And Saw”
Brilliant, thanks for this.
Hi Paul,
This is a fantastic description. Your blog inspires me all the time and frequently I can learn something new.
Many thanks and best regards,
Guenther
Thank you for your positive words Guenther.
Warm regards,
Paul
Whilst looking up at the tree to assess how it might fall it is prudent to lookout for any widow makers, free branches that might be hung-up there. These may fall in a different direction to the tree you are felling or, more likely in my experience, be dislodged as you work. These can easily cause serious injury. Whist felling trees we wear hard-hats on the conservation work parties I’m involved with. You are unlikely to have one with you in the forest so best be wary. Of course on a canoe trip you might have a helmet I suppose but better safe than sorry and assess the hazard properly before you get started with cutting tools.
Yes Steve, very good points. It is also wise to consider the species of tree to fell. Dead standing Birch for example are notorious to have top ends break off as you chop down the tree.
Indeed, all good points fellas.
Fantastic article as always Paul!
I especially like your highlighting of branches and their effect on lean and falling direction, that’s something I figured out the hard when I dropped my first few boughs.
cheers
Jamie
Thanks Jamie.
Most trees i felled had been trees in forests in Germany, where I could not ask the owners on a hike, because I didn’t now them. So we usually took the small ones, that’s more like steeling an Apple, if not helping to hold the forest clean.
Do you think that if i can choose, it is worth to fell and saw a larger tree in parts, and hack it, instead of collecting a few small ones? In whet konditions they are whet in the outer Parts too, like you should have it in Britain. But it is far less of work to proceed the smaller trees. And they are drying at the fire.
Ok, it may be a kind of fun. But if i am lazy? Is it worth the work?
I only use open fire in the forest.
Here we use Sami Lavvus, or lean to constructions, no tents with stoves.
Great reference material but I can’t recommend Paul’s woodcrafter course enough if you want real confidence in these areas. You can’t beat hands on experience especially under expert tuition.
Thanks Stewart.
Hi Paul,
Hope you’re keeping well.
Please may I ask- do you tend to go for a 24inch length saw blade and is there a particular type of “tooth” that you favour as dual purpose or the best compromise to saw both green and dead wood?
Thanks again for all your hard work and helpful content.
All the best, Andy
Hi Andy, yes for this type of work I tend to use at least a 24″ saw blade. If I’m using the Agawa Canyon 21″, then I just double check I have enough clearance for the size of tree I am taking. In terms of saw tooth profile, you need to use a blade that is designed for green wood, with the so-called raker teeth.
Hope this helps clarify things.
Warm regards,
Paul
I’ve never seen the felling cut that much higher than the face cut. I’ve always thought that the felling cut was supposed to be at the same level or slightly higher than the face cut. Nevertheless, it seems fine as there’s still hinge wood.
My only concern with the high felling cut is that it might reduce the amount of hinge wood/holding wood.
I am doing a course for chainsaw felling certification (in sweden) where we learn to make the front and the back cut at the same level. Is there a reason the back cut should be higher when felling with a saw?
Then you have a backstop when the tree is falling. It is less likely to slide backwards off the stump. People I know in the UK (and Canada) who fell with chainsaws also do this. Interesting it is different in Sweden.