How to Light a Campfire with One Match
The ability to light a fire is an essential wilderness skill. Whether you are practicing your bushcraft skills in the local woods or planning an expedition, fire-lighting skills should be at the top of your list.
Apart from the everyday comfort of having a campfire to cook over, to keep us warm in the evenings and as a focal point for socialising in camp, fire is an important survival tool.
Successful fire-lighting gives a boost to morale and can be an important phsychological factor in survival situations. Fire is an effective and reliable way of making water safe to drink and for signalling. Fire makes food safe to eat and wards off wild animals. It keeps us warm and helps us dry wet clothing.
There are many ways to light a fire but the humble match is often overlooked in favour of more impressive skills such as bow-drill or hand-drill or the commonly carried Swedish Firesteel (a.k.a Fireflash or Ferro Rod). People take matches for granted yet there are still a few subtleties to master and skills to finesse, if you want to get the most out of them.
Besides, practicing the methods in this article will help sharpen up your fire-lighting skills in general.
Preparation Is Key In Firelighting
Preparation is a vital aspect of successful fire-lighting. Success is largely determined by what you do before you strike a match. Put all the building blocks of success in place first.
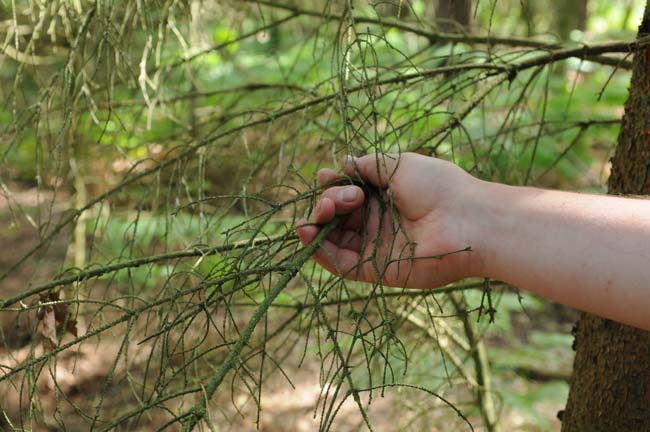
For your kindling, collect small, thin sticks that are dead and dry. The best are either still attached to a tree or hung up in one. Avoid collecting sticks from the ground. You are looking for matchstick thickness sticks. They should break cleanly with a crisp and definite ‘click’.
The best small sticks for kindling are from woods that contain resin or oil that is flammable. In the northern temperate zone and in the arctic forests the best kindling comes from coniferous trees species such as pine (Pinus), spruce (Picea), fir (Abies) and hemlock (Tsuga) but not larch (Larix). From the deciduous trees the birches (Betula) provide the best kindling.
A further advantage to the evergreen species mentioned above is that they often have dead branches low down on their trunk. There is so little light reaching these branches that the tree doesn’t waste its energy in maintaining them. This provides a ready supply of dry kindling that is also protected from rain and snow by the branches above. You can easily collect plenty of small dry sticks in a short amount of time.
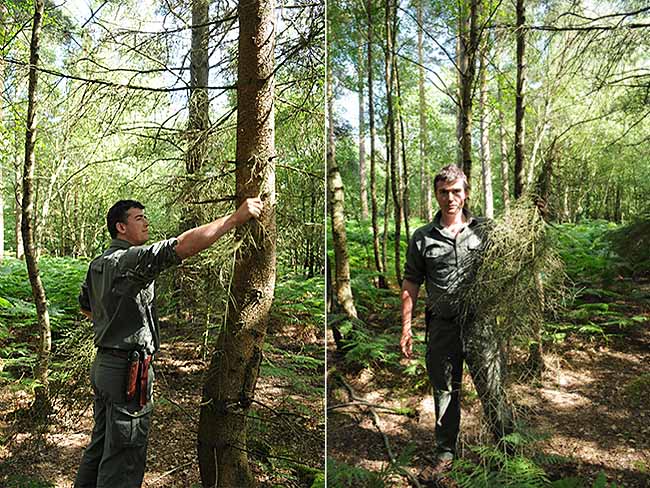
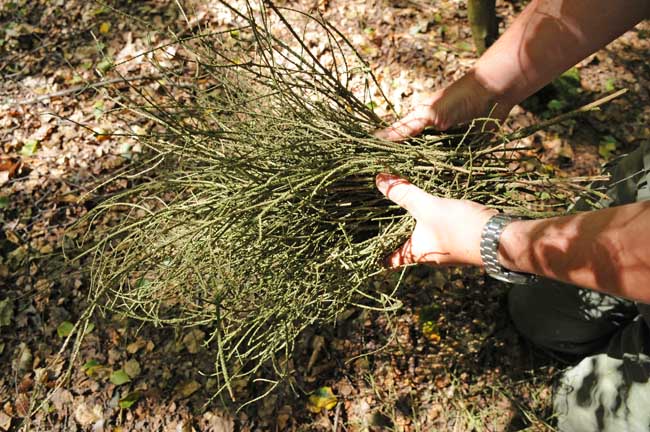
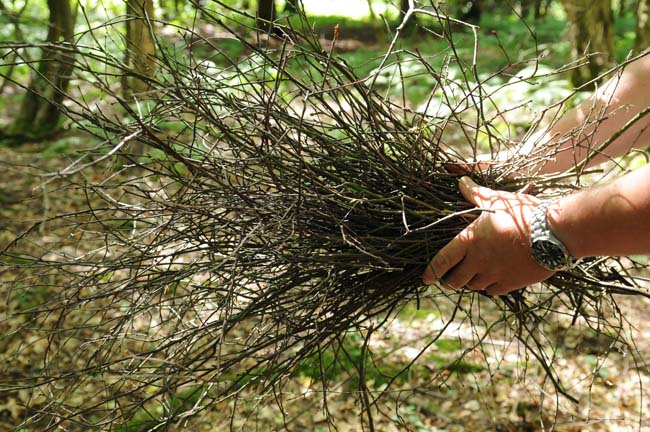
After your initial kindling, you need some slightly larger fuel. Pencil-thickness is good for the next stage, then finger thickness, then thumb thickness. The idea is for each grade of fuel to easily ignite from the previous. You can’t light a log from a match. There needs to be some intermediate sizes of fuel. All of your fuel should be dead and dry. Make sure you collect and sort out your fuel before you begin to light your fire.
Select an area for your campfire. Check there are no obvious tree roots you might ignite. Also check above that there are no low-hanging branches you might ignite by accident. Even if this is not a risk, as a general rule it is best not to damage tree foliage by creating a fire too close under their branches. Obviously if you were in an emergency situation and you needed to use some trees for natural shelter and have a fire nearby to keep you warm, then this is a different situation. Even in an emergency situation, however, you don’t want to be starting a forest fire around you.
In the area where you will have your campfire, clear the leaf litter and other dead foliage away until the bare earth is exposed. If the ground is peat, you should not light a fire there. You must find a rocky area (such as next to a stream) to light your fire. In very dry coniferous woods this is good practice too, as it is easy to set fire to root systems. Generally it is good to have your fire within easy walking distance of a water source. This will provide you with all the drinking water you need plus you will have water to extinguish all remnants of your fire before you leave.
You should create a hearth of dead, dry sticks of around thumb thickness. On top of this you will create your fire-lay. Creating a hearth has several advantages:
- 1. A hearth prevents your kindling from sitting directly on damp and/or cold ground;
- 2. A hearth (of dead, dry sticks), provides a ready source of fuel at the centre of your fire;
- 3. The gaps in the hearth allow air (in particular, oxygen) to be drawn into the base of the fire.
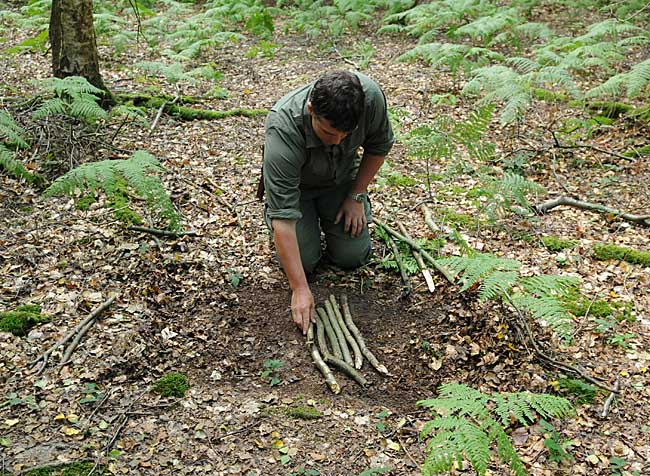
Now that you have prepared the area and the hearth, separate the bundle of kindling into two good handfuls. Keep the kindling long. Each handful should look like the end of a miniature witch’s broom.
Now think about which way the wind is blowing. Even if there is only a slight breeze, take note. Kneel with your back to the wind and place your handfuls of kindling in a V-shape with the open side of the V facing you.
Make sure you are kneeling with your knees and feet together. Otherwise there will be a wind-tunnel between your legs (nothing to do with what you had for breakfast!) directed towards the base of your fire, which could easily extinguish your match.

Now You are Ready To Light Your Fire
Now you are prepared. You have collected plenty of dead, dry match-stick thick kindling from the most suitable woods available. You have collected larger fuel that is also dead and dry. You have selected a suitable area, prepared the ground and put down a hearth. You have arranged generous bunches of kindling and positioned your body taking into consideration wind direction.
Now you can light your match.
But you must do this properly. By properly I mean in such a way as to minimise the risk of failure, which is what this whole article is about. What if it is your last match? Always practice as if it were.
The first thing to note is that whatever type of container you are using to carry your matches, be mindful to protect them from the elements whenever you open the container.
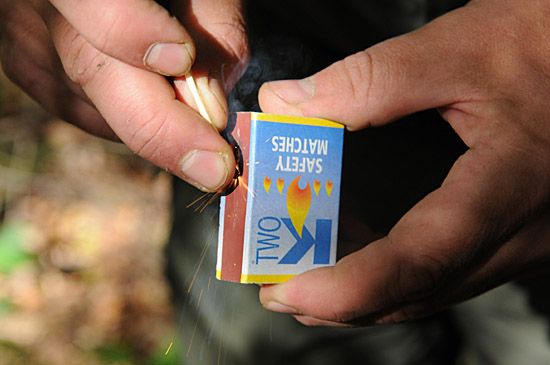
If you are using a regular box of matches, you can open it in two ways – so that the match-heads show, or so that the base of the match-sticks show. What if it’s raining? Or what if it has been raining and there are big drops of water coming off the trees intermittently? What if snow is blowing off the trees? You don’t want a big drop of water or dollop of snow landing on your match-heads. Open the match-box so the base of the sticks is showing.
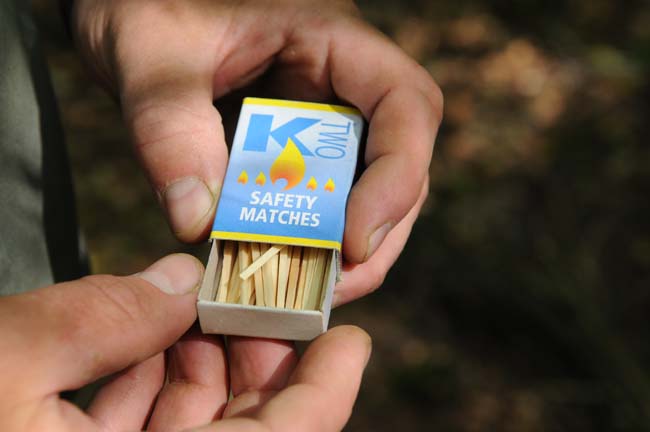
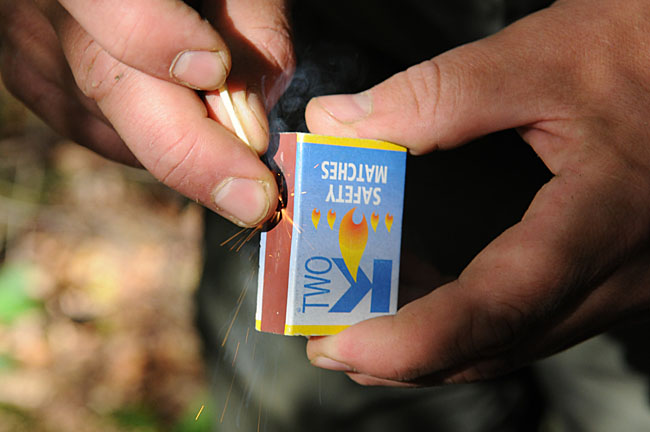
A match-stick is easy to break if you apply pressure at right angles to its length. It is very hard to break if you apply pressure along its length. Therefore, when you strike a match you should apply pressure along its length, not across it.
With cold hands, and reduced dexterity, it is easy to apply too much force and break the match unless you follow this rule. Again, if it’s your last match – or even if it isn’t but you make this mistake a few times – this simple mistake could cause you to descend into a much more serious situation.
As you strike the match, you should also support the head. Don’t be afraid of burning your fingers. You won’t. Just remove your finger at the end of the strike.
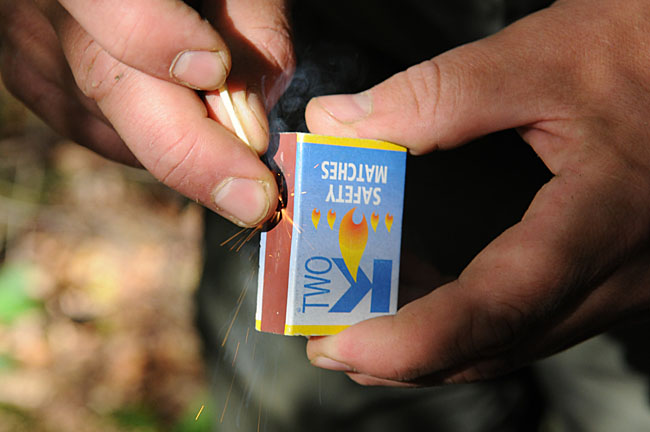
On igniting the match, take it straight into cupped hands to protect the vulnerable flame. Wait for the stick to take from the match-head. Don’t drop the matchbox. Not until the match-stick is alight should you take the match to the kindling.
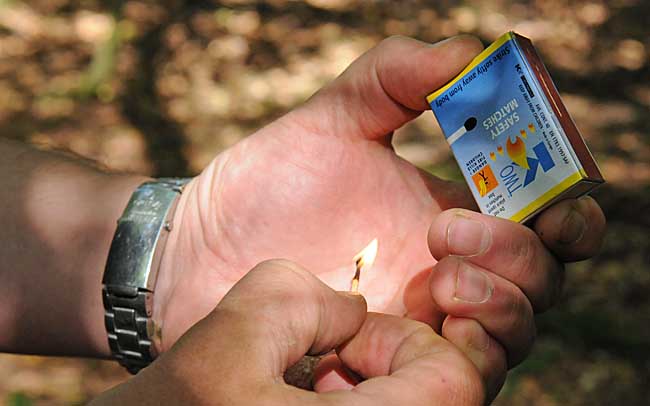
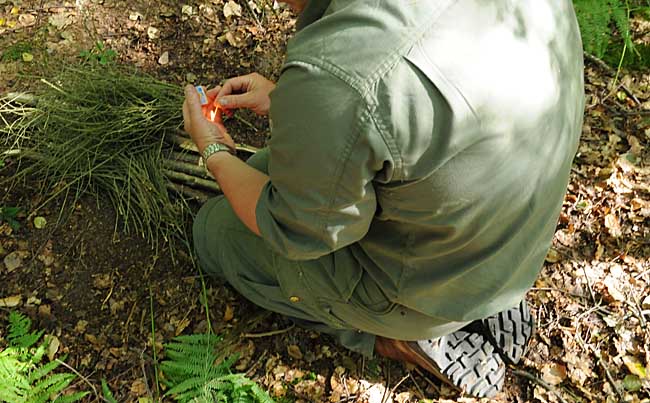
Once the match is burning well, carefully take your flame to the kindling. Remember to keep it protected. This is a critical stage of the process. Remembering that heat rises, aim to light the kindling low down. The best spot is in the centre of the V-notch you have created by overlapping the two bundles of kindling. You have most fuel stacked up here and by lighting it at the bottom of this stack, you will create a thermal column up through the middle of it.
Hold the match about 1cm (0.5 inches) below the material you are lighting. If you can light the kindling in a couple of spots, all the better.
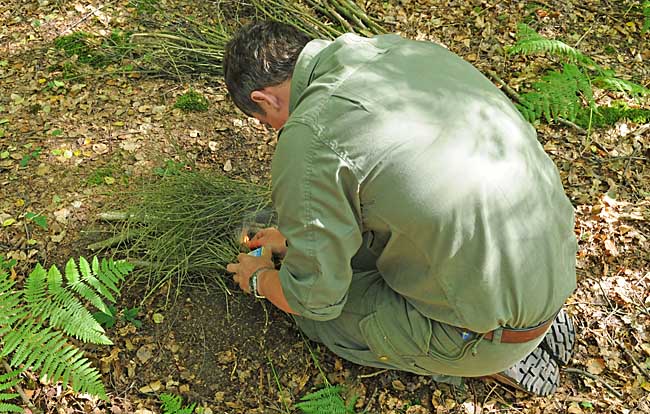
You should still be holding onto your box of matches. This is important. Apart from a standard match-box not being waterproof and being at risk of becoming damp while in contact with the ground, it may also become lost. In the excitement of getting your fire going you may forget about the box. You, or a companion, may stand on it or kick leaves or other debris over it. Keep hold of the box!
Once the fire has begun to establish, you can quickly stow the box in a pocket.
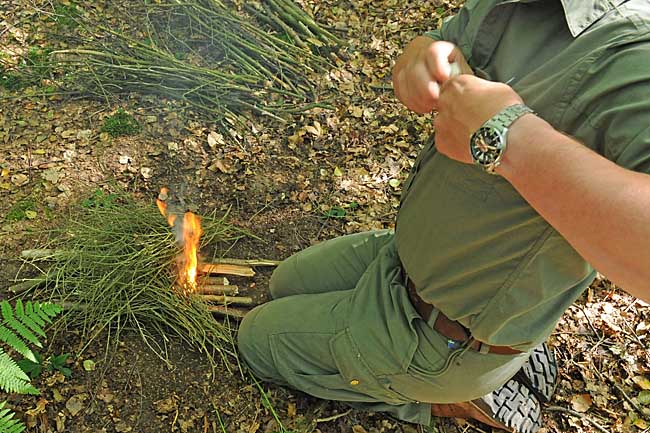
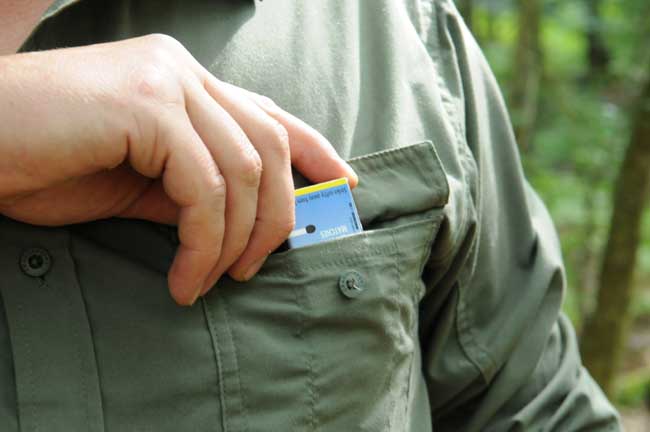
Keeping your kindling long allows you to adjust your fire as it becomes established, if necessary. You may need to re-position the kindling slightly or, if the nascent fire needs a little more oxygen you can lift the uppermost bundle a little to allow more air into the fire. You should certainly experiment with this effect when you are practicing as it can be quite dramatic.
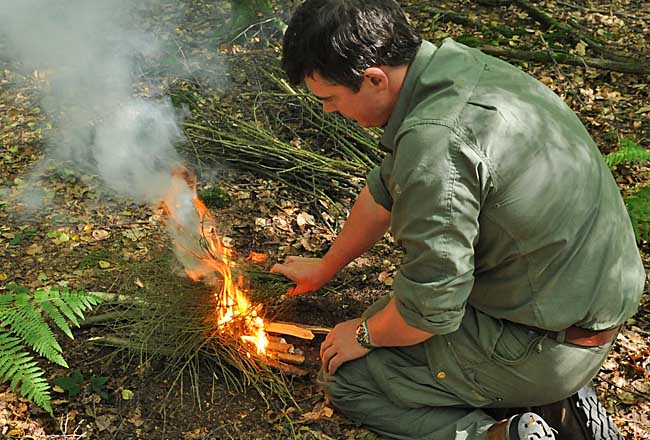
Once the flames are coming up through your kindling strongly, you can add more fuel. Don’t put sticks on one at a time. Grab a couple of handfuls and lay them on in a similar arrangement to your original fire lay. Again, keeping the sticks long will allow you to manoeuvre the sticks and place them in the fire without scorching your hands.
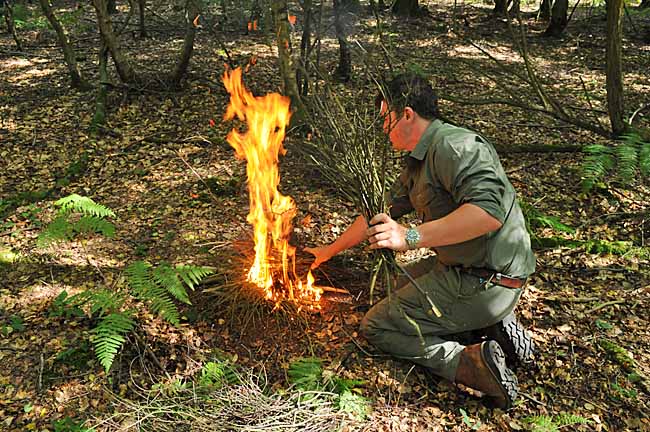
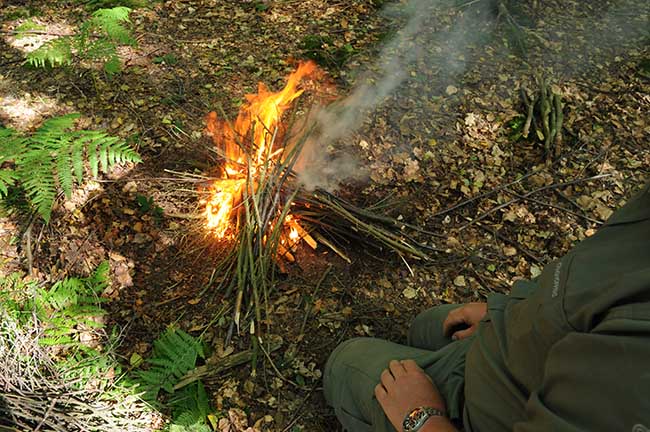
And that’s it, your fire is established and you can now build it up further if necessary or use it to boil some water for a lunchtime brew. The initial principles are the same in either case.
Remember the critical importance of preparation and material selection. Choose and prepare your site well. Look after your matches and use them carefully. Take into consideration the weather conditions – wind, rain/snow. Then you won’t go far wrong. And if you are thinking that all of this seems like a bit of a faff, it actually doesn’t take long to do it. Plus doing things properly the first time normally takes less time in the long run.
If you have a friend who would find this article useful, please share it with them. Thanks!
Related Articles On Paul Kirtley’s Blog:
Bow Drill: The Keys to Success.
How to Build a Survival Kit on Bushcraft Principles.
Hypothermia and How to Avoid it.
72 thoughts on “How to Light a Campfire with One Match”
I absolutely agree that thorough preparation and attention to detail is the key to mastering many bushcraft skills, perhaps none more so than fire lighting.
I think it is always good to revisit the basics. Whilst this may seem to some to
be classic ‘teaching your Grandmother to suck eggs’ stuff it is full of sound advice which is useful to review. We all have things which we do out of habit and might not quite remember why we do them in a particular way. Going back to basics reinforces good habits and can re-educate us out of our bad habits. Although articles like this one may not seem as exciting as some other topics they are really valuable. Thanks Paul, keep them coming.
Thanks Steve
Good points and well made.
The basics of any subject are often the most important. They form the foundation for everything else.
All the best
Paul
I recently came across and build a wood gasification stove. I then read the advice on lighting it … of course the aim is just one match. The advice is to light the top and let it burn down.
To put in context, the “stove” is basically a baked bean tin with another tin around it and a lot of holes. But the main “fire” is within the baked bean tin.
True, once the top was burning, it would burn down as the online advice said. But, getting the top burning with one match and without accelerants like meths proved a challenge.
I even attempted building little teepees of kindling into which I would put the match. The trial and error … mostly errors to start, revealed I did not know as much about fire-lighting as I supposed.
To cut a long story short … I finally did go out with the stove, pull sticks from trees (in the frost so not entirely dry) and light … by using a layer of birch bark on the top … without a teepee in sight! (There is more to it, but I will end there)
Hmmm those little stick stoves can be tricky to get burning. Then they don’t always kick out a lot of heat unless you continuously feed them. They can be like a voracious nestling demanding to be fed worms and gubs constantly 🙂
I’m pleased to see the humble match being promoted. I think I almost put pressure on myself not to use them because it’s not bushcraft & I must admit, I’d not thought about wind travelling through slightly open legs. I’m going to put a link to this blog entry in a thread on Escouts (a Scouting forum). Thanks.
Hi Austin
Good to hear from you. Thanks for the link.
I’m interested to know why you think using a match is not bushcraft?
All the best
Paul
Hi Paul, this is so uncanny, you must be a mind reader. I am sat at the PC righting about methods of making flame for the qualification i am doing, the first group i am covering is friction and i have started with the humble match myself.
I go and put the kettle on, and check my in-box, only to find you have written the same as me at about the same time as me, not word for word, but still is this TELEPATHY.
I think the word telepathy means distant mind experience from one person to another or something like that.
I hope we can do the same next time, you could save my a lot of time reseaching, (only joking) keep it up, great stuff, thanks Roy
Hi Roy
Good to hear from you again.
I don’t think it was telepathy but I’m glad to hear my article was so timely 🙂
All the best
Paul
Yet another good article, thanks. It has given me an idea, the next time I venture out if I can’t light a fire using one match only, I will not be having a hot meal I will eat it cold instead. If that isn’t an incentive to prepare my fire correctly then I don’t know what is!
Hi Mark
That is indeed a very good way to practise this skill. Put some pressure on yourself. This in itself will improve your preparation. Let us know how you get on 🙂
All the best,
Paul
Great article Paul. You’re right about preparation too, having the wood to hand instead of running around like a madman after the tinder catches makes for a better brew.
Hi Steve
Yes, a brew break should be relaxing shouldn’t it? Get everything prepared first, then relax and enjoy it 🙂
All the best
Paul
Fantastic !
I have , by my bed ‘ The Complete Book of Fire ‘ , Building campfires for warmth, light, cooking, and survival by Buck Tilton ( Do you know it Paul ? )
What I have just read is a great addition to that, and with the photos, makes it ‘more real’ in a way.
Ah… The humble match !
Very, very good article sir, great stuff !
My best.
Chris.
Hi Chris
Yes, I have seen The Complete Book of Fire.
Thanks for your comment. The humble match shouldn’t be forgotten. The kindling I’m lighting in the photos would be impossible to light directly with a fireflash…
All the best
Paul
I really liked this post Paul, i enjoy the whole aspect of fire lighting & methods to do so.
Again, another great Blog post.
Cheers.
Thanks Dave,
This should translate perfectlyover to using BC tree species.
All the best
Paul
Thanks Paul,
Superb pictures and content. Preparation Preparation Preparation… with hug size bundles !
Best
Mark
Hi Mark
Yes, when it is critical, hug-sized bundles as per Mors’s survival bundle.
All the best
Paul
Brilliant as always, you’ll have enough content for a bloody good book at this rate !
Regards
Churl
Thanks Churl, can I take that as a solid pre-order? :o)
Even your own brand of matches !
Yes, I’ve diversified away from chewing gum… 😉
A late comment from me, but a wonderful article, it is good to see the often overlooked match being used, I often think people go off in a kit frenzy and fire lighting seems to have an unwritten hierarchy in the methods to use. I have to admit to liking a fire steel, but I always teach my scouts to use matches first as it is a vital skill.
I was a little surprised to not that you made no mention about waterproofing ordinary matches. I teach my Scouts to dip them in molten candle wax and coat 2/3 rds of the match. the wax can be easily removed with a finger nail and the wax can help the wood to burn. A simple, cheap and very old method.
Hi Bill
A somewhat late reply to your late comment – apologies!
I agree that there are merits to waterproofing the heads of matches. This is something I learned at an early age from Lofty Wiseman’s Survival Handbook.
I also tend to carry matches in waterproof containers (as discussed in this blog post on Frontier Bushcraft’s website, for example).
With this article, however, I wanted to keep it as focused on the essentials of fuel selection and lighting technique as possible.
All the best,
Paul
I found a box of waterproof matches in a Trangia stove I was given and decided to try using them … utterly useless there was nothing I could do to get them to light … I would even go as far as to call them “fireproof matches”. I also once waterproofed some matches … and then found the box was so wet that the matches would not strike.
Yes soggy matches or a soggy striker will kill any attempt to light them. A waterproof container is essential.
Nice article, and something that I like to practise myself.
I know that when I am out with the scouts I will give them a few matches rather than a box to use to light a fire. Though in saying that one youngster did point out that if it is your last match why not use the box as kindling?
Hi, from a fellow scouter. It depends is my answer.
On its own, it wont be enough kindling. It could however supplement what you can find/create from a thicker sized sticks.
If you can acquire plenty then I’d keep the box intact. The empty match box can be used as a container.
Eg store a some fine kindling/shavings/small pieces of birch bark or fat wood you create later. It could also be a place to keep small pieces of charcoal left from this fire for another time which will be easier to light.
If you cooked, perhaps there’s the opportunity to collect some meat fat into the box, mixed with wood shavings/scrapings or even strips from the outer part of the box, now becomes a fully fledged firelighter.
This post will help the internet viewers for creating new
webpage or even a blog from start to end.
Great tips thanks for sharing!
My pleasure.
Hello Paul,
Great article as always – very clear, concise & informative.
I’ve always considered my fire lighting skills to be pretty good but I’ve learnt a couple of new extra ‘tricks’ from you today – many thanks!
Please keep up the good work, it’s much appreciated by many.
All the best
Thanks for your feedback Darren. Glad to read this was useful to you.
Warm regards,
Paul
Hi Paul, great article. I hadn’t even considered opening the matchbox bottom end first. And also good point to note about not allowing a wind tunnel through your legs. Brilliant tip about dipping the match heads in wax. I would never have thought about that.
What would be the best kindling to use in a damp environment? Would it be spruce again because of the high resin levels? Many thanks, Kate
Hi Kate,
Nice to see you over here on my blog as well as on Twitter. I’m glad there were a few nuggets in this article for you 🙂
As for natural tinders, the best is birch bark. It contains substances which make it both water resistant as well as highly flammable.
Warm regards,
Paul
Great! Tx Paul. I saw a tip in this month’s US Backpacker magazine about using nail it glue to help get a fire started in wet conditions because it sticks to anything and is flammable, but to avoid the fumes. What’s your take on something like that? Really enjoying your content. Thanks so much. Kate
Brilliant info thanks for sharing
Regards Neil.
As always be prepared!
Do you have any ideas (or tips) on fire maintenance? My pyre often collapses and then there’s smoke. I have to build it up again. Great article, BTW. Thanks
That’d be a whole article (or several). I’ll add it to my list Willem.
Warm regards,
Paul
Hi Paul.
All very interesting.
Having not seen your web site before the last winter I set myself a task
to light a fire using birch bark and a lighting steel.
There`s a wood near by with birch trees on the top of the hill and also in the valley.
The trees on the hill would make lighting fires by this method quite easy, perhaps they had more light there and therefore had more sap in their outer layer. Also the wind would blow through this area drying them out . However bark taken off trees in the valley could not be lit no matter how many sparks I threw at them. (Shaving the steel maybe that would work) .
Some birch bark has a layer of very fine rice paper like material on them making catching a spark a god send.
Oh and dead birch tree bark is impossible.
So here`s the question why could I make a fire with birch bark from the hill and not in the valley .( Oh it was Feb- march time of year)
Regards.
Justin
The humble match. With ferro rods and lighters, some do forget about it. One other “trick” to try is using a half of one paper match. I used to do that as a teenager, in order to save my penny matches (I used to smoke back then). It was something I read from “The Great Escape” where prisoners of war had to save their resources. That’s where preparation, and wind considerations all come into play. I urge you to try it. Just split a paper match in two and light a fire with the half match.
Hi Paul,
This is all well learned from yourself and well practiced! However I was out with some youngsters the other weekend who’d brought their own matches and after several failed attempts to actually light the match I offered to show them how. But the matches they had were rubbish! I believe it was due to there being insufficient head on the match because no sooner had it burst into life when it just fizzled out.
I guess it’s best to test a particular brand before venturing out or make sure you buy a well known quality make.
Have you experienced failure due to inferior matches? Despite using your lighting techniques
Regards
Stewart
I’ve struggled with making simple backyard fires until I learned the concept of the ‘fire triangle- fuel, oxygen, heat’; three elements a fire needs to ignite. I knew them all, but was always frustrated with a fire petering out without igniting the larger logs. It was because I didn’t have enough HEAT to ignite the larger pieces of fuel. I found this post helpful in that it illustrated the abundance of kindling needed, and gradations of increasing size. This, I hope, is what will give my fire the heat necessary to ignite a split log. Thank you for showing all the details in your posts and videos.
Very useful. A great exercise to do with my scouts.
In Scouts in the 60s
To pass firelighting you had to light a fire using only two matches
And it was all down to preparation
There were no lighters or magic spark sticks
The old skills are the best skills Neeman 🙂
Warm regards,
Paul
In Boy Scout in the 60s, we had to light a fire with two matches to get your fire lighting badge
Hi Paul, on the theme of Scouting, I manage to fit in being a Scout leader too & am forever banging on & on to my Scouts to collect more wood for our back woods cooking only to be asked the question “Is this enough?”. Which, of course is answered with “NO, go and find some more” nearly every time! But, by the time they reach the end of there time in Scouting most of them do get the message, time taken to prepare the basics & above all more wood! Thanks for the link, will try & get some of my older Scouts to take a look! I also help fire lighting & backwoods cooking with Brownies & Guides as my Wife is a Brown Owl & to be honest girls are just as bad as the boys!
Paul,
What are your thoughts on strike-anywhere matches?
Regards,
Isaac Osborne
Hi Isaac, yes the are good if you can get hold of them.
Warm regards,
Paul
Very informative as always.I think Paul the emphasis on matches is being lost too be honest.This article is very good indeed.Matches have been used for hundreds of years,even on the Frontier in the 1700’s I use a brass tinderbox which contains sulphur matches.I have of course UCO ones in my kit also.
Andy Turner.
Hi Andy,
Thanks for your comments. I’m glad you like this.
Yes, matches do seem to becoming undervalued.
Warm regards,
Paul
From a Coleman collector:
Coleman sells a orange plastic waterproof match box
Available at Wal Mart for $1 that should accompany
Everyone in the woods. Also great for toothpicks or
Vaseline/cotton balls
Strike anywhere matches are usually available at ACE True Value hardware stores
Hi Paul, very good article this.A key skill to learn and ‘practice’.
As you say it can and is a lifesaving skill.Keep up the great work.
Another great article Paul.
It was funny I was looking for an article on how to strike a match correctly after watching the scouts in my group strike matches in all sorts of ways, none that I would say was correct.
When I did the search your blog pop up and I was kicking myself for not looking here first.
Tonight’s scouts lesson will be on match striking and fire lays.
Also I read one of the comments saying that matches were not bushcraft, I disagree. I think there are many levels of bushcrafting but as long as you are out in nature enjoying nature you are bushcrafting even with modern conveniences, I don’t think you need to do every thing from scratch to be bushcrafting otherwise it we would need to make all our own cordage and not bring any modern cordage and the list goes on. They main thing is to enjoy being in nature in my honest opinion.
And whilst I’m ranting my opinion of the difference between bushcraft and survival is the situation and nothing else. In a true survival situation you will use anything you can to survive including matches even a blow torch if you have one.
OK rant over.
Hey Paul,
Great article! 🙂 I was wondering why you don’t advise Larch for kindling?
Another great article. And again I’m going to try your method when I’m next out. Thanks for all the work you put in to show others how to do things.
My pleasure Phil. I hope the advice in this article serves you well.
Warm regards,
Paul
Very good article!
I especially loved the bit about dexterity (VERY important!!).
I can have COLD, DEAD, WHITE looking (and not so well behaving) hands/fingers when it is 30ºC out there, in the summer.
But this is an old warrior with certain health problems by now…
Good info to go back to basics and more!
Thanks, Paul.
(EDC on my end: EXO Ferro rod, BUT ALWAYS also matches, normal & Storm). And a BIC. And more… 🙂
Excellent lesson on lighting a fire and ensuring the job is done even with last match stick.
Self explanatory pix.
Thnx Paul
Thank you Paul, I haven’t used a match for such a long time, this has me excited to get out and practice with matches again. Some excellent tips in there, particularly the V shape of primary kindling. It would be great if you offered a facility for people to send you videos of them trying the lessons you teach! Just a thought, it would make a nice playlist on your YT platform and demonstrate people get results from your instructional content. Thanks again, Dave.
Thank you Sir for the comprehensive walk through!
Mors Kochanski used to light the twig kindling while holding it in his hand. What do you think about this technique? Is it a good one? Thank you.
Hi Barb,
Yes, I also do this sometimes. It’s a good technique The key is to bind the bundle together with a length of tree root or a withy, so that you can keep it all together and move it around without it disintegrating.
Warm regards,
Paul
I was intrigued to see what was in your course “lighting a fire”. First, great to see you use the traditional British terminology and that kindling is match stick thickness. Tinder being the material that will catch the light.
More importantly, watching a few Naked and Afraid shows, it is very obvious they have no real idea how to light a fire in anything but a BBQ … or I guess most live in bone dry areas, where there is not the slightest problem getting a fire going.
We in Britain know how to light fires with damp material and so naturally have good technique!
Indeed, it is a “green and pleasant land” because it is a bit soggy here 🙂
I’m 76, an old guy living in western Oregon, USA. I’ve been making campfires and learning primitive fire-making skills since I was an adolescent. Let me just say that if I had learned Paul’s techniques and principles at the outset I would have been far more successful. This is an excellent primer, very straightforward. Thank you, Paul.
Hi Gary, thanks for your positive words. It means a lot.
Warm regards,
Paul
Great content. Even to spark a match these says seems to be a forgotten skill.
Surely fuelled(!) by hobs with inbuilt spark igniters and induction hobs.
Hi Pedro, indeed these fundamental skills are becoming less and less commonplace in daily life. Let’s hope we can keep the flame alive! 🙂
Warm regards,
Paul