Carving A Set Of Utensils For A Frost River Utensil Roll

Other than knocking out the occasional small spoon for eating with, I’ve not had much time for carving recently.
It’s not that I don’t like carving.
Quite the contrary, I really enjoy carving.
But, of late I’ve been occupied with leading general bushcraft courses, making wilderness journeys, writing articles, photography and, of course, running a business.
So I was really looking forward to running Frontier Bushcraft’s new Woodcrafter course, which revolves around axe skills, woodcraft and carving.
One afternoon during this 6-day programme, once the students were all under way with their own carving projects, I took a couple of hours to make a serving spoon from some lovely cherry wood harvested from a wind blown tree.
This spoon matches the aesthetics of a spoon I’d made from cherry in the past. It’s quite robust and I use it in the kit we take for UK multi-day canoe trips. This second spoon will make a good addition.
Like other creative pastimes which require concentration and coordination, I find carving therapeutic. For some time I’d had in mind a little project. I wanted to take make a set of utensils to fit in a Frost River Utensil Roll.
I first came across one of these lovely waxed cotton rolls on a trip on the Bloodvein River. Our outfitter, Harlan, had supplied cutlery, pot grabs and a few larger utensils in one of these rolls and I was impressed with the organisational utility of the roll as well as its build quality.


I wanted to buy a couple of the rolls from the outfitter’s store but they had none in stock. Harlan very kindly shipped a couple of rolls to me at a later date though.
My planned little carving project, then, was to make a set of utensils to fill the roll. These would be used in our group cooking kit on UK based canoe journeys, such as our River Spey Canoe Expedition.
So, I managed the first component during the Woodcrafter course. The remaining pieces had to wait until after the course had finished. The following week I remained in the woods to undertake various projects while some of my team ran an Elementary Wilderness Bushcraft Course. And one of these projects was to complete the remaining pieces for the utility roll.
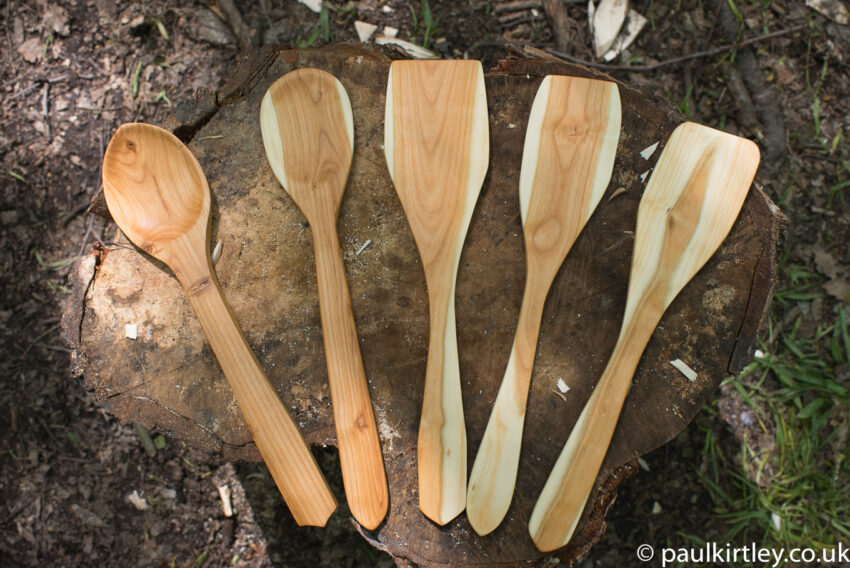
I made a shallow stirring spoon, a fish slice/egg flipper and acouple of fairly flat spatulas for stir-frying. These were all made from wild cherry, Prunus avium, left over from the previous week.

I aimed for simple, robust designs that would stand up to the rigors of expedition use yet which were still aesthetically pleasing. I also aimed to make the best of the contrast between sapwood and heartwood of the cherry.

Through much of my home I have cherry floorboards and I’m a big fan of the warmth and rich hues this wood has, particularly when oiled.
Carving Tools Used To Make The Utensils

For larger utensils I always rough out the carving with an axe, typically a Gransfors Small Forest Axe, which is my default general purpose camp axe.
On this occasion I reached for the more specialist Gransfors Large Carving axe, which is a superb tool. When I first picked one of these up in the early 2000s, I really didn’t like it. I found it too heavy and imprecise for my skill level. It has great heritage, however, being of a type favoured by the likes of legendary Swedish woodcarver Wille Sundqvist.

As your axe carving skills improve, however, you tend to favour a heavier axe and I’ve grown to love this style of carving axe. It has good weight and a long curved edge which makes it great for slicing green wood. You do need some wrist/forearm strength to use it but it’s worth persevering with. Once you get the hang of using it, this type of axe is precise and efficient.
As such, these days I find my roughed out carving is often almost complete with just the carving axe.
While a general bushcraft knife would be fine for the job, for efficiency I finish off my carving with a Mora 120 Woodcarving Knife.

This diminutive blade is both precise and surprisingly powerful. The handle which fills your hand allows strong cuts. Keep the laminated blade sharp and you cut through wood such as the cherry I was working, like a hot knife through butter.
To create the bowls of the spoons I used both a small and large spoon knife from Swedish blacksmith Svante Djarv.

Finishing The Carvings
After some light sanding, mainly of the spatulas, I applied a liberal amount of walnut oil. This is available in good supermarkets, alongside the more commonly used culinary oils. It’s not expensive, food safe (unless you have a nut allergy) and dries nicely. It forms a protective coating, which is quite water resistant. I find it the best amongst all the food safe oils for utensils. You can add multiple coats to create a very protective coating.

Walnut oil also really brings out the grain and colour of a wood. With cherry in particular, it accentuates the rich natural colours of the wood and brings out a real warmth.
Utensil Roll Assembled
I was very pleased with the finished utensils and they really look the part in the Frost River Utensil Roll. The waxed cotton canvas from which the roll is made has a warm, dark brown colour that complements the warm tones of the cherry utensils.

I’m pleased with how they all fit together in the roll. I made a point of keeping the individual items as flat as possible while still retaining their intended function. I love making curved serving spoons and ladles but nothing of this type would fit in the roll. Keeping the items relatively low profile allows the roll to be very neat when rolled up.

It’ll be almost a shame to use them but this set was made to be practical and I’m looking forward to the next trip on which we can use this set.
Let me and other readers know what your favourite carving project has been to date or let us know the carving project you’d like to complete when you get the time…
Related Material
Six Men, Three Boats And The Bloodvein: Canoeing A Wilderness River
Integrating Bushcraft With Modern Outdoor Life
The Raven PK1: Evolution Of A Knife
Get Your Signed Copy Of Wilderness Axe Skills and Campcraft
Buy a signed copy of Wilderness Axe Skills and Campcraft at wildernessaxeskills.com
18 thoughts on “Carving A Set Of Utensils For A Frost River Utensil Roll”
Stunning carving Paul, it looks great.
Hello Paul,
Thanks for sharing paul. I love all carving and have such admiration for people’s enthusiasm and skills in woodcraft. I think we at similar in our taste for design. I love simple, functional but elegant work. My next project when I get time is a sweedish dough bowl when I get the time and material. Not a bushcraft task but one I’m looking forward to doing.
Are there any good utensil rolls to be bought in the Uk?
Mind how you go
Andrew
Another great article Paul, thanks for sharing what you have been up to.
Could you suggest a nut free oil that could be used on carved utensils?
Paul, for those with nut allergies, what oil would you recommend using to finish the implements?
Great work Paul! The utensils look right at home in our waxed canvas roll. Cheers to making good stuff for the outdoors!
Thanks David. They make a great combination. I expect to get many years use out of both your waxed canvas roll and the utensils.
Keep up the good work at Frost River 🙂
Warm regards,
Paul
Hi Paul, thanks for sharing !!!
Regards
Wow – they’re brilliant! I agree, almost a shame to use them they’re so nice! How gorgeous is Cherry wood!
Hi, Paul,
Cherry is a stunning wood and the tools you carved look lovely – clean, symmetrical and showing off the wood to good effect.
I have one question: what do you mean by ‘light sanding’? I know that ideally, you should leave the cut marks there but I’d be interested to hear what grit paper you used and what made your efforts ‘light’.
Very best wishes, as ever,
Richard
Great job Paul it’s so good to make your own equipment isn’t it .
I just finished making 4 sporks out of claret ash and given 2 away to people about to go on big expeditions, have spork will travel.
Cheers Pete.
Great article Paul, and very inspirational. I’m just getting into carving myself but not sure which wood I should be using. Is it best green or older/dried?
Thanks
David
Hi David,
Thanks for your comment.
You’ll find carving green wood easier, certainly to begin with.
Green wood, however, will potentially change shape after you have finished carving, due to the drying process. Seasoned wood, on the other hand, will already have gone through this. Seasoned wood is generally significantly harder to carve though.
Start with making some small items such as spoons, butter knives, etc from green wood and progress from there. Common species that are not too difficult to work with and that are easily available are birch and sycamore.
Let me know how you get on.
Warm regards,
Paul
Hi Paul,
thanks for sharing.
I never tried to carve something if not feathersticks. Also I must admit that my convex ground blade knife is not well suited for that jobs but I’m waiting for a mora robust that I should receive sooner.
As I ahead into the woods normally I have in mind to train with fire making tarp configurations and compass or survival navigation that I forget to carve something.
But soon or later I’ll do it and maybe some of kitchen utensil….
Thanks so much and best regards.
Pierluigi Tucci
Hi Pierluigi,
Thanks for your comment. Yes, I understand about training the essentials such as fire-making and shelter set ups.
It is nice to make things from wood, however, and good carving skills have the very practical benefit that when you come to carve anything – even a bow-drill set – you will be more efficient with your production.
Enjoy the woods and maybe some carving 😉
Warm regards,
Paul
Great article as always, Paul. Great looking utensil set there. I often carve a simple spoon and fork for my outings. Usually they are crude and easy/quick to whittle out with little mind other than some thing to cook and eat with.
Hi Paul,
Nice little article, that cherry does look beautiful, but unless you use it as a spoon or spatula and give it a few scars, then it is just a fancy piece of wood, I am sure by now it has seen many battles on the cooking front,
Many thanks for your posts Paul, the are helpful also.
Stay safe,
Nige.