How To Make Garlic Pan Bread On A Campfire

How to make garlic pan bread on a campfire was something I needed to find the answer to. Or, at least, I wanted to work out how to make a good garlic pan bread on the campfire.
I was working from first principles and had only basic ingredients available.
When we undertook a journey on the Bloodvein river in 2014, we had a number of pre-packed fry pan bread mixes from Cache Lake amongst the food packed for the 14-day journey.
In 2015, we returned to Canada for another journey on this wonderful river system. We were disappointed to discover, however, that the Cache Lake fry pan breads were no longer available from the outfitter. Something to do with import or food regulations he told us.
The previous year, these pan breads had become a firm favourite and part of our daily routine. We’d set up camp, get a fire going, get the kettle on and, while the kettle was boiling, make up a mix of pan bread. This would then be cooked off and we’d have a piece of tasty, somewhat greasy, pan bread with our pint mugs of tea before cooking dinner proper.
At the end of a day’s paddling, this combo of bread and tea was a good way to perk ourselves up. It started the process of getting fluid, carbs and fat back into our bodies. It became part of our daily routine. On the days when we were particularly weary – after a long distance or working into a headwind for most of the day – the pep up our brew and bread provided was significant.
With renewed energy, we could then get on with sourcing and splitting more firewood, preparing ingredients and cooking dinner, discussing the plans for the next day, and so on.
So, with the absence of the pan bread mixes but plenty of flour, baking powder and a variety of herbs and spices in our wanigan, I set about making an equivalent to our favourite from scratch.
After a few goes, not all of which proved as successful as I would have hoped, I arrived at a formula for making a garlic pan bread that worked. And it worked consistently. Some might even call it a recipe.
This quickly became a favourite and the speed of production decreased dramatically. We most often had it as a snack, not long after arriving at our camp but sometimes it was saved to accompany our main evening meal.
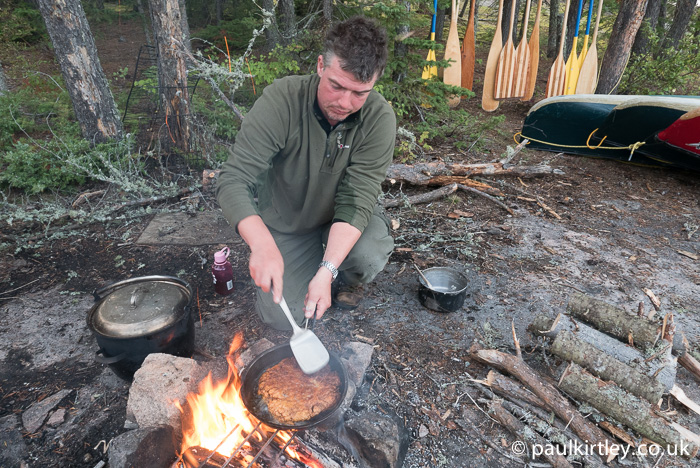
Below is my recipe for garlic pan bread over a campfire. The photos were taken one evening during the 2015 Bloodvein river trip.
Making A Garlic Pan Bread


Pan Breads – Quick, Easy and Tasty
Pan breads of this type are quick and easy to make, adding a great element to your camping menus. The are delicious, punching above their weight in terms of flavour. They are also both filling and calorific, providing not just carbohydrates but also fats, as well as replacing salt.
The garlic pan bread proved a firm favourite on our canoe journey. I’ll definitely be making them again on future trips.
Let me and other readers know about your most memorable improvised culinary creation while on a trip in the comments below…
Related Material On Paul Kirtley’s Blog:
Medicinal Use Of Balsam Fir For Cuts, Grazes & Sores
Six Men, Three Boats and The Bloodvein: Canoeing A Wilderness River
41 thoughts on “How To Make Garlic Pan Bread On A Campfire”
Hi Paul, looks great! Just wondering if the ingredients can be pre-mixed before hand and the mixture taken on trip rather than all the ingredients individually (save on packing space etc)?
The dry ingredients can be pre-mixed ahead of time. I usually do this when I go camping.
Thanks for the confirmation Andy. I know sometimes ingredients cant be premixed (such as bread, the salt kills the yeast) so thought it worth checking before I go out and bake myself a brick!
Hi Andy,
I sometimes do this but on longer trips prefer the flexibility of keeping them separate. Carrying flour, baking powder, powdered milk, powdered egg, salt and fat, you can make pan breads, bannock, flat breads, pancakes, dumplings and more.
All the best,
Paul
Hi Richard,
Yes, you could if you have planned your meals that way. But as I’ve mentioned elsewhere in this thread, on the longer trips I prefer the flexibility of keeping the ingredients separate – same as in the kitchen.
Warm regards,
Paul
Thanks for this article! That looks delicious!
It is very similar to what we would call bannock in the American bushcraft circles I run in. The base ingredients I use are:
1 cup of flour
1 teaspoon of salt
2 teaspoons of baking powder
3/4 cup of water
From there, you can add anything you like, really. I like to add 1/4 teaspoon of oregano (a little goes a long way!) to add an Italian bread flavor, and some chopped onions, as well as garlic.
Sometimes I will cube some summer sausage as well and add it to the mix. I will definitely have to try the basil!
You mixed your bread with very little water. That helps keep clean up to a minimum, since you don’t have dough sticking to everything. I use more water than you do for 2 reasons: I have found that my bread cooks faster with a little more water, and secondly, bread made from drier dough gives me a stomach ache. If I add a little more water, the bread is much easier on my stomach.
Hi Andy,
There are a lot of different bannock recipes. The one we typically use and teach on our courses at Frontier Bushcraft is
3 handfuls of plain flour
2 handfuls of powdered milk
1 teaspoon of baking powder
We often add dried fruit to this, which as well as providing a nice taste, helps keep the bread moist for longer if not being consumed immediately.
If we don’t add fruit, then a teaspoon of sugar can help improve the taste.
This mix goes really well with bacon in the mornings.
Thanks for sharing what you do and let me know how you enjoy the basil 🙂
Warm regards,
Paul
Great, thanks Paul a new recipe to try out.
This very similar to the recipe (if you would call it that) I use or show others. I tend towards self raising flour so I don’t need baking powder, and one less thing to carry. I add sugar. if feeling flash I like to add brown sugar for a fuller flavour. Then add in dried fruit or herbs depending on preference.
Dave P.
Hi Paul,
Thank you for sharing this article! This is something I’m willing to try out very soon.
We once ate a frikandel (dutch meat snack which is usually fried) with syrup at 7 in the morning.
We wanted to do a short overnight just 5km down the river, we figgured the canoe would be a nice way to travel. After a little bit of paddling we found ourselves a beautiful spot. Because of rain the water level was higher than usual and the water wasn’t that clear either. Our canoe hit an obstacle under water and we, including our supplies went for a swim! Luckily most things were tied firmly, except for our food supplies… and a paddle. Yes we were stupid enough not to put everything in waterproof bags because it was a short trip and we were all experienced in canoeing….. (quite ironic isn’t it)
We ended up with the snacks and syrup which I had in my backpack because the lack of space in the other bags. So there we were, standing in our underpants at the campfire. Drying out all our clothes, sleeping bags, phones and torched and one of us making a paddle from wood. We managed to catch a trout so we eat that, which was nice! Leaving the snacks and syrup for breakfast.
We still have our improvised wooden paddle hanging at the café of our campsite, reminding us and others to go well prepared! None the less, best canoe trip ever!
Hi Jelle,
I read your story with interest and it made me smile. Thanks for sharing this tale with us 🙂
Let me know how you like the pan bread when you try it.
Warm regards,
Paul
Hi Paul.
Pan breads are a favourite of mine! Thanks for sharing this recipe it looks yummy and I shall try it soon..
Thankyou and best wishes.
Alan
Hi Alan,
Let me me know how you like it.
All the best,
Paul
This recipe didn’t sound like much, but as I looked at the pictures, my mouth started to water.
I am going to try this in the backyard first, and next spring I hope to good at making them for real camping. Thanks again for a great blog.
That looks awesome Paul. I think this is one recipe I will try for sure.
Thanks
Sandy
Hi Paul. Love the bannock recipe. Bannock is something we often make with the Scouts in our troop, they really enjoy cooking it over the open fire.
For a 1 pan meal suggestion how about making up your chicken soup in a trangia pan (dried or from a tin if weight isn’t the issue) drop in a packet of super noodles – chicken n0odle soup! delicious, filling and easy. enjoy with the bannock
Hi Paul I enjoyed your blog and recipe. I’d like to add a couple. I premix every thing but the water. Along with the flour and baking powder I like to toss in mixed fruit brown sugar and hot apple drink mix . Tastes awsome. For a breakfast one I’ll put in garlic powder and cooked pieces of bacon.
Great article Paul and your camp cuisine efforts a wildland comfort. Before a day climb across the
North Cascades I cooked bannack loaf to help provide calories. The recipe was basically same as yours,
but I use whole ground grain mixed with cornmeal. Other ingredients included dried fruit or wild
berries. Chopped onion and a tin of tuna or other meat mixed in the dough great and tasty. Pan
bread is best cooked slow and off direct fire.
Hi Paul, wonderful article as always. I use the same “recipe” as you do for a base with different combinations of herbs except with non wheat flour mixtures (medical issues). One thing I do change up is I use half of the flour and add cornmeal which I usually carry for dredging fish in. I use different herb mixtures and even mix it with wild green onion tops or dehydrated if necessary and rehydrated yellow onion and some honey crystals.
Thanks again and keep up the great episodes
Your California fan
Wil
Hi Paul,
This looks like a good recipe that i want to try, would you think i could try and cook this on a Jetboil stove and pan as well as on a campfire?
Thanks
Paul.
Just for future reference. If you cook this at home and have some left over, save it and make it into croutons for a salad. Have just completed such and endeavour and
That’s a neat recipe. Have often made pancakes while out camping…going to try that one.
Let me know what you think Craig.
Cheers,
Paul
Hi Paul: I really enjoy your blog. I have read articles for 2 yrs and have never heard anyone talk about what to use for cleaning your dishes, and pans after a meal. Also what would you take for various cleaning items in a SHFT situation
Hi Paul: I really enjoy your blog. I have read articles for 2 yrs and have never heard anyone talk about what to use for cleaning your dishes, and pans after a meal. Also what would you take for various cleaning items in a SHFT situation.
That sounds really good, Paul, I’m going to have to try it soon. This is my favorite fry bread, I have small hands so converting might be tricky. I usually plan on 2 servings a day. It also make a great trail pizza with a sliced mozzarella stick, some pepperoni slices and dehydrated tomatoes.
Basic Fry Bread
Yield three ½ cup portions which make 2 servings each:
To a bowl add:
1 cup all purpose flour
2 tsp. baking powder
1 tsp. baking soda
¼ tsp. kosher salt
1 tbsp. brown sugar
¼ cup powdered milk or powdered buttermilk
½ c of mix makes 2 servings, individually package in freezer bags with instructions.
When ready to fry, add; 1 tsp. vegetable shortening, ghee, olive oil, lard or bacon fat to each 2 serving bag. Mix ingredients in the bag, add water to enough water make a dough.* Let rest for 10 minutes. Cut off a corner of the bag and squeeze into a pan to make 2 servings. Bake in a fry pan coated with oil or a fat, flip when needed. It is done when it sounds hollow when tapped.
Add dried fruits, nuts, cinnamon, foraged fruit, bits of cheese or bacon if desired. Serve with ghee, olive oil, syrup, honey, or press out thinly in the pan, fold over and make grilled cheese or pizza pockets.
*Note, for lighter fluffier type of bread, mix 1 tsp. apple cider vinegar before adding water, it will react with the soda and baking powder.
Steady on! I’m sitting here recovering from the intense exercise and stress of my first Webinar and you’re talking food – I’ll be scoffing all night if I start now.
Thanks to all who’ve shared recipes as I’ve lots of variations and ideas for Scout summer camp now.
All the best,
Rob
Hhahah Rob, apologies if I’ve been working you too hard! 🙂
Hope you enjoyed the webinar and found it valuable.
Let us know how you get on with this recipe as well as all the variations added by others here in the comments. It’s turned into a nice little extended resource…
Go well.
Warm regards,
Paul
I’m going to have to try this next time I’m in the bush. The tins used are they aluminum?
We also need to see how you make your coffee!
I just wanted to thank-you for the recipe. I made some spaghetti for the adults in our Scout troop and this was a perfect side. Though I adapted it somewhat by mixing a generous helping of grated Parmesan cheese into the dough and then melting some mozzarella on top.
Hello Paul. I make bread a lot in tbe outdoors and I’m always keen to save a bit of washing up. I mix all my ingredients inside the Ziploc bag, massage it all together ….can be left to prove in it by the fire for a bit too.
Hi Deni,
I’m aware that a good number of people either pre-mix into zip-locs at home and/or use the bags for mixing in the field. I understand the benefits in terms of convenience but personally I don’t like pre-mixing ingredients except on very short trips (1 or 2 nights) where there is a rigidly fixed menu. On longer trips there is more room for flexibility. Also, with client trips, I don’t always know what everyone’s taste is going to be. If I had pre-mixed garlic into all the bread mix and then one of the clients I am guiding hates garlic, then we have an unhappy client for two weeks! Second, I try to minimise the number of plastic bags I use for environmental reasons.
Warm regards,
Paul
Hi Paul,
Just a quick question, how many weight watcher points are in it??, , also this is a soda bread and would cook great in your makeshift canoe camp oven, just a tip if you haven’t tried it, thanks for all the blogs you put out.
Nige.
Some. 🙂
I prefer to rake hot coals out of the fire and cook the pan bread on them. There is less scorching and the bread cooks more evenly.
Hello what’s the secret of not burning it over a open fire tried to a couple of times and it seems to get burnt and not fully cooked inside
Have been meaning to try this for ages and eventually got around to it tonight on a fire in the garden using my small Swedish hunter’s pan. Absolutely tremendous feed – all the family absolutely loved it. Huge thanks. Ashley
Ashley, I’m glad you tried it and loved it!
Thanks for letting me know 🙂
Warm regards,
Paul
Hi Paul I’d eat it but not a fan of garlic ,so I would use nuts,and berries a bit sweeter but really tasty similar to a bannock thanks for sharing appreciate the hard work that go,s into it
Hi Paul,
Thanks for your comments. That’s the beauty of simple bread recipes like this – you can modify them to suit your taste and the ingredients available. That’s particularly useful if you can forage some of the ingredients.
Warm regards,
Paul
Flat ‘im out!
🙂 Top Shop!