
Tactics For Fire-lighting In The Damp, Cold Months
Damp, cold conditions are not conducive to fire-lighting. The same environmental factors that promote heat loss and hypothermia also work against the successful establishment of a fire. There is a certain irony in this: the more you need a fire, the harder it can be to light one. Among all conditions encountered in the outdoors, damp cold is often the most challenging for fire-making.
By way of contrast, in very cold conditions, below about minus 20 degrees Celsius (minus 4 Fahrenheit), such as those found in the boreal forests of Scandinavia or northern North America in mid-winter, lighting a fire can sometimes be comparatively straightforward.
In the coldest forests in winter, as long as you don’t select wood with water frozen into it, there is little moisture around to impede ignition. At these low temperatures, the air is literally freeze-dried, and while the humidity can still be nominally relatively high, the absolute amount of moisture in the air is low.
Very low temperatures, of course, do handicap the establishment of a fire to an extent, as you are warming everything up to a fixed ignition temperature from a lower starting temperature. Still, we can easily mitigate some of the effects.
The situation is quite different in temperate regions during winter. In Britain, much of northwestern Europe, the Pacific Northwest of North America, and other areas with similar climates, winter cold is often accompanied by high humidity, precipitation, or both. Winter temperatures more commonly hover around freezing, producing a damp, penetrating cold. These same conditions also place greater demands on fire-lighting, as moisture affects fuel, tinder, and the ground on which the fire is built.
Even in the coldest winter forests, moisture can still become an issue once a fire is lit. Heat from a fire melts snow, ice, and frozen ground in the immediate vicinity, releasing water and creating a locally damp environment. This latent moisture underscores the need for sound tactics that account not only for ignition but also for sustaining a fire as it develops.
Overall, cold and damp conditions are among the most exacting conditions for lighting a fire. In such situations, attention to detail and thorough preparation become especially important. The following tips and tactics, drawn from experience, sometimes hard-won, will help you establish and benefit from a fire during the cold, damp months of the year, whenever you encounter them.
The Basics are the Basics
Regardless of the conditions, your fire-lighting efforts should always be guided by the foundational principles that have long been proven to stand you in good stead.
Even if you are in real need of fire as soon as possible, don’t be tempted to cut corners. Proper preparation of materials is the ethos of all consistently successful fire-makers.
Further, pre-position yourself for success by regularly training in techniques and practices you intend to rely on when conditions are harsh. Get into good habits in the good times, and they will be part of your practice when things are more marginal.
The fundamental “rules” matter most in marginal conditions, and under pressure, your performance always drops to the level of your training.
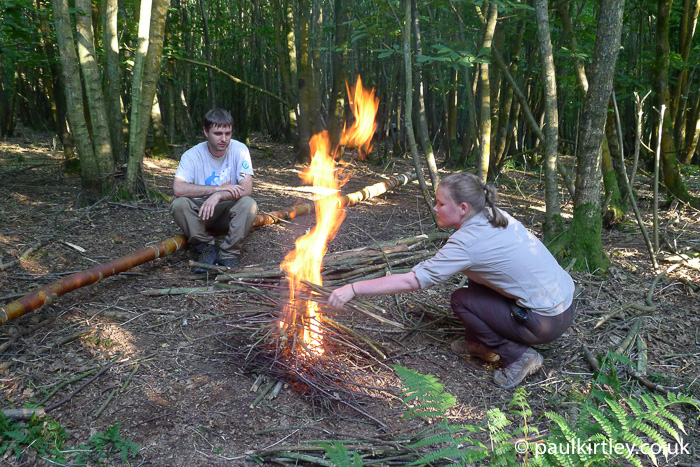
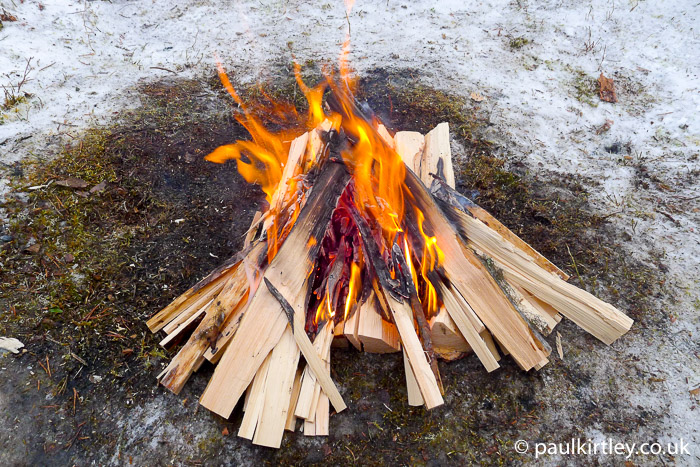
You should always select dead, standing and dry wood for your fuel. When setting your fire, you should always first create a platform of dead, dry wood. This platform raises your initial fire from the cold, damp ground, adds fuel to the heart of the fire and allows good oxygen flow into the base of the flames. Collect plenty of kindling. It should be a bundle, not a handful, particularly in winter.
Keep your sticks long so you can create a good, open-V-shaped lay of kindling and manipulate the first flames. Don’t just have your kindling prepared. Also, prepare the subsequent stages. Have the following stages of fuel ready to go, broadly graded – pencil thickness, then little-finger thickness, then index-finger to thumb thickness and so on.
Adding fuel to a new fire is like working up through the gears in a car’s gearbox. Start in first, accelerate and change up to second, then third, fourth. As momentum builds, you shift up. Similarly, with your fire, when flames come through the kindling, put on the pencil-thickness fuel; then, when the momentum builds, and flames come through the second grade of fuel, put on the third, then the fourth. Thus, you build a fire.
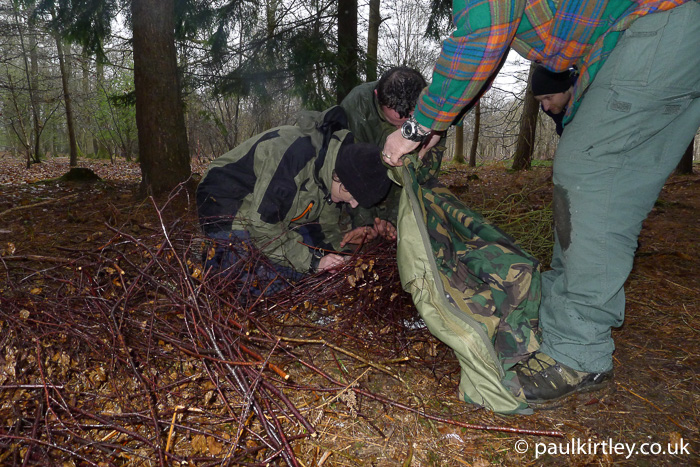
If it’s raining, then shelter the initial stages of the fire. You can, of course, erect a tarp. More on this below. If you have nothing else, use a rucksack liner, a plastic bag or even a jacket. Yes, you will get a little wet, particularly on your back, but it’s better to ensure a big blaze. If you are on your own, suspend the bag or jacket with a few sticks. If you have a companion, they can hold the rain protection over the area you are working.
This shelter will protect the initial ignition and the first small flames. As the momentum builds, the fire’s power will repel the rain. Make sure you put at least double the normal amount of kindling on the fire when it’s exposed to direct rain.
If you can’t find decent dry secondary and tertiary fuel to follow on from the primary kindling, then split larger wood to access dry fuel inside. Again, it should be dead, dry and standing. By standing, I mean upright. Gravity acts at right angles to the ground. The more horizontal a piece of wood, the more gravity will tend to pull water into the wood. Vertical dead wood will have relatively little water penetration.
The outside of even vertical dead wood can be a little wet, plus the inner bark can be somewhat absorbent of moisture. The initial few millimetres of wood can be slightly damp if moisture is trapped beneath the bark. If this is the case, then remove the wet bark and damp wood with your knife. Under no circumstances does it help to have a damp layer of wood attached to the dry fuel you are seeking. So get rid of it.
Good Quality Kindling is Critical
You can generalise fire-making into two broad stages. The first is creating a flame. The second is taking the flame to fire. Critical in the second stage is your kindling. A small handful of damp twigs from the forest floor won’t provide the desired results. Yet this is usually the first resort of the inexperienced.
I can’t overemphasise the importance of quality kindling in establishing a fire in cold, damp conditions. It is the bridge between the fragile initial flames and an established, robust fire. If your bridge is weak, it may collapse.
So, where should you collect your kindling from? Not off the ground for starters. Instead, you should be searching above the ground – dead twigs still attached to the tree, and detached dead twigs hung up amongst other twigs and branches.
Some tree species yield more suitably-sized twigs than others. Birches are particularly productive. Not only do they produce matchstick-thin twigs, but the oils in the bark also make this naturally fine kindling both water-resistant and impressively flammable. I’ve also found medium-sized beech trees a good source of fine, hung-up kindling.
Many needled species of tree are ready sources of kindling, spruces and hemlocks in particular. The lower reaches of small to medium-sized trees often harbour many small dead twigs still attached to the tree. Because of the shape of the tree above, combined with the density of foliage the live branches carry, the dead twigs lower down are usually remarkably sheltered from precipitation. Thus, they are generally really quite dry.
With any potential kindling, you should expect a clean snap or click when breaking sample twigs to confirm they are dead and dry. Any twigs that take effort to remove from the tree, needing to be twisted around multiple times or to be severed by a cutting tool, are likely not suitable.
And what if you can’t find any kindling just hanging around? Well, you can make some.
Feathersticks Really Show Their Worth
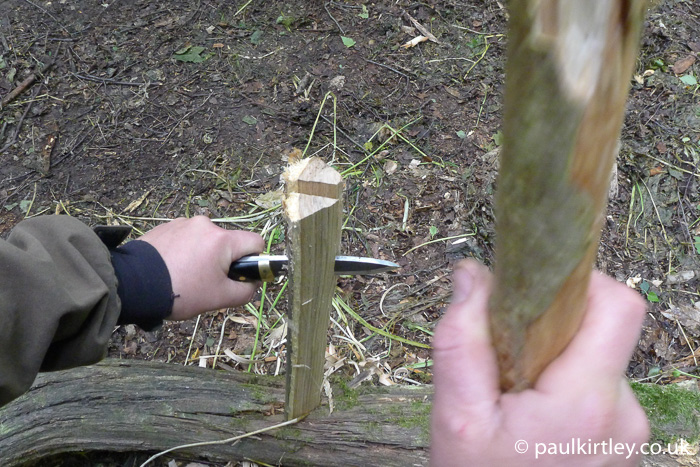
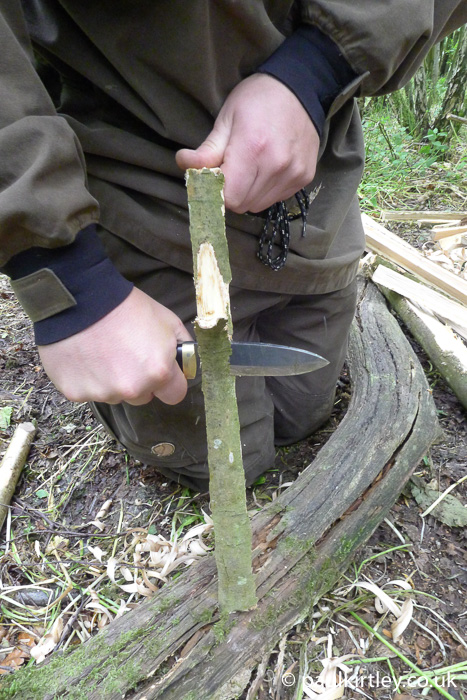
If you can’t harvest dead, dry fine kindling directly from the woods, then you can produce fine material using a sharp cutting tool. Good feathersticks will form both the initial kindling and the next size of fuel up, both in one deftly made fire-lighting unit. The intention is for the whole thing to eventually catch light in one package, starting with just a small flame.
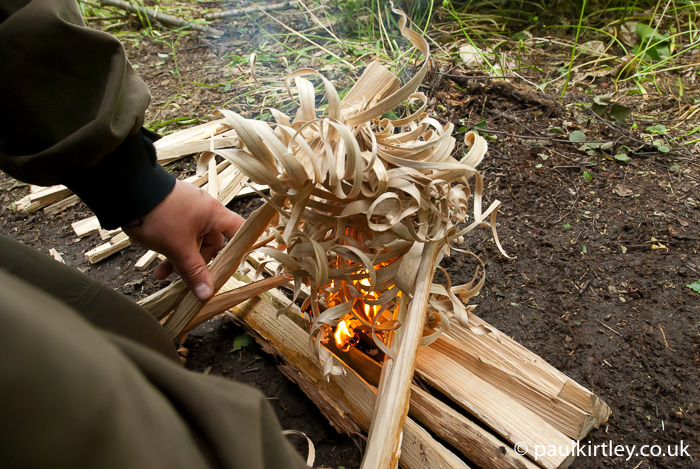
Poor feathersticks will see the feathers light, but the stick not taken by the flames. In this situation, unless luck is on your side, you’ll end up with some charred sticks and no fire. The key to success with feathersticks is for the stick component of your feathersticks to have thin necks so that the feathery curls light from the sticks. That is, you must carve the stick down to a thickness the same as the size of a thin splint you might add as your next size of fuel up from the actual curls.
In dry conditions, you may only need two good feathersticks plus some splints to establish a fire. In cold, somewhat damp conditions, you will likely need four good feathersticks plus more splints; in very wet, rainy cold conditions or when your life depends upon it, I recommend six very good feathersticks plus as many splints as you can muster. As with any firelighting, the key is preparation. Make good feathersticks, keep them dry, and prepare plenty of fuel of all the sizes you need. Then, put down a good platform of split wood.
If you are finding this article helpful and want to develop greater confidence in taking a small, fragile flame through to a stable, established fire, you will find my Fire Essentials: Mini Masterclass useful. This short online course focuses on mastering the critical transition from ignition to sustained fire. It builds on the fundamentals discussed in this article, but explores them in greater depth. You can find full details of the course here.
Using Fire-Lighters in Damp, Cold Conditions
In damp, cold conditions, even well-chosen kindling can require more heat energy to ignite than it would in dry weather. While feathersticks made from genuinely dry wood will often carry a fire on their own, this is not always the case with small-stick fires when the exterior of otherwise sound kindling has absorbed moisture.
After prolonged rain, sleet, or thawing snow, it can be challenging to find small sticks that are dry enough on the outside to ignite readily with a single match or spark, even when you are looking in the best places: up off the ground, among hung-up twigs, or at the bases of dense conifers such as spruce.
In these circumstances, the judicious use of firelighters can make a significant difference. What you are looking for are materials that are both relatively impervious to moisture and high in energy, providing sustained heat long enough to dry and ignite slightly damp kindling.
Natural Fire-Lighters
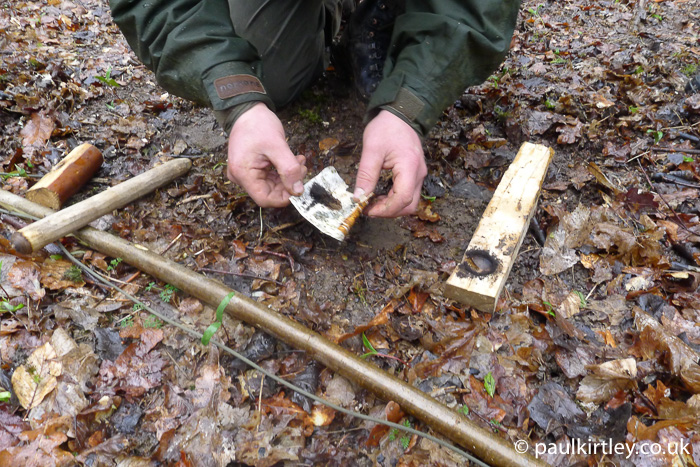
Among natural materials, birch bark and fatwood are by far the most reliable fire-lighters in damp, cold conditions.
Birch bark contains oils that make it naturally water-resistant and highly flammable. Even when the outer surface is wet, it wipes dry easily. You can light strips of bark with a match or lighter. Thin scrapings from the surface of the bark can be ignited with a ferro rod. Once burning, birch bark produces a hot, sustained flame. You can use this heat to drive moisture from the exterior of small sticks during the critical early stages of establishing an outdoor fire.
Fatwood, harvested from resin-rich sections of pine and related species, is similarly moisture-resistant and exceptionally energy-dense. You can light shavings of fatwood with sparks from a ferro rod. Otherwise, thin splints of fatwood are easily ignited with a match or lighter. In cold, damp conditions, fatwood can provide the added heat energy your kindling needs to get going.
Both of these materials integrate well with the small stick fire-lighting approach described above. They will bridge the gap between an initial small flame and a burning bundle of kindling, which can be tricky in cold, damp conditions.
Manufactured Fire-Lighters
There is also a strong case for carrying a judicious quantity of manufactured firelighters in damp, cold environments.
Here, I have in mind materials such as cotton wool balls impregnated with petroleum jelly, BBQ fire-lighters, or commercial products such as WetFire, or tinder card.
Each of these is compact, lightweight, and largely unaffected by moisture. Yet, due to these materials’ respective flammable chemical constituents, they will provide sustained heat that can serve as a reliable “get out of jail free card” in challenging conditions.
As with natural firelighters, we should not see these as shortcuts or substitutes for proper preparation. Instead, when the odds are stacked against you, these firelighting materials extend your margin for success. Carrying one or two reliable fire-lighters is a sensible precaution, especially when you may need a fire for warmth or safety.
These materials – both natural and manufactured – are particularly effective when igniting small-stick fires in cold, damp conditions. Here, the goal is not simply to create a brief flame, but to deliver enough heat energy to dry and ignite the damp exterior of otherwise dry kindling. Used correctly, they buy you time, allowing the fundamentals of fire-building to do their work.
Learn more about these materials and more here.
Is Friction Fire Unrealistic in the Damp, Cold Months?
Bow-drill or even hand-drill is not unrealistic, but the more you have practised good material selection and honed your technique in the more clement months of the year, the more certain it will be that you will achieve success. If you are keen to develop year-round bow-drill skills, continue to practise in the autumn and winter. Use the species of wood you find most reliable in the summer, and keep using this as conditions become colder and damper. Until you are confident you can light a fire by friction in cold, damp conditions, the time to experiment with new materials is in the summer. Stick with the materials you know and trust as you extend your skills into the winter.
The basic principles of bow drill in damp, cold conditions are the same as any other time of year, but there are a couple of small, specific tips you might find helpful.
First, be absolutely fastidious about not putting your drill down on the ground when you are not using it. Keep it in a warm pocket until you need to use it. Note that because you are warming up the wood from a lower starting temperature, creating an ember may take longer than it usually does in warmer conditions. A layer of cold, humid air, close to damp, cold ground, can be enough to quash an ember. As always, lift the ember up and away from the damp ground as soon as you can.
Second, your tinder bundle should be perfect. It should be dry and as well-prepared as possible. Again, you can sometimes get away with being slapdash in hot, dry conditions. Not so in cold, damp conditions. Keep your bundle warm in the inside pocket of a jacket until you need to use it. The temperature difference between keeping the bundle at 20-30 degrees above freezing within your clothing and having it at ambient temperature around freezing makes a noticeable difference. Then, of course, make sure you have plenty of well-prepared kindling and secondary fuel as described above.
Some General Advice For Fires in Cold, Damp Conditions
Regardless of how you might achieve flame, whether it be a bow drill with, say, alder wood, to create an ember, blown into flame using a bundle of honeysuckle bark, or your trusty ferro rod dropping sparks onto some scraped-up birch bark, whether it be flint-and-steel onto amadou, then blown into flame using the inner bark of oak, or just your favourite brand of matches, and regardless of the kindling you are using, there are some general considerations for the colder, damper months of the year you should pay some attention to.
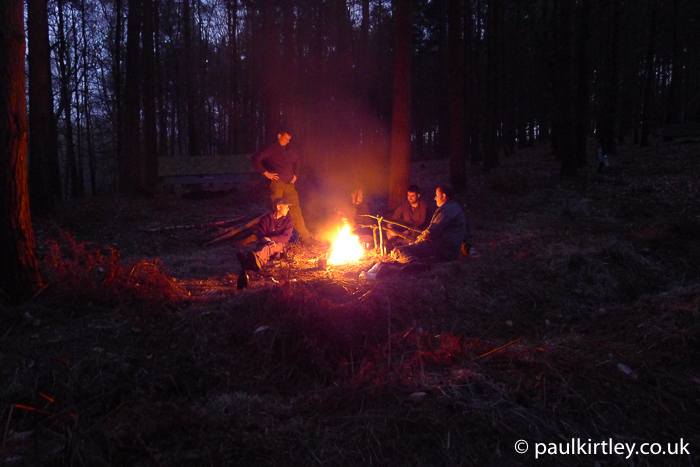
You need to avoid exposed, windy places for your fire. Not only will such a location make your fire-lighting efforts harder, but it will also be bitterly cold, even with a fire. Drop downhill a little or move around the contour to find a position less exposed to the wind. Or it may be a case of pushing a little further into the woods, away from the edge, exposed to the prevailing wind, to reduce the effect of the cold wind on both you and your fire.
A more subtle consideration is to avoid localised low points in the terrain. This consideration doesn’t mean only avoiding valley bottoms. In hollows and depressions, the ground will likely be more damp as water accumulates and persists there. Also, cold air is denser than warm air, so it sinks into the lowest points in the local terrain. So, dips and depressions in the land tend to be cold and damp. Avoid these for your fire-lighting efforts.
If the driest ground you can find is still sodden, then build a double platform under your fire lay. First, scrape away wet leaves and the like as you would normally. Then, place down a platform as you usually do. This platform can be dead, standing sticks of about thumb thickness, or split from dead, standing wood of larger diameter, such as you might use with feathersticks. Then take a second set of sticks and lay them at right angles to the first, creating a double platform that raises your initial tinder and kindling further away from the wet ground. This double-thickness platform helps reduce the effects of moisture evaporating from the ground into the initial stages of your fire, while providing more dry fuel into the heart of your fire as it establishes.
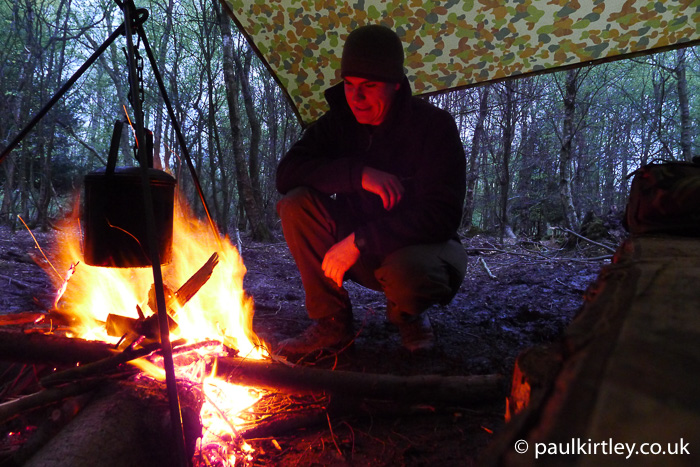
Consider erecting a tarp directly over your fire site. Do this before you light your fire; otherwise, you risk melting your tarp, particularly if you are setting it up on your own. If it is raining or snowing, this will protect the initial stages of your fire from the dampening effects of precipitation falling directly on it. Even once you have established your fire, protecting it from rain or snow will allow your fire to burn efficiently, and you will need less fuel for a given amount of heat. There is also another, highly beneficial, effect of having a tarp over a fire. You achieve a convection current. Warm air rises from the fire, reaches the tarp and is prevented from rising further. It cools a little, then descends as more warm air rises to displace it. Thus, you create a pocket of warmth under the tarp, which would not be there otherwise. When the falling snow is wet, the combined benefits of having a tarp over a fire make a huge difference.
Lighting Fires in Snowy Conditions
What if there is snow on the ground before I come to light my fire? Well, you have two options. You can either light your fire directly on top of the snow or first clear the snow away, then place it directly on the ground as per usual. The choice depends on several factors.
The primary thing to understand is that a fire directly on top of snow will quite quickly start to melt the snow beneath it, then sink downwards into it. Whether this is a problem depends on how long you intend to use the fire and, to some extent, how deep the snow is. It’s pretty common to see families in Norway, for example, out for a day’s skiing on prepared trails through the forest, to build a lunch fire directly on top of the snow. They roast some pre-cooked sausage and keep themselves warm while standing around. It’s quick, efficient and does not require shifting any snow. You can extend the time before a fire sinks by building a larger platform underneath it. The thicker the platform, the better it protects the snow from the heat radiating from the bottom of the fire.
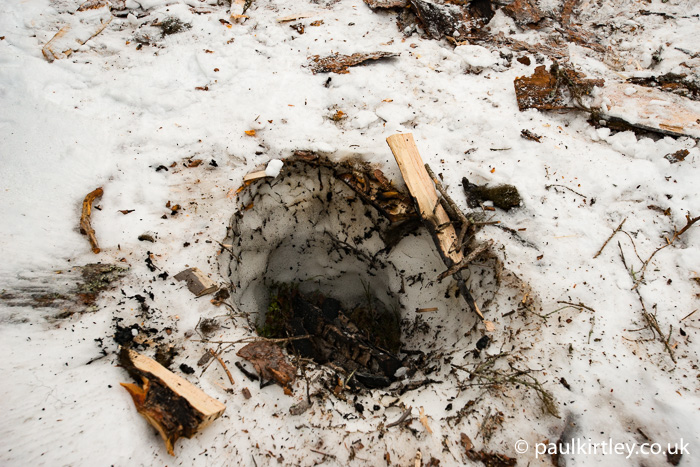
If you are going to hang around in that place for any length of time, however, it is generally best to remove the snow from the ground first, then set your fire. If you just dig a hole for the fire, though, your fire will be down a pit, and you will be on top of the snow, not getting much, if any, warming benefit from it. So, you’ll need to clear an area large enough for both you and the fire. You will then be down at the same level as the fire, on solid ground. Remove as much snow as you possibly can from the ground.
If the ground is frozen, it likely won’t seem to contain as much moisture as it actually does. As soon as it warms up, water in the soil will start melting, and the moisture will be more apparent. The bottom line is you should still build a decent platform of dry wood on which to set your fire. A double platform, as described above, is often prudent. You don’t want the heat of the initial stages of your fire melting and evaporating moisture from the ground, which can significantly hinder its ability to get going.
Summary – Small Details Are Important
While some of the above details may seem small, it is in marginal conditions that attention to detail makes the most difference. In cold, damp conditions, you have less margin for success than in hot, dry conditions. In such circumstances, anyone can light a fire with little effort. Indeed, in the driest conditions, the concern is that any naked flame in the bush might spark a blaze that quickly gets out of control.
In cold, damp conditions, however, the challenge can be to get anything to light at all, even though you want it to. Moreover, in cold, damp conditions, the value of a fire can go beyond want into the realm of need. The irony is that the more you need a fire, the harder it is to create one. The above tips and advice, based on my own experience, will help you succeed the next time you really need a fire.
If you liked this article, check out the following…
How To Light A Campfire With One Match
How To Make Fantastic Feathersticks
PK Podcast 037: Dan Hume On His Quest For Traditional Fire Skills
Canoeing The Spey With Kevin, Ray & Justine part 2 – A Few Campfire Tricks
Northern Forest Fire-lighting Fundamentals: Pulling It All Together
34 thoughts on “Tactics For Fire-lighting In The Damp, Cold Months”
Hi Paul,interesting post as always.I agree prep work is everything.I tend to adapt to the surrounding woods and what I can use,like cramp balls,put into a bundle then taken to flame,but in rain it’s very difficult.So I tend to use birch bark scrapings.Its all about what nature can supply us and how we use and understand how it all works.
Hi Andy,
It’s good to hear from you. Yes, indeed, being flexible and seeing what nature can provide is a key element of being capable in these skills.
Warm regards,
Paul
Thanks Paul, great stuff, great tips
Thanks Tim 🙂
The chap in the tartan Swanndri shirt is displaying great jacket technique.
A very confidence building description of all the stages to achieve success. Thank you
Thank you Paul, those were excellent tips. Outstanding content and beautiful writing (“winter is a much harsher mistress” – loved that). I also appreciated the related links. I always learn from your work. Keep it coming!
Many thanks Paul,excellent stuff and always looked forward to. I would like to be more deeply involved with your courses, but thats not possible, so I am grateful occasional videos and blogs. It’s funny as I look back at the courses I have done,I laugh, it;’s been only you and Ray who have put on a worthwhile course, where you actually learn. Good work keep it up. Joe
An interesting article Paul.
Living in Darwin, Australia, Half the year the challenge is controlling your fire as the bush is one big tinder bundle, the other half is tropical rains of 100mm+ in a day. Whilst I’m confidant that I can light a fire all year round in my area and surrounding area I can’t comprehend lighting a fire in the snow, then again I get hypothermia just thinking about snow.
Having said all that I do love reading about how you crazy people do it and every now and then pick up a tip or two that I can use in my tinder bundle.
I look forward to your next article.
When I teach fire craft to Scouting youth, I talk about breakfast, lunch and dinner with respect to sizes of materials – breakfast-tinders, lunch-kindling and dinner- logs. As you may only get one opportunity to get a fire going, prep is the most important component. Making sure you have enough materials and your lay is set up to start a fire. The greatest mistake that I see is not having enough materials and trying to start a fire without a proper platform to protect fire and materials from the wet.
Great article. When I teach fire craft to Scouting youth, I talk about breakfast, lunch and dinner with respect to sizes of materials – breakfast-tinders, lunch-kindling and dinner- logs. As you may only get one opportunity to get a fire going, prep is the most important component. Making sure you have enough materials and your lay is set up to start a fire. The greatest mistake that I see is not having enough materials and trying to start a fire without a proper platform to protect fire and materials from the wet.
Great tips Paul, thank you. I’ve been struggling with feather sticks and I think you’ve just told me why: my feathers are fine but my neck is too thick I think. More practice needed, as ever.
Great article Paul. Useful in combination with your YouTube videos, which are invaluable. One fire prep principle never to be overlooked, which i learned from you on your May 2012 course, is having 3 ways to light a fire on your person.
Hi Paul,
I suppose being in Canada, I’ve been reasonably spoiled with the opportunities the bush has presented me to light fires. I have never really failed to make a fire in cold or damp or rainy conditions, as I have, like you, maintained the step-up method of fine, dry tinders, increasing kindling sizes, and eventually bigger woods. I also use different fire lays, the teepee for when it’s raining, which sheds rain, and allows the wood to blast up faster; the upside down fire, where I light the top of the wood pile, criss-crossed at 90 degrees to itself, especially in cold and snow, as the fire will burn down well (all dry stuff by the way). I also am not afraid to use armful bundles of dry ‘squaw wood’ from under evergreens, and red-needled lower branches of pine, as these will ignite a high heat flame that turns damp kindling to usable firewood.
All in all, I use birch bark when I can, but no worries if it’s not there, as squaw wood does the trick. As for feathersticks, I used to make ‘fuzz sticks’ from Boy Scout lore, which work as well, and the feathersticks have the advantage of being ignited by ferro rod when feathered fine enough.
Thanks for the article.
Good, comprehensive article Paul.
I have lived for over two years in a travel trailer in a Canadian forest (BC) at 3,500 feet elevation and spend an average of 4 hours per day outside, sometimes 10 hours. I think it is important to be able to identify the trees in the forest you are in, where i am there is a lot of black spruce, Paper Bark birch and Aspen, also some Vine Maple and a few Canadian Balsam Balsam/ Noble Fir). Each of these trees have their own ‘gifts’ to the outdoorsman who seeks to light a fire, each have their own limitations in their fire-lighting value. Fourty Five kilometres West where I used to live the predominant tree species were Ponderosa (Yellow) Pine, Douglas Fire and Juniper with a ground covering of Sagebrush, a much drier environment.
‘Dead standing trees’ I tend to look for the ones that are on the edge of a clearing where there is more exposure to sun and wind. If the tree can be easily felled I use the wood from higher up the tree as the lower wood tends to have more damp bark and larger dimensions that have been slower to dry out. Bark remaining on the lower part of dead-standing trees wicks up moisture from the forest floor. One question, when creating a platform to keep combustibles off a damp floor/snow, do you see any advantage in a top down fire? Thanks again Paul.
Hi Paul,
Thanks for a perfectly timed article! I’m heading for Norway in twelve days. Borgefjell Np.
So i definitily will be able to use this tips
Regards
Hi Paul,
A timely article as my ego was recently put into check practicing the bow drill from a dead standing alder. Something in fair weather I was confident I could do, but some added humidity and lower atmospheric temperature just produced bucket loads of dust and smoke yet no ember. The tip of keeping the kit off the deck when not In use makes so much more sense now.
Thanks again.
Chris
Hey Paul, great post.
I’ve seen you use only the very end of your ferro rod to get sparks with the sharp spine of your knife. I’ve tried this at home with my two ferro rods, and I fail to get sparks. The spine of my knife is also sharp, so I was curious on if it might be due to the brand of ferro rod. What’s your preferred company for ferro rods? How can I tell if a ferro rod is hard or soft when looking to purchase online? Thanks again from Wisconsin, USA.
Hello Paul,
First of all, I’m realy grateful for your blog, your videos and articles. I realy appreciate your informations and advices. You changed a lot of my perspective on bushcraft.
Here in germany fire is hard restikted. But I’m lucky to have some privat places were I can practice in a efficient context.
Mostly I practice my skills daily on my way though the woods, independent form weather. I always have my firerod and my knife with me. So I collect some tinder on my way and try establish a small fire. Normally this will be deleted immediately.I also practice at home in my open garage when I’m late form work. Preparing tinder, making feathersticks etc. Just for geting practice my skills.
I also agree that preparation and skills are half the flame.
So thank you very much for this article.
I’m looking forward for the next.
Best regards
Teddy
Great article Paul, definitely befits the season!
I’ve been practicing getting a fire going with just feather sticks and some birch bark to help get it started. So far I’m in the humbing stages of initial failure but hopefully with enough practice i can get consistent success in the damp.
Hi Paul,
Yet another great article from yourself, gives me something to try and play with before I do the elementary bushcraft in April,
Many thanks, keep well.
Nige.
Very informative article, it’s great to see other people input and idea’s and how they would do something different. Yesterday I watched a video by an ex USMC and he used three pieces rolled up masking tape to get his fire going and slowly dried out the pencil and thumbsticks to slowly add to it, something I may try if this weather carries on as it is at the moment
If only we had known the fundamentals of firefighting on my JNCO’s cadre back in the 70’s, as usual the 72 hour exercise was in a damp mid November in Germany and after a fairly dry patrol on the first night we got to the food prep stand RV by then it was torrential rain. All revved up and ready to get the hexamine blocks and cooker out the DS said we had to light a fire…”But we weren’t given the skills light fires Sarge” and the reply was “Tough just get on with it”
No tinned compo rations either…the food was the chickens clucking around in the bushes that we had fed on camp and given names.
It took two hours back then to get a good base of embers down before we had a decent fire so since then I have taught myself by trial and error and now am confident that I can light a fire in all weathers. I even taught my young nephew how to prep pigeon and rabbit we had shot and cooked over and open fire that he lit in damp conditions
.
It’s a skill we all should have
Hi Paul,
Is it possible to light a fire in 93% humidity?
After hours of trying, I could not start a fire in such conditions. I was in a coniferous woodland blanketed with moss and I was quite elevated, albeit on a very slight slope. I set up a tarp.
I split down some dead standing Scot’s pine and even harvested some fat wood from it. Scraped a pile for tinder along with wispy birch bark and wood shavings from my pack. I made a bunch of feather sticks. I lifted the moss, cleared the roots, dug down to bare earth and used split rounds a for my hearth. Processed the various thicknesses of kindling and began reigning sparks down for hours lol. A few times I had what seemed a strong flame. I even began using a gas lighter and the materials would simply cease to burn or when a flame was established it would soon fade away. The materials were bone dry. After hours of trying however, they became damp just from being exposed to the damp air!
I even held the lighter to a fresh feather stick above my head, far away from the damp ground but it would not burn.
I was humbled to say the least.
There’s a lot I’ll take from this article, thanks. I now know my skills must be honed in and meticulously practiced. But I do wonder if it’s simply not possible sometimes? Or are there things I could’ve done differently?
One thing I thought, is that I could’ve kept the feather sticks inside my jacket close to my body, to prevent exposure whilst I made the rest? And perfect carving them to maximise their utility.
Cheers Paul, all the best!
Hi Daniel, thanks for posting your questions and some of the context that gave rise to them. Real-world experience is very valuable and it’s great you have been getting out and building your own experience, from which to draw.
Having read what you have posted above, I would say there is a statement in the middle of it that I would question, as it may well not have been true…. that is about the materials being “bone dry”. Sure, it can be hard to light things with sparks but if you are lighting feathersticks with a gas lighter and they are not catching strongly then the material is not dry, certainly not as dry as it could be.
If your featherstick curls were burning well but the sticks were not catching from the curls, then there are a couple of potiential issues – 1/ you might not have made enough curls to provide the heat energy to ignite the next level of fuel (which, as stated above, might have been damp) 2/ The sticks the curls were attached to were too thick. This is a common mistake with feathersticks. It’s related to the first point, in that the fewer curls you make, the thicker the stick remaining. But even if you make a good number of curls on your featherstick, the remaining stick can be too thick to catch light from the curls. It’s analagous to lighting some fine kindling then adding sticks that are too thick to take from burning kinding.
If the featherstick you held above your head and tried to light with a lgihter was a decent featherstick (see my article below for comparison), then the logical conclusion is that the material must have been damp, even if you thought it wasn’t. Have a look a the two articles linked below…
https://paulkirtley.co.uk/2013/how-to-make-fantastic-feathersticks/
https://paulkirtley.co.uk/2014/lighting-a-fire-with-feathersticks/
With respect to lighting feathersticks with a ferro rod, this can be done without too much issue, once you have the knack (and assuming you have dry materials*). You need a focussed spark at the base of a featherstick. There are a couple of ways of achieving this.
*materials selected should be dead (and properly seasoned), standing, and dry.
One method with the ferro rod is as I show towards the end of the following video sample from my Online Elementary Bushcraft course (from about 09:30 onwards)
https://www.onlinebushcraftcourses.com/core-skills-feathersticks
Another method is as Mors Kochanski shows in the following video on the Four Dog Stoves YouTube channel
https://www.youtube.com/watch?v=Ja4gnTAoNzU
Humidity certainly doesn’t help but living in the UK, it’s not unusual to have humidity in the 80-90% range and it sometimes can go into the low 90s. Humidity is a drag on fire-lighting but shouldn’t break the deal altogether, as long as the material selection and prep is good.
Even though things didn’t go as smoothly as you hoped, I’m very glad you are not deterred. Reflecting on your practice and asking questions are key compoenents of solid learning and self-improvment. Please let me know any additional thoughts or comments, based on my comments here, as well as the information included in the linked articles and videos. I hope all of this helps.
Warm regards,
Paul
Very useful Paul, thank you! And apart from the bow-drilling method, I can say that I’ve learned many of the other best practices. But a “kit fever” hit me. This summer I’ve seen some old finished whisky tubes on my bookshelves, that I keep because I love typography and graphic design. And I thought they could be useful for a fire lighting kit. The idea is to store some dried thin kindling in a tube of your favorite Scotch. Well, I think Laphroaig, Oban, and others with long but not too thick tubes are preferable because they can be easily packed aside the rucksack, or in the bottle pockets, etc. While big cylinders like the Bruichladdich or other similar ones could not be as good as the others (I’m not giving drinking advice) – Don’t fill the tube with sticks as long as the tube, but leave some space for a few wood feathers, or paper handkerchief, and if you have some stored, complete the kit with some birch bark. Overall it’s a light kit, it can be refilled after using it, while you find other wood, and it can give you time to gather the best wood, relying on the fact that you already have a good start. I know, it seems silly, and maybe it is, but it’s some fun with an object that looks more beautiful than useful. I made 4 of them XD (not joking) – Bye!
Sorry if this has been asked but I have a lovely dd tarp, one of the photos above shows a fire under the tarp, is this a safe thing to do? would it work with an ^ shape layout?
I would also like to know more about how best to make a fire under a tarp. I’m always paranoid about a spark putting a hole in my precious tarp so I end up not going out when it is raining, which is a real shame as I’m missing out on lots of adventures.
You also talked about the inner bark of oak and I was wondering if you could give more info on that?
Hi Alisdair,
Thanks for your comments and questions.
With respect to lighting a fire under a tarp, the following two resources will be helpful:
The Value of a Tarp in Your Daypack https://paulkirtley.co.uk/2011/bushcraft-tarp-in-your-day-pack/
Can I Light A Fire Under A Tarp? https://www.youtube.com/watch?v=4sXUt8fb-U
Warm regards,
Paul
This was helpful. I’m reminded of the movie “Revenant” where Leonardo Di Caprio’s character emerges from a river, soaking wet, while snow is falling. In the next scene there’s a roaring fire. I laughed.
Hi Gary,
Yes, in those circumstances that roaring fire would be most welcome. But it would be hard to attain, for sure!
Warm regards,
Paul
Paul – good information for sure, and I really like the analogy of working through the vehicle gears with respect to the size of fuel placed on a fire. I would like to echo something you said regarding proper planning and preparation. In my mind, there is a direct relationship and correlation between the temperature outside (cold) and the amount of preparation required. When it’s frigid such as -35 Celsius it’s imperative to have everything ready to go so that you can maximize the effectiveness of any flame you do generate. The last thing you want to do is to be running around, trying to find the next piece of wood to place on your fire. preparation is paramount and I think that applies in all temperatures, but is significantly more important when it’s extremely frigid.
And one last thing is that if a person plan ms to use a Ferro Rod in extremely frigid conditions, I encourage you to practice it in those conditions. It’s a completely different thing to light a feather stick made of marginal material at -30 Celsius than it is at +20 Celsius!
Thanks for the comment, Jaye. It’s good to hear from you here on my blog.
Preparation is certainly important in cold conditions, and practising skills in the environments you expect to use them is always worthwhile.
This article is primarily focused on the more common challenge people face in the colder months here in the northern temperate, which is dealing with damp materials and damp conditions when it is cold, rather than extreme low temperatures. But the broader principle of being organised and prepared before you commit a flame applies across the board. I’m glad you found the vehicle gears analogy useful.
Warm regards,
Paul
As you say Paul practice, practice and practice. I know how much my own abilities to make Firesticks has improved with regular practice at making them.
Thanks David. It’s good to read that your experience corroborates this too.
Warm regards,
Paul