Northern Forest Fire Lighting Fundamentals: Pulling It All Together
Winter Fire-lighting In The North Woods
Over the years I have created a number of tutorial articles and videos on fire techniques relevant to the north woods or northern forest in winter.
Here I’d like to pull together all of these threads into one coherent resource, along with some additional material and answers to FAQs.
The main feature is the video above, which you should watch first. Even if you’ve seen this video before on my YouTube channel, this is actually a newer “remastered” version of the video.
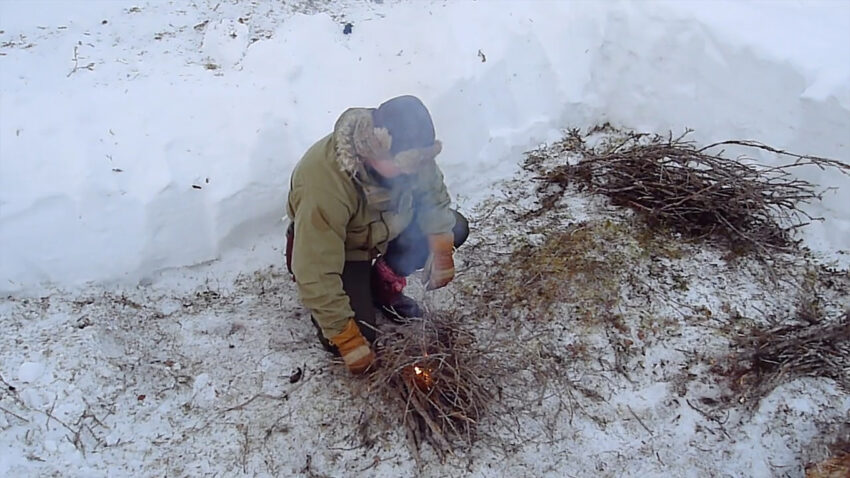
In this video I discuss and demonstrate fire lighting techniques that are simple, straightforward and reliable in cold conditions.
In particular you’ll see that I cover:
- two key natural firelighting materials found in the boreal forest;
- combining natural materials for winter fire lays;
- key preparations and considerations you need to make for failsafe winter fire lighting.
And for a bit of fun, watch right to the end for the deleted scenes….
In the rest of this post below, I go into more detail on some of the techniques as well as expanding on some others.
I’ve drawn together lots of related material from this site, which I hope you can see forms a coherent whole and, as such, I hope this serves you well in your winter fire-lighting endeavours.
Particularly Useful Tree Species For Winter Fire-Lighting
Spruces (Picea) and birch (Betula) are common and widespread northern hemisphere species, particularly in the northern temperate and boreal zones. They also have properties which make them useful for starting fires. Medium sized spruce trees typically have a mass of small, dead twigs near the base of their trunk. These are not only an ideal diameter for kindling, they contain resin and are usually dry due to the protection from dense green foliage above.
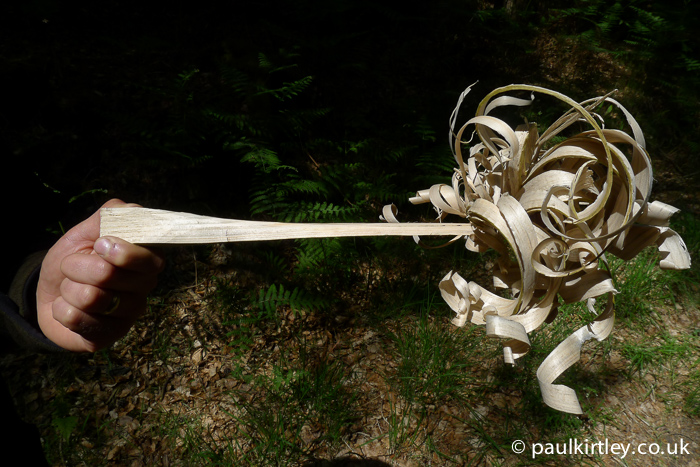
Birch bark contains oils which not only make it flammable but also act as a waterproofing agent. Thus birch bark is an excellent ready-made natural fire-lighter. Further because the bark of birch has a laminate structure of fine, thin layers the bark can be scraped up with a sharp edge to create fine shavings and dust, which will readily ignite from a spark.
The following video goes into more detail on how to prepare birch bark to readily accept sparks:
If you don’t already have access to the 20 free videos mentioned in the video above, get them here.
Pines (Pinus) are another common and widespread genus, which if found dead, dry and standing can make excellent splints for fire lighting, partly because it splits relatively easily in sections between knots as well as it containing a good amount of oleoresin/turpentine.
Feathersticks: Very Suited To Winter Fire-Lighting
Straight-grained pine also makes an excellent basis for feathersticks. These are not covered in the above videos but they work well in such an environment and provide another reliable means of lighting fires, albeit requiring a sharp cutting tool and the requisite skill.

Click here to read my article on Lighting A Fire With Feathersticks
Lichens For Fire-Lighting
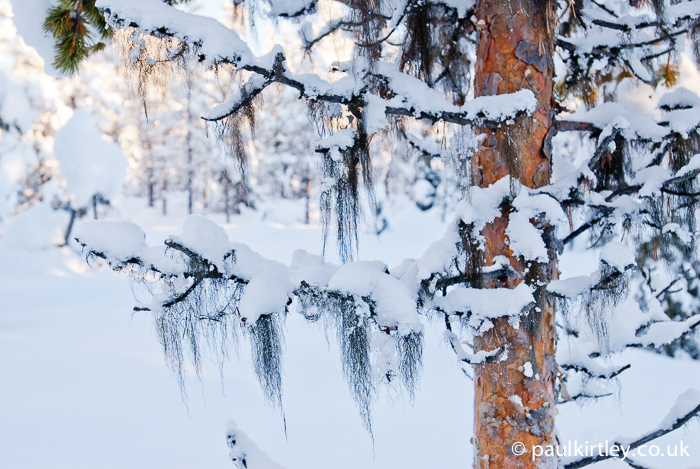
There are many species of wispy, beard-like lichens which festoon trees in the usnea, bryoria and alectoria genera. It is one of these that I use in the main feature video above.

Bracket Fungi For Fire-Lighting
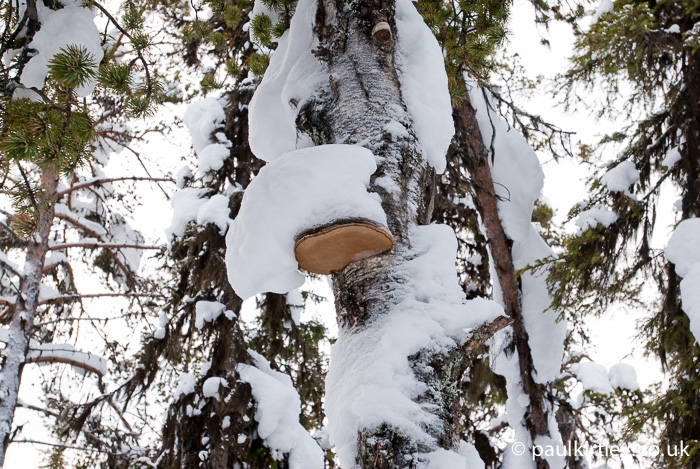
As good students of bushcraft know, there are a number of excellent tinder fungi. Horses hoof fungus, Fomes fomentarius is one of the best. It grows in the northern woods on birch.

The traditional method of preparing Fomes for firelighting with flint and steel or even flint and iron pyrites is a little involved. It is much easier with a modern Firesteel (ferro rod).
Click here to read about The Easy Way To Use Fomes Fomentarius As Tinder
If you are finding this article helpful and want to develop greater confidence in taking a small, fragile flame through to a stable, established fire, you may find my Fire Essentials: Mini Masterclass helpful. This short online course focuses on mastering the critical transition from ignition to sustained fire. It builds on the fundamentals discussed in this article, but explores them in greater depth. You can find full details of the course here.
Creating Large Sparks With Your FireSteel
Over the last decade or so, the Swedish FireSteel, or ferro rod, has gone from being an obscure novelty to a ubiquitous fire-lighting gadget on sale in every camping store.
If you don’t already own one, here’s a video on my top ferro rod picks.
Most people’s technique can be refined by learning how to generate really big sparks with them. The typical action most people make is to generate a diffuse shower of sparks. This will work with many materials. For example, the lichens mentioned above, when teased out like cotton wool, accept a shower of sparks quite readily.
Other potential forms of initial fuel, however, need a more concentrated heat source. If you can create a large, concentrated spark with your FireSteel, then you have more options available to you (e.g. the trama layer of some bracket fungi such as Fomes fomentarius mentioned above).
The following video goes into detail on the required technique for generating large, concentrated sparks. It’s the method I use in the top video above too but the following video shows the specifics of the technique much more clearly.
If you don’t already have access to the 20 free videos mentioned in the video above, get them here.
Common Questions About Winter Fire-Lighting And Related Techniques And Equipment
I’ve had the above videos in various places, including YouTube as well as here on this blog, before bringing them all together on this one page.
Some of the common questions I receive are below with answers.
Can you tell me more about your winter clothing?
Yes! I have made a series of videos…
My winter wool layering systemCold weather footwear I useWinter handwear (gloves and mittens)What is a mothership jacket and why do you need one?My boreal winter smock (Ventile)
You can also read about my quest to find my perfect set of winter mittens:
https://paulkirtley.co.uk/2014/hestra-bivak-lovikka-quest-perfect-winter-hand-wear/
What knife are you using in your videos?
The knife I’m using is a knife of my own design, made by Raven Armoury. In the videos above it is the prototype PK1 knife that I’m using and you can read more about its development in the article below:
The Raven PK1: Evolution Of A Knife
What axe do you take winter camping?
The following video and article gives a good overview of my thoughts:
Axe Choice For The Northern Forest
In the context of fire-lighting, and accessing dry timber, the set of axe techniques in the article (with embedded video) linked below are some of the most useful.
Essential Axe Techniques for Backcountry Firewood Splitting
You mention digging down to the ground – what type of snow shovel do you use?
I talk about choosing and using a snow shovel effectively in the following post (with video):
Choosing And Using A Snow Shovel For Winter Camping And Travel
How long does it take before a new Firesteel starts producing some proper sparks?
When the FireSteel is new it is coated with a protective lacquer, which helps prevent it oxidising while in storage. With a couple of scrapes, you can remove this from the area of the steel you want to strike the spark (it will go from dull to shiny).
Using the FireSteel technique from your video I can shave off material but no spark…why?
If you are removing metal from the FireSteel but not attaining sparks, then the issue is not pressure but speed. Increase the speed of your scrape while maintaining the pressure. There is a point at which this will create a spark. Too slow and it won’t, however much you dig in.
I’m not sure about using the left hand thumb to push the knife. Doesn’t it expose it to the blade too much if you slip?
It’s actually the finger underneath which is much more likely to be cut if you mess up this technique. Make sure the pressure is largely parallel to the FireSteel, not too much downwards towards your finger. Also make sure you keep the knife under good control towards the end of the FireSteel.
What would you say about how your Firesteel technique only uses a small part of the firesteel; is this a waste?
Well you’ll wear down the end more quickly than the rest but it does not waste the rest because once the end is worn down you just move back and do the same further up the steel. The rod effectively becomes shorter but you still use all the material, just in a different order to scraping down the full length on each strike.
Doesn’t using your knife to spark the ferro rod damage the finely honed edge? And doesn’t the temperature of the sparks damage the temper of your blade?
I am using the back of the knife, not the finely honed edge of the knife, so there will be no damage to the edge. Second, the spark is not changing the temper of the knife. You need to think about not just temperature but also the amount of energy involved. While the temperature is high (up to 3,000 degrees Celsius), the amount of heat energy is very, very small. Third, the spark is not sparking onto the blade but largely onto the material beneath it.
How do you keep your ferro rod safe? How do you avoid losing it?
Carrying a ferro rod securely while keeping it easily accessible is crucial in the field. In the article linked below, I share my optimised ferro rod pocket-carry setup using paracord, a mini carabiner, with the option of adding other essentials like a whistle and a light. This streamlined system ensures quick deployment of the ferro rod and minimizes the risk of losing vital gear during wilderness trips. Summer or winter, this setup will keep your ferro rod safe and ready when you need it most.
How I Optimise My Ferro Rod Pocket Carry
Related Material You Might Like…
How To Light A Campfire With One Match
How To Make Fantastic Feathersticks
24 thoughts on “Northern Forest Fire Lighting Fundamentals: Pulling It All Together”
Hi Paul, Happy new year.
Like the re-mastered video footage especially 5:12 Min , glad I’m not the only one
Hi Adrian, HNY to you too (again possibly 🙂 ) I’m having a bit of a marathon comment catch-up session so have replied to a few of your comments in the last hour or so 🙂
A bit of snow down the next keeps you awake…
I have a new smock coming soon, which will be a bit more protective so it should be interesting in a similar situation.
All the best,
Paul
Hi Paul
Not more kit? Maybe your treating yourself for the 17th eh. I hope you have a great day M,H,R.
BEST WISHIES
Adrian 42 yesterday. Yes it was a big paper round.
🙂
Adrian, alas my old Norrona smock (seen in the top video above) is now 12 years old and somewhat threadbare in places. I’m also a bit stockier than I was back then. A new shell is required….
Many Happy Returns to you too.
Paul (still 41, just)
Hi Paul.
Just had a thought, how does leather hold up in arctic conditions. Do you have any tips for caring for leather in the arctic. Is it the same as for temperate zones?
Many thanks
Adrian.
Paul – Not really got stuck into everything that you are offering on your site just yet – but I am hooked, it seems to have been a busy last few days for some reason – but what I have already seen has inspired and also impressed me – I am an ex light infantry soldier – having lived in a Basher for nearly 22 years of my life, so I like to think that I do know my stuff, but I am still finding find your blogs informative, interesting and an excellent revision session.
Currently reviewing all my kit from PSK & EDC to Belt Order and 24 hr BOB up to a full 72 hr Burgan.
Great site – good stuff – warm regards and happy new year
Phoenix II.
Hi Pheonix,
Welcome and thanks for your comments.
I’m very glad you are getting so much out of my site.
It’s always good to review kit, systems and protocols. Let me know if you have any particular new insights into organising your kit.
Keep in touch.
Warm regards,
Paul
Hi Paul you go from strength to strength that first vid was great,what a lovely landscape i wish i was young again i would do the same, i am now going to watch the rest,and i know i will enjoy thank you very very much. happy new year to you,atb,Baz
Hi Baz,
Thanks you’re very kind. I’m glad you really enjoyed the first video.
It is a special kind of forest there, particularly beautiful when the snow is like that.
All the best,
Paul
Paul, thanks for the informative video on fire starting in your neck of the woods. We don’t usually get that much snow here in Kentucky but sometimes. I appreciate your blog, information articles and videos. Keep up the excellent work and Happy New Year 2015. Oh by the way the deleted scenes were great.
Hey Steve, nice to hear from you and Happy New Year to you too. I hope 2015 is a good one for you.
Thanks also for your kind words about my blog. I’m glad you enjoyed the deleted scenes 🙂
Warm regards,
Paul
Great videos and articles Paul, seen most before, nice to see them all in the same place. Will be very helpful for my upcoming trip to Swedish lapland. Mandatory viewing, as your vids always show the best methods and philosophy behind them. Many Thanks. Hope you’re having a prosperous New Year.
Hi Dave,
Yes, it’s good to consolidate things sometimes.
Thanks for your positive feedback. I’m glad this material is of practical relevance to you.
Whereabouts in Lapland are you headed? What will you be up to?
Warm regards,
Paul
Hi Paul,
Actually Im the only brit attending. The rest are dutch and Swedish.
https://translate.google.co.uk/translate?sl=auto&tl=en&js=y&prev=_t&hl=en&ie=UTF-8&u=http%3A%2F%2Fwww.extrasurvival.nl%2Fcursussen%2Fcursusaanbod%2Fweekenden-weken%2Farctic-lapland%2F&edit-text=Olavs Website
Really looking forward to it. Cheers.
Hi Dave,
That looks a good syllabus. It should be a great experience. Bring back some good photos! 🙂
Cheers,
Paul
Hi Paul,
I enjoy your videos and commentary. However, there is one thing regarding fire lighting with old-man’s beard that has been overlooked. Although it is indeed a good material for firelighting -when it is dry, it is often NOT dry. In the picture you show with the snow on the branch and the “beard” below, it is likely NOT dry…
Why? Because Old man’s beard is hygroscopic – which means that it absorbs moisture/humidity from the air. So, don’t be dismayed if it doesn’t light immediately. Likewise, don’t depend on it as your first choice on which to spend your last match…
regards
Don
Hi Don,
Thanks for your comment. I’m glad you enjoy my material.
You are quite correct regarding the potential – and common – dampness of beard lichens.
In the winter I always try to pick lichens which have had a bit of breeze blowing through them and are as free as possible of snow and ice.
But they will often still have some inherent moisture. My method is to put some into my trouser pocket, not too tightly packed, so that the warmth from my body will drive off the moisture. I find this works quite well.
I did mention it in the video (at the 7:25 mark) but, in retropsect, perhaps I could have emphasised the potential dampness more for those who are completely unfamiliar with this as a fire making material.
Thanks again for your comment.
Warm regards,
Paul
Hi Paul,
I have to admit – I didn’t review the video – just read the text. Often don’t have as much time as I would like to review videos and can skip over the “fluff” in text… that must be suffered in a video…:>)
Just to feedback on your approach to putting “beard” in your pocket to dry it:
a. Anything that i put in my pockets tends to get packed in pretty well after a relatively short time. Chance of it coming out of my pocket in the same “loose” form that it went in, is close to zero. Changes of “dry” = somewhat nebulous… I wouldn’t risk my life on it…
b. Although this lichen can be very effective, there are other, better and more “sure” things to use if the lichen is damp. If you only have “one match” better to “spend” it on the more sure rather than hoping that the beard is dry enough to light. [which might be a good topic for a future post – “How to Tell if lichen is dry enough to light without wasting your last match to find out”…
Anyway, I won’t belabour the subject further. I enjoy your postings.
regards
Don
Don,
I won’t labour it either. I agree. Birch bark is far superior.
Warm regards,
Paul
Hi Paul,it is amazing how universal fire-making skills are world-wide. The northern forests are
fundamentally the same conditions with a few exceptions. Lighting fire in a rain forest is considerably
more difficult because its hard to find dry tender. A sharp bush axe and bow saw will help solve this
situation. Standing dead tree snags provide dry wood; however, safety precautions are necessary when
felling even moderate sized trees.
Best Regards
Jim
Great stuff Paul,
I am up in the north of Sweden now and this video is the goods, pure and simple. Thank you very much for it.
Rory
Paul,
Great content as always … but you definitely need to add in the out-takes for future videos … coffee on the laptop screen always welcome :o)
Cheers,
Sol
really helpful and interesting . like the idea of laying a bed off the ferro rod before igniting , cheers paul .
Very nice Paul, Hug big!